Tuesday, December 29, 2009

Hot off the ironing board!

Here are the December projects that I remembered to photograph before sending on their way... though 2 of them are still waiting for their companion garments and are living on the dress dummies.

Going by Historic Order...

Mid 18th century shifts:

The first one has fitted sleeves & a scalloped flounce. It's made from a cotton/linen blend that is almost handkerchief weight, but not quite. I sent it's twin to CO for a very elegant lady.

Another sleeve type that I played with is the straight ruffle. Apparently this was worn a lot, by all classes, but I just don't like it as much as the flounce. Maybe if the sleeve was more fitted over the elbow?
Both of these have a semi-fitted sleeve vs. the 'easier' rectangle.

The next one I make will be long sleeved with a short ruffle. I also like the 1/2" band with a single button style.

I am avoiding draw strings on sleeves as I have never seen a historic reference for this pre-1780. It's a fire hazard and I highly recommend getting rid of any drawstrings that could dangle in your soup or double as a candle wick.


Late 18th century wool shirt.

This could be worn anywhere from mid-18th century to mid 1800's. Wool shirts, known in the reenacting community as "blanket shirts," were commonly worn by the working class (though never made from blankets!). The most common color was light brown, as it was easy to dye & re-dye, but any color could be worn. They were over-shirts for outdoor work... similar to sweat shirts or fleece jackets today.
I made this particular shirt for a friend of mine, who looks great in it, and I'd share if I could get his pictures off my e-mail!
The tricky thing about wool shirts is that most of the finishing work has to be by hand, because your machine will choke on all those layers. The cuffs & collar have to be hand finished, the neck gussets have to be top-stitched by hand, all the button holes must be hand sewn... the heart is always hand sewn... you might as well do all finishing by hand just to make it look right.


1790-1800 Waistcoats
These two wasitcoats are the same pattern for men of different heights. Strangely enough, they have the same waist measurement. I'm not sure this coincidence has ever happened before! The one gentleman is close to 6' tall, the other is about 5'5".

The blue waistcoat is made from fustian (cotton/linen blend) lined with cream fustian. This stuff frays like there's no tomorrow. Overlock, fray-check, stay stitch galore. But it's lovely to touch & stiff enough to not need interlining.

The white is linen lined with self fabric. The collar will have to be starched, but then it will stand up perfectly.

Not sure I put that top button in the right place. It's right from the side, but looks kinda funny from the front. It's the right number...

This waistcoat is 1 of 4 garments in this order.


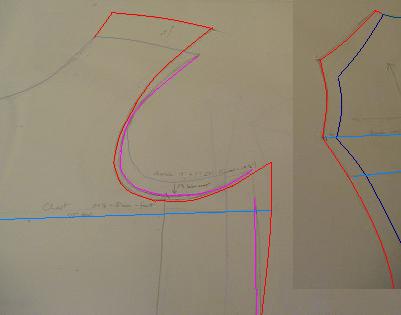
1829 Waistcoat & shirt
2 of 5 garments...
This poor shirt has modeled for every waistcoat pictured here... It's a beautiful cream linen with a pleated front, which is kinda cool. And surprisingly easy to do... Really more pin tucks than pleats, but I'm not splitting hairs. The collar is extra wide & will stand up when starched. The cuffs are very wide too. Self-fabric wood-blank buttons.

The waistcoat is silk lined & backed with linen. It has a cotton interlining so the silk doesn't go all wonky.
The buttons are wood 4 holers covered with silk. My blanks took a hike somewhere... I'll find them next year!

This pattern is modified from the one above to be a late 1820's style. The collar is about 2" taller than the 1790 waistcoat & it's more fitted at the waist, with only 4 buttons in the front. I tried welted pockets, but they looked terrible with the silk. The outlines showed something fierce. I hate fake pockets, and have a feeling that this was what the originals had. I refuse to make fake pockets. So no pockets. Not even hidden ones.

Fortunately this gentleman is exactly the same size as my husband (what are the odds?) and I've been able to head off some potential oopses before cutting into customer fabric.


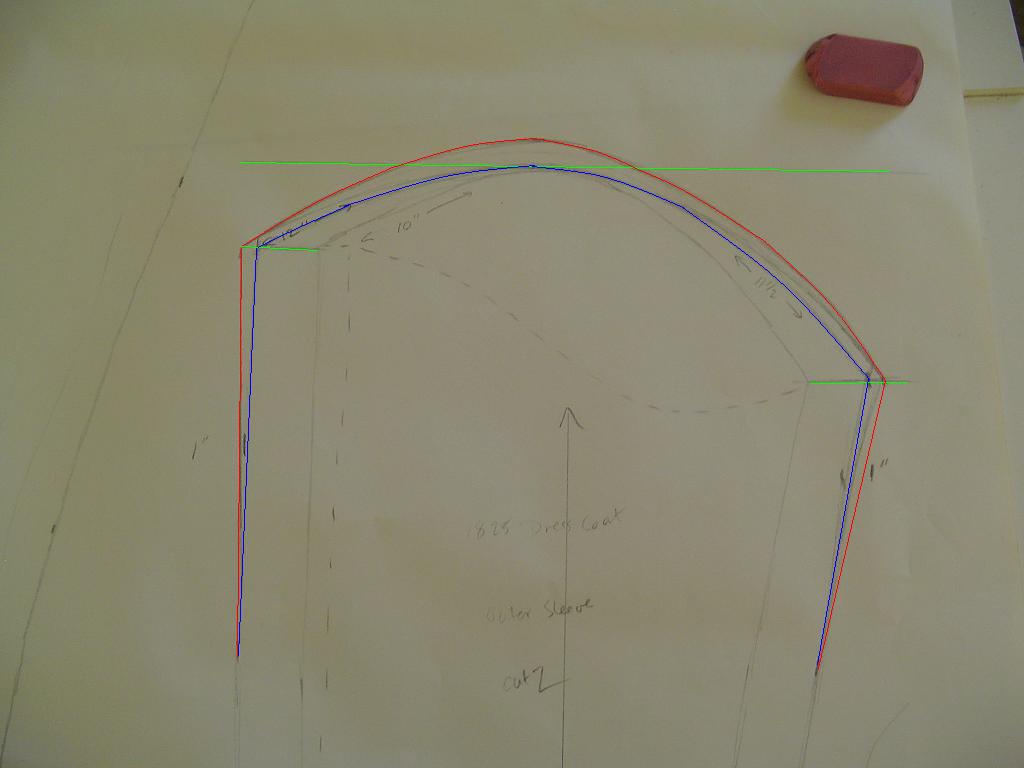
Early Civil War Uniform, 1861-63
(just to clarify, the American Civil War was from 1861-65).

This was my mother's project. This handsome gentleman is my former high school history teacher, Tom Cook. I learned more from him about troop movements in the Civil War than I ever cared to know.
He is one of our local historians and has written & published a book on Letchworth State Park... which is not on the bookshelf where it belongs, I will find the title & provide a link at a later date.

The jacket is a shell jacket made from navy blue wool that quickly dispatched every machine needle it met. The original color we discussed was Cadet Blue from West Point. This blue-gray color was abandoned early on because it was too similar to the Confederate Gray... if the term 'friendly fire' means anything to you. The sleeves are lined with brown cotton, the jacket itself is unlined as most of his tour-guide work is done in the summer. The cuffs come to the first knuckle... "the directions told her to do that!".. sorry, in-joke. I'm not sure what the reenactors do about sleeve length today.

The shirt is cotton with a pleated placket front & stand-up collar... and starched to within an inch of it's life.

The pants are sky blue wool, standard throughout the war. They are the right length when he has his shoes on.
All buttons are brass.

I think he got the cap off of e-bay.


So, this is a fraction of what's on the sewing table this month. The pile of stays parts is gradually becoming a pile of stays, the 1829 order is slowly getting done and the brain tan breeches that MUST be finished by the end of next week are literally inching towards looking like a garment a guy could wear.

Happy Sewing to all of you costumers in the New Year!

Thursday, December 17, 2009

Just to make you feel warm & cozy!

OK, so things are a bit hectic this time of year, with Giftmas coming up & winter travel delays & the shortest month of the year (that being December which though the calendar insists has 31 days, in reality has only 23)...

We should all take some time out of our 'gimme-rush-moneyin-moneyout-church-store-tempertantrum-stressedout-nicetoseeyou-ohgodtheinlawsarehere!' lives to really think about what matters.


Stop & look around at the marvelous creation you are a part of.

Go outside & take a few good deep breaths, and feel the miracle of life.

See the beauty of the world.

Listen to the wind in the grass, feel the snow on your face & the trickle of water in the streams.

When you come back in, take time to appreciate the warmth & love in your own home.


Whatever label you want to stick on it, in this dark time of the year every moment of light is something to be cherished. No matter where you are (in the Northern Hemisphere anyway).

Take time to enjoy the beauty of a new-fallen snow, the thrill of a winter storm, thank your lucky stars you aren't in North Dakota (unless you are, then thank the skill of your furnace man).

Have you ever stood in the middle of a winter field at midnight & looked at the glory of the heavens? That cold, clear space come down to earth in that single moment of time.

Have you ever felt the chill air blow across your face while Father Frost tries to freeze the breath in your body, knowing that the only thing standing between you & an icy end are the clothes on your back and that warm, distant farmhouse?

If you haven't, you should try it some time.


Please remember, no matter what holiday you celebrate, WHY you are celebrating it.

These holidays are not about THINGS. They are about love. And no matter how many or how few items are under your (_________), what really matters is the people in your heart, and sharing those thoughts & feelings of love & appreciation with them.

It's not about everyone going to Grandma's through snow, sleet & dark of night.
It's not about everyone getting the same number or price in gifts.
It's about the love & caring you have as a family (and not asking those you love & care about to risk life & limb to be there on THAT day). Remember that you love your family & friends no matter what day it is, and that they love you too.

A single gift that is truly a gift, not an obligation, is worth more than an I-pod or X-box or whatever the latest soon-to-be-outdated toy will ever be.
Sometimes a gift of your time is the most precious thing you can give.
Sometimes a gift of your skill is worth more than all the gold, frankincense and myrrh in the world...
Sometimes a gift of kind words is the only thing someone needs to warm their heart for years.


Keep warm this Holiday Season.

Take the time to count your blessings (and tell them how much they mean to you).

Keep your mittens & muffs tied around your neck so your hands are always warm.

Hug your children when they come in covered in snow. It's better than presents under a dead pine tree.

Sunday, December 13, 2009

Hand Sewing Basics: Straight Stitches

There are many types of straight stitches when you are hand or machine sewing, but here are a few very basic stitches that everyone can use.

Running Stitch / Basting Stitch / Gathering Stitch

Running Stitch:
Use this when you are joining a seam that has no stress. This is great for side seams on skirts & dresses, loose jackets or shirts, etc.
Also great for lightweight fabrics.
Do not use it for seams with stress, or very heavy fabric, as it pulls out easily.
You can use this as a top-stitch on informal garments like aprons, shawls, dressing gowns, etc. but not on formal garments like gowns or dress coats (for these, use a very short top-stitch that covers 3-4 threads and is made one stitch at a time... therefore, not a true running stitch).

1. Secure your thread.
2. Load the fabric onto the needle evenly with up & down OR back & forth motions.
I like to use my left index finger & thumbnail to move the fabric onto the needle, rather than moving the needle (this makes for fewer Band-aids).
You can load up to 4 stitches on a long needle, but 2-3 is a good number.
3. Gently pull the thread through, making sure you have a straight stitching line. If it's not straight, pull the thread out & do it over.
Because....
If this is a seam, you will want it to lay flat & even.
If it's top-stitching, you want it to look good.


Basting Stitch:
This is used to hold 2 or more pieces of fabric together. It can be long & even, long and short (alternating), or even diagonal (not shown here).
This stitch is intended to be removed, so I like to use an alternate or contrasting color thread. Only tie loose knots so it can be easily removed after your actual seam is finished.


Gathering Stitch:
Gathering is a way to get a lot of fabric into a little space. You can make ruffles, flounces, etc. using this method.

For light gathers, use a 2:1 ratio. For moderate gathers, a 3:1 ratio, and for tight gathers a 4:1 ratio. This means for every 1" of finished seam you have 2", 3" or 4" of cut material.

There are many different kinds of gathering stitches, but this is the basic template all others are built off of.
Use a heavy hand-sewing thread to gather fabric as it may take a bit of tugging, and you don't want it to break (standard machine sewing thread is not strong enough).

1. Mark center of fabric to be gathered.
2. Using a single thread that is longer than your final seam length, make 2 rows of loose running stitches OR basting stitches parallel to each other; about 1/8" apart on the edge of the fabric to be gathered.
3. Gather each side evenly & sew seam.
4. Remove gathering threads.


Back-Stitching:
This stitching method is used to make seams that take a lot of stress. Fitted garments like bodices, pants or breeches, waistbands, stays, corsets, etc. This seam does not move and is remarkably durable.
It's great to use on heavier fabrics as it will hold them in place better than straight stitching.
Do not use this stitch if your seam has to 'give' or stretch.

Back-stitching should look the same on the front as the back in thicker material, or have a slight overlap on the back with thinner material.

1. Secure your thread.
2. Put the needle in behind where the first thread comes out & bring it out slightly ahead.
3. Put the needle in where the first stitch ends & bring it out in front of the second.
4. Repeat until seam is finished.

Back-stitching is also a way of securing thread if you don't want knots.
Make 2 or 3 overlapping back stitches (all in the same place) and continue your seam.


History of these stitches:
All of the stitches featured here have been used as early as the 11th century, and probably long before that.

The basic running stitches were used for side seams on dresses, 'tunics' and robes. They are most often used in combination with a knotted thread & will hold for a very long time. If a seam is stressed, it is easy enough to pull that section back into shape if the thread isn't broken. If the thread is broken, it's easy enough to repair.
If a person wanted a little more strength in the seam, two running stitches might be used; one going one way, the other in the opposite direction, so thread-fabric-thread becomes thread-thread-thread.

Back-stitches were used on the upper garments of everyone, and the lower garments of men & boys. Again, because these are seams that take the most stress.
Gowns sometimes go from running stitches in the skirt portion to back-stitches in the bodice. This is a very economical use of thread, as the running stitch takes 1/2 the length of the back-stitch.

Many seams were 'left raw', which means the only treatment the cut fabric got was the single seam. Others were 'finished' in some other way. For the most part, it is not necessary to 'finish' seams unless it is a much-washed garment like a shirt or shift. (Or if you are throwing it in the washing machine like a sensible modern person).

Hand sewing basics: securing thread

There are many ways to tie knots & secure your thread. Here are a few.

Cut a length of thread (15-25"), usually one arm length is comfortable.
If you are using a double thread, cut twice this length.
For hand sewing cloth, I prefer cotton hand quilting thread.
For leather I like waxed linen.
For silk I prefer silk floss, though cotton will do.

Tying a knot:

Hold the thread between thumb & forefinger.
Wrap the thread around your forefinger
Take the loop off your forefinger & push the tail of the thread through the loop.
Pull the knot 1/4" - 1" from the end.
Double knot if necessary.

-This takes a bit of practice, but it's really easy once you know how.
-Don't over-think, it becomes reflex after a while.
-Use whichever hand you are comfortable with.

Alternatively, you can wrap & roll the thread then pull the knot tight.
I've never mastered this method, so no pictures.

Pull the thread through the layers of fabric so the knot is tight to the fabric & start sewing. Do not clip the end too close to the knot.
This should be used for hidden seams, inside seams, or quilting.
It only works with tight-weave fabrics where the knot will not pull through.


Hidden knot for quilting

This is a good way to secure your thread when quilting without having little tails hanging out all over the place.

Tie knot as above.
Enter the quilt from below & 1"-2" from where you want to start quilting.
When the knot meets the bottom fabric, gently tug it into the batting layer without letting it come through the top layer. It will make a popping sound.
Start sewing as normal, or back stitch once to further secure it.


Lost Thread Knot
I use this method in just about all my hand-sewing projects.
Used for top stitching, securing the ends of thread, loose weave fabric, etc.

Diagram:
1. Insert needle with unknotted thread 1"-2” from your stitching line between layers of fabric.
1 & 2. Bring the point of the needle out at your stitching line and pull till the end of the
thread is just inside the entry point. Make sure your thread is hidden between layers.
3a. Insert the needle just behind exit point to make a back stitch (leave needle in fabric).
3b. Wrap the thread around the needle twice, moving the loops close to the fabric.
Not pictured: Gently hold the loops with your finger nail & pull the needle through, creating a loop & knot at the base of the thread.
Pull so the knot lays flat.
You may have to make a second knot in the same place if the thread is slipping.
Begin stitching.
Secure your thread the same way before you run out.
Repeat until seam is finished.
Note: make this knot on the back side of fabric. It's nearly invisible, but when repeated many times it becomes obvious.

Photos of Lost Thread Knot.

1. Insert 1" from stitching line, between layers.


2. Pull through so thread is hidden
(this shows a little for illustration only. If yours shows, you can pull the cloth up and ease the thread inside the layers after the knot is secure).


3. Insert needle in back-stitch


4. Wrap the thread around the needle twice.


5 & 6. Push thread close to fabric with thumbnail & pull the needle through.
Go slow or the thread will tangle rather than making a neat knot.


7. Pull the loop/knot so it lays flat against the fabric & make one back stitch before continuing with your seam.
The back stitch should follow the natural direction of the thread so it doesn't bunch up.

This knot through the fabric can be used to secure the thread after a seam is finished. Repeat the steps 3-7, then lose the thread as in step 1 & cut.
Repeat with your next thread to continue the seam.


Historic Uses of These Knots
The first knot shown here has been used for centuries. Some of the earliest surviving cloth garments are sewn together using this knot technique. (Look up the Moy Bog dress & other early clothing). This knot hardly appears to be sturdy enough, but hand washing is much kinder than modern washing machines.

The second knot, or Hidden Knot, was used from about the mid 1400's on (it may have been used earlier, but not to my knowledge... which is, of course, incomplete). Most commonly we see it in quilted garments from the 1700's, like petticoats, breeches, waistcoats & jackets.
It is not used when the lining is separate from the batting & outer fabric, but is used when all three layers are quilted together. This is not the most secure method, but when combined with a back-stitch & or not on a stressed seam, it will hold up for several centuries.

The Lost Thread Knot is something I've used for years, and I honestly don't know where I learned it. It may be something I taught myself, or I could have picked it up from a book. My mother does not use this securing technique. I have no evidence of this being used historically, but it works for me & I'm sure I'm not the only one to have ever thought of it.
If any of my dear readers have evidence of this being used pre-1900 I'd love to see the examples.

All of these knots will hold up to regular use. But one must remember that our ancestors repaired their clothing. This was not a throw-away society until very recently. Clothes were cut down, re-used, worn into rags, threads were pulled & re-sewn... nothing went to waste. There was too much labor invested in each garment to simply cast something aside.
"A stitch in time saves nine" was not just a cute rhyme. It literally meant that if you saw a seam coming out, stop & repair it now or you'd have a bigger rip later. Nearly every woman had a full sewing kit on hand (or in her pocket) at all times. I'm not saying that every woman was a master seamstress, but this was a basic skill taught to all girls, and many boys.

Sunday, November 22, 2009

Quilt Frame

I've been looking all over the internet and antique stores for an affordable quilting frame for the quilted petticoat. I'm tired of fighting with the hoops & cats wanting to be in my lap with such a pretty 'blanket'. Much to my dismay, the type of table quilting frame I'm looking for would be stretching my current budget.

After hemming & hawing about building vs. buying, I decided to re-purpose an old card table that was a gift from a friend.

Normally I would hesitate to bust apart an antique, but the top was warped & water stained with pen doodles all over the design. And the bottom is just lovely.


Materials:
Antique wood card table (or at least a wooden table base)
rubber mallet
pliers
soap, water & wash rag
measure stick/tape
1"x 2" board OR L-shaped oak/maple trim (if you want it fancy)
pencil/pen
Saw
sand paper
8 clamps (plastic tips, not metal as these will touch your fabric).


Step 1: Make sure the top will actually come off, and that there is room to work on the underside of the table (you can see this open space on the right side of this picture).

Step 2: Using the rubber mallet "gently" hammer off the cardboard top from the underside.
I turned the table on its side & went around the edges until it was free.


Step 3: using the pliers remove any staples or other sharp metal bits that may be lurking. Put these in a container & throw them away... don't leave them on the living room floor for your guests to step on.

Step 4: wash all those years of dust off the upper part of the table.... and while you're at it, you might as well wash the whole thing. Now that's the power of Pine-Sol baby!


Step 5: Measure the outer edges of the table - 27" x 25".

Step 6: Cut some 1x2's to match those measurements. I had one board that would work, but the sides ended up being a little short. This will be fine as I just want to hold the fabric, not stretch it. More importantly I don't want to compress the corners & accidentally stretch the fabric.

Step 7: Sand all rough edges.
You can stain the boards, but I'm leaving them for now.


Step 8: Lay the quilt over the frame & clamp the front edge.
Now clamp the back, lightly pulling the quilt straight.
Clamp each side to make it lay flat with no sagging. Do not pull it tight.


I haven't figured out how to hold the rest of the petticoat. Right now I've folded it & laid it across the back half of the table.
I may be able to wind it around some tubing hung from the underside of the table frame. Setting it on the floor is not an option.

This table folds up and stands on it's own. I think it will still work with the petticoat attached.
It doesn't tip, and I'll comment on how comfortable it is to use.


Here is the quilt frame I wanted to begin with, and the link to where you can buy it.

Saturday, November 21, 2009

How to re-size a historic pattern: front & back

Continuing the topic of re-sizing historic patterns, here is how to re-size the back & front of a waistcoat. You can use this method for any jacket/top, even if it has more parts than just front & back.

Begin with your original scale drawing (this is a 1770 sleeved waistcoat from Cut of Men's Clothes). This is the one you keep on file & don't cut.

Don't try to copy these images, the camera angles have distorted things.

The pieces are:
Front
Back
Upper sleeve
Under sleeve
Gusset
Pocket Flap
Pocket (not shown)


Trace the back onto another piece of pattern paper, (this is the one you will cut).

Measure the back waist, Paul's is 21". This is the base of the neck to the natural waist in back. The actual garment measurement will depend on the cut, but this one is exactly the same, 21". Lengthen or shorten at the middle of the back, about where the ribs start. (this is not pictured here, the original pattern was right for him).

Measure across the back & multiply by 2. This is the current back width of the pattern. (I'm lazy & fold the tape measure over).
Measure your back width, (from where your arm meets the back, across the back, standing naturally).
You should add 1" to your back-width minimum.


Paul's has a 19" back width. He will need a minimum of 20" to be able to move, but no more than 21" as it will be too big for him.

Extend the back width evenly on either side.
If more is needed, continue to extend the measurements.
(Depending on the garment I may add more to the center back than the side back, you will get a feel for this if you do enough.)

Draw in the new center back (do not draw in the new side-back yet). Extend this measurement all the way down (this may get re-adjusted later, but this helps to maintain the shape of the garment).

note: always measure in the middle of the ruler, ie: 2"-3" rather than the 0"- 1" as your lines will be more accurate.


Trace out the front.

Make any length adjustments that you need.
Be careful to match the side seams in length. This may change as you make adjustments, but it's a helpful guideline. The underarm-waist measurement will be useful here.

Measure the chest on the front (minus button space) and add it to the chest measurement in back.
For an average size person, you will need 3-6" of ease depending on the garment. This one needs 1" in back & 3" in front, including the buttons... so 4" larger than the chest, total.
Make any adjustments to the chest & re-check.


Repeat for the waist. Depending on the shape of the individual, you may be adding more to the center front than to the sides.
Always add equal amounts to the side front & side back seams.

Remember to extend the skirts in proportion to the body, but maintain the angles unless the individual is heavy, then increase the angles.


Adjust the armhole, shoulder & neck accordingly.
(See the previous post).

In this illustration you can see how some of the shoulder angles have changed.

When you lower the armhole, do not go much lower than 2" for 18th century garments. If the person wants more movement, cut away from the front of the armhole rather than the underarm. Even then, only cut away what is absolutely necessary. Make sure it isn't cutting off circulation at the back of the arm.

Double & triple check all your measurements to make sure everything will fit together. Clean up your lines & measure again.
Now you can move on to the small parts.


For the pocket, trace the original onto your sized pattern (green) & increase it accordingly (red).
Maintain the angle & line placement from the original garment. If your person is much taller (Paul isn't), extend the pocket too.

Be careful that it doesn't get too big, but make it large enough for the wearer to comfortably get their hands in. If this is sized-down for a child, make the pockets "mommy" size so you/she can fish out whatever lovely things the little darling has collected.

The pocket itself should end 1/2" -1" above the hemline, or no longer than standing fingertips. This prevents the pocket from catching when you line it, and the "lean & fish" while you wear it. It should be the same width as the top of the pocket flap, but the hole should be 1" in on either side, so there's no chance it will show. If the pocket flap is curved, make a smiley face hole, if the flap is straight, make a rectangular hole.


Draw your final lines in pen or marker.

Remember to add in your grain line, button placement, clip marks, etc.
Also include the garment name, date, person it was made for, individual measurements (in case you run across someone the same size), and where the pattern came from.


Size your sleeve accordingly & re-trace the under sleeve. Make up whatever you can in the gusset, remember to keep things in proportion.

(I cut& pasted the gusset here, it's not in proportion).
The upper sleeve has the under sleeve marked in as well, but is not cut from the same pattern piece.

Add in your seam allowance, I prefer 1/2", but 5/8" works just as well.

Tuesday, November 17, 2009

How to re-size a historic pattern: armhole & sleeve

Historic patterns are wonderful to use, but often uncomfortable for modern people to wear. They tend to restrict arm movement & are very small in comparison to what we are accustomed to.

Here is how to re-size an armhole & sleeve for more comfortable modern wear, but maintain the integrity of the original pattern.
(I'm using the 1825 Dress Coat pattern from COMC).
You can use this method in pre-made patterns as well.

Add 4" -6" ease to the original armhole measurement (19 1/2"). Do not add more as it will lose the historic look.
*Working class garments had much more arm movement than leisure class... add 5-8" depending on the garment.

I want a 24 1/2" finished arm hole. This should give Brian enough room for his clothes & some arm movement.
*If someone is dancing or riding in this garment, I would add a little more in the upper sleeve.
**If this is for a theatrical event, ask the costume manager if they want a truly historic look or if they want the actors to be able to have full movement.


Once you have the correct length on the sleeve (add X" to bicep & forearm), mark your width increases according to the individual.
In this case I had to add 2 1/2", so 1 1/4" to each side of the bicep.

If the wrist is correct as it was here, and the forearm needs to be larger, make gradual changes from one area to the other.

Alternatively, you can split the sleeve down the center line & add more there.

I prefer to add onto the outside along the horizontal guidelines as that is a little more forgiving. (Guidelines are in green).


Set in your new sleeve-width measurements & lightly draw the new lines. Keep the shape of the sleeve.
(new lines are in green, old lines are in blue).

For this dress coat, I want 5" ease in the armhole,
3-4" ease in the bicep,
2-3" ease in the forearm
& 2" ease at the wrist.


Using a triangle or T-square, mark the top of the sleeve cap in both directions. This will give you a good guideline for re-adjusting the upper sleeve.


Re-draw the sleeve cap, making it meet the same place as the original cap.


Now measure again & add more by measuring up from the highest point of the sleeve cap & re-draw the lines.

I re-drew this line 4 times before I got the measurement & shape I wanted. Be patient & don't get discouraged. You may have to readjust after you have played with the under sleeve too.

Do not erase the original pattern, but if your adjustment lines get too confusing, erase them as you go.


Once your upper sleeve is "set", draw in guidelines for your under sleeve.

Guidelines should be at the lowest & highest points, and mark where the lines intersect.

Measure how many inches you increased the width, then move the lowest/highest point accordingly.
IE: if there is 1/2" difference on the left side of the lower & upper sleeve, mark 1/2" from the edge of the upper & under sleeve.


Readjust the lines for the under sleeve. If you need more inches, lower the low parts & raise the high parts, but be careful to maintain the original shape as much as possible.

The guidelines are marked in green, the original line in blue & the adjustments in red.

Measure a final time & make sure your upper sleeve & under sleeve measurements are 24 1/2" or more.

I prefer to have 1/2"-1" more for a perfectly fitted sleeve as I can account for the ease, but don't like stretching the body of the coat.


Re-draw the vertical lines to match up with the final edge of your top sleeves.

Make sure they meet up where they should (in this case it's just above the elbow).


Re-check your measurements & shapes one last time & erase any old lines.

I prefer to use colored Sharpie markers to finalize my patterns.

Add seam allowance (I like 1/2") to the outside of whatever needs it (if you are working with cut edges, do not add seam allowance).

Be sure to label all pattern pieces with the following:
Garment name
Pattern piece
Grain lines
Number of pieces to cut
Customer name
Measurements

This will make it very easy to make another garment when your returning customers say "I want another one JUST LIKE THAT ONE!" Or if you have a customer with almost the same measurements, you don't have to reinvent the wheel.

I fold up my patterns & put them in gallon plastic storage bags with the garment & customer name on the front.
I also store my patterns according to male/female & century.

All of the original adjustments were made in pencil, any colors have been added on the computer for clarification. If you have any trouble understanding the directions here, please let me know... I'm a bit low on blood sugar & it's past time for lunch.