My wonderful 1830 Pink Day Dress is done or nearly so.
I'm so absurdly happy with this dress! It's completely over-the-top
foofie, candy-box Romantic Era sappy perfection. I really feel like this is a case of "bigger is better." I can wear this with or without my early 19
th century stays & both ways are comfortable & stay on well, the main difference being where my
bustline sits & how upright I'm forced to be.
I can't decide if I feel more like a slightly daft but incredibly beautiful woman, or a little 5 year old girl twirling around in a new Sunday Dress.
This is certainly NOT a hot weather dress. It will be perfect for those damp, rainy camp days when you'd do anything for another layer.
The complete outfit: shift, stays,
chemisette, corded petticoat, stockings, shoes & dress; weighs 15 lbs. No wonder all those women were labeled as 'delicate flowers'... not only did they dress like flowers, they were exhausted from carrying around all that fabric! And Heaven forbid One fall in water, One would surely perish!

I am still looking for the "right" pink silk to make the piping for the skirt border & belt. The stand-in is a mauve cotton belt and no border. Once I find the right fabric & buckle, the belt will be stitched on to cover the skirt-top join.
This dress has an amazing freedom of movement. I've rarely come across this in historic dresses. I feel like I could play baseball or kickball in the thing, though I would not want to try mountain climbing in the skirts... hiking; yes, cliff-hanging; no.
I did decide to forgo the sleeve supports. They are impractical in my profession & the idea of turning sideways to walk around my camp-store is not a happy one. So much in the same way as
paniers & bustles are out, so are artificial balloon arms.
 The Inspiration:
I decided to make this wonderful pink day dress from an 1830 fashion plate.
Before I started this project I wondered if it would be "Pretty in Pink" or "3 Day Old Cotton Candy."
My friend Missy decided it was "Taffy" while helping me pin up the hem, though "Strawberry Ice Cream" was another suggestion.
Whatever the case, it
will not fare well near a camp fire or soot.
 The Pattern:
I used the 1834 Day Dress out of Cut of Women's Clothes (see the
"1830's Day Dress" post) as the base pattern. I changed some things, like lengthening the front & sleeves so I could gather them up, reshaped the sleeve to have more taper & poof. I also shortened the back a little to raise the waistline so it would be more "1830" than "1834."
I used the
perline pattern from an 1827-29 dress in Janet Arnold's Patterns of Fashion and altered it to have those lovely petal points
(Missy calls them Fairy Wings)... though I lengthened it way too much.
The
chemisette comes from Patterns of Fashion, and is very similar to the 1800-10 version, but the collar is my own design.
 Materials:
I found this fantastic pink linen at
JoAnn's for $3.50/yd.
The lace was off of a trade blanket, $5.00 for a whole bunch of cards
(thank you Burrito Bob!).
The lining is
osnaburg scraps in a nice cream color.
The belt is a little too narrow as I chose the smaller buckle (the black thing looked terrible, I'll have to find a different buckle later). It is made from cotton canvas scrap that is dyed a brown/violet. After I find a better buckle, I'll use a darker pink silk.
The
Chemisette is 100% white linen with 3 rows of ruffles, not quite a "8888" ruff as I didn't have enough fabric, it's more "~~~."
The cotton cord for piping is a thicker jeweler's cord than I use for the stays.
Everything is sewn with cotton thread, either pink or white.
The dress took 6 1/2
yds of 60" wide linen. The bodice was only 1 yd, the sleeves take 1 yard
each (smaller sleeves would work well too), and the skirt was 3 widths of 40" long.
1 yd of the
osnaburg (approx) for the lining.
Basic Sewing Process:

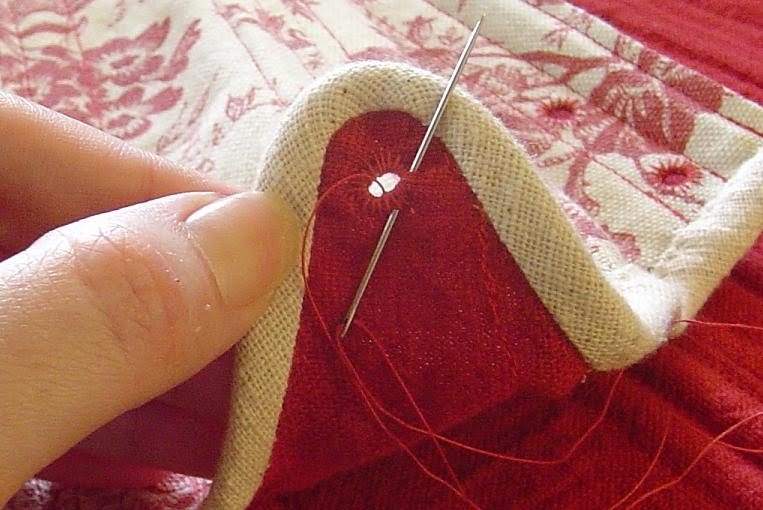
1. I cut lots & lots of bias tape out of the scraps & sewed it all together.
To get decent bias tape, you need at least 16" square, though it doesn't have to be square.

2. Made the piping.
To make piping:
Cut & sew bias tape.
Using a zipper foot, lay the cording inside the bias tape, fold in 1/2 over the cord.
Stitch as close to the cording as possible without catching it.
Ta-
da!
You now have bias tape with a good seam allowance... trim to 1/2" or 5/8", whatever you prefer.


3. Sewed the bias tape & lace onto the
perline pieces.
I finished the bias tape & stitched the lace on at the same time.
4.
Overlock all body pieces.


5. Sew gathering stitches on bodice fronts & front 1/2 of 'dart', and on the lower part of sleeves.
Add piping to the elbow side of the sleeves.
6. Stitch up front dart
without piping.

7. Sew the back(s) and back linings together (I added some piping to the back, it's really just one piece), and sew the sides & backs together.
8. Sew piping on
one front only (the side that's going to be on top).
Sew the front lining on the fronts with the zipper foot so you can make the seam tight to the piping.
Clip the ends of the piping so everything sits right & you have room for the other seams.
9. Stitch the side & back of the lining to the lining fronts & then stitch all the shoulder seams together. Make sure everything is lined up right or you'll have a real convoluted mess.
10. Finish the bodice seams around the waist & neck, turn through the armholes.
Press like crazy.

11. Top-stitch all the edges & seam lines, being careful to line things up correctly... bone on the lining at this point, if you are going to.
For this garment, the bones are on the
outside of the lining, not the inside. My best guess is that they were removed for washing. I did not add bones to this dress.
12. Stitch the armholes closed. (Normally I'd say to sew the lining over the raw edge of the sleeve, but in this case that would be too bulky).

13. Gather & sew the
perline onto the bodice.
Be sure to mark the top of the shoulder so everything lines up correctly... the shoulder seam is several inches down the back, so try it on & mark it!

14. Sew the main sleeve seam, leaving 3" open at the cuff so you can get your hand in (you can add buttons, laces, etc. to close them).
Finish the cuffs (I used bias tape to finish the edge).
15. Sew gathering stitches by hand along the sleeve cap.
Gather the sleeve into the
armscye, pin & stitch.
Check it before stitching again for reinforcement.
16. Sew the skirt panels together, press. Finish the placket(s).
Double-box pleat the skirt into a band. Stitch the band onto the bodice or bodice lining.
There are several ways to do this:
A. I chose to have one 12" placket with a slight overlap on the inside of the bodice. It closes with ties on the waistband (I was going to use hooks & eyes, but decided to go for a more adjustable waistline).
B. You can also stitch 2/3 of the skirt onto the bodice and make a drawstring to tie around the waist like an apron in front. Leave a maximum of 14" open at the sides or it will blow open as you walk (very irritating).
C. Stitch the skirt with waistband onto to the bodice with no overlap. If you do this make the placket about 8" deep.

 This is where I was when I first posted.
17. Sew hooks & eyes on the front every inch. Make sure the fronts overlap far enough to stay closed & line up correctly.
18. Stitch ties on the skirt waistband & inner waist of the bodice.
19. Stitch ties to the mark at the shoulder seam & a few inches above the back of the elbow to make the sleeves the correct length. Tie these together & adjust as needed (be careful when you put the sleeves on... this can be tricky).
20. Have friend Missy mark the hemline while wearing the dress...
this is very important!
Hem the dress.
 This is where I am right now and this may be all I do... but I really want to complete the project as per the fashion plate.
21. Add any trim to the skirt.
22. Stitch the belt onto the side & back seams of the dress. Make sure it covers the bodice/skirt break.
Make hat.
Make corded petticoat.
Dress like a China Doll.

 There are many types of trim on gowns & suits of the 18th century. The white sleeve puff of 1780 has always interested me. Though I looked for a pattern, I never found one. The "ah-ha" moment came with the last English Gown that I made. I needed a way to cover up as much fabric as possible (my customer loved it, I hated it... in the end it was quite pretty), without using flounces / engageantes as she's not a fan of them.
 Sleeve Puffs, (if anyone knows the proper name, please tell me!), are made from lightweight fabric; muslin, lawn or even fine lace netting... usually white, that is cut to shape & gathered up into puffs on a sleeve. Very similar to decorative cuffs or an outer sleeve. Gathered lace can also be stitched in the center & left loose on top & bottom. This was usually done in layers and often accompanied the puffs.
 1. Measure the "cuff" of the sleeve: 12"
 5. Draw the pattern to proper measurements & cut on the straight or bias (whichever looks better)
 10. Pin in place & gather onto the cuff. Stitch in place.
 11. Pin & stitch each row, moving up the sleeve. Make sure to squish the fabric down so the puffs are evenly distributed. (you may want to pin at the top marker; -bicep- so you know where the next stitching line should fall).
 12. Finish the last row so the puff lays horizontally around the sleeve.
 13. Add any lace or trim.
 14. Repeat with the other sleeve.