Saturday, May 15, 2010

Green Gown with Thistle Somacher, 1750-80

The green gown with thistle stomacher is finished!

This is my 2nd to last "it's taken forever" project from last year, and it feels sooo good to be done...

And she likes it!

I won't go into how to make yet another English Gown.


The gown is made from a light to medium weight linen that was a lovely acid green which I over-dyed to this fantastic grass-green. In sunlight, some of the yellow undertones still show up, playing very nicely with the brighter green in the stomacher.

It's lined with a lightweight but stiff black linen to give it shape & a little more substance. The bodice is lightly boned, laces in front with space for the stomacher to fill in the gap.
The skirts have a slight pick-up in the back via loops & ties, but can be worn long.

The cut & style are what I would call a remade gown or a later gown with earlier hold-overs, which was done all the time; rather like a middle aged or older woman saying "just look at what those kids are wearing today!" and a young woman looking at Grandma's gown and thinking "yeah, if I change THAT and this, it'll be perfect!"


The bodice is totally separate from the skirt, as in the 1760-80 cuts, the false pleats & sleeves are 1750-60 with their generous ease (she'll be able to move her arms), and the braid trim on back is very 1760-80.

The entire dress is hand finished with green or black cotton thread.


As in everything I do, if I had it to do again I would change some things.
The back would be cut in one with the skirt (which I may start doing with most of my English Gowns as it gets rid of the odd shape that the detached skirt makes at the point... and that I have to fuss with to get it to lay right...)
The braid would have tassels on the ends, and the sleeves would be a little more decorative... perhaps a cuff, flounce or more braid.
I would pair it with a black linen petticoat.

"Simple" was the customer request, and I think I achieved simple and elegant all in one.

The next few weeks promise to be very, very busy and involve lots of multitasking, paperwork and perhaps some electric saws & wood glue. Then I'm off to my first event!

End note: packing for my first event. The wooden clothes rack is finished & will go on the first test run this week. I'm hoping it will work much better than the hangers. We shall see...

Wednesday, May 12, 2010

Production line update

Since sleep is elusive, I'll update the "what I've made" section here. This is a fraction of what has passed through my shop in the past 2 months, but it's been fun!

There have been several English Gowns and several more still in-progress.

I keep saying that I need a small dress doll, but I REALLY need a small dress doll. I've had a slew of orders from the size 1 to size 6 range recently, and my smallest dummy only goes down to size 8.


And isn't my mother lovely? This gown will have a matching petticoat shortly, and I will probably make a shift with ruffles to go with it as well.

This was a test dress for another gown that is much more labor-intensive. And in the works right now. It has paniers, a stomacher, and those false pleats that hang loose & pin in place so no matter how pregnant you get, it still fits (not that my mother is going to get pregnant, but it's one of the benefits of this kind of dress... built in maternity).


Many, many stays have gone out, come back & gone out again... actually only 2 pairs have come back: 1 because the lady found out she has heart trouble & the other because it was a "this may fit you, but probably not" kind of thing... that one is in the mail right now.

I'm exploring a new stays pattern. Diderot's 1776 lightly boned stays with the cross-pieces in the front. Not sure how well they will hold up, function or support various bodies, but we'll find out! I have to make a test version for myself before I launch into this with both feet.


Only a couple waistcoats in the past few weeks, as I've been stuck in pretty-ruffle land for a while now.


Speaking of Pretty Ruffles, my mother has been making ruffled shirts like crazy. Now she's on to pants, but I think she was going a bit loopy with all that foof.

This tailcoat is another 1808 version, gray wool with white linen lining. I dubbed it "The Manta Ray" as it looked like one of those lovely creatures heaped my cutting table. I kept doing double-takes.


I've also made a lot of "small" garments for ladies. Shifts, petticoats, pocket paniers,
(this is all the same outfit, it's just that with the paniers it doesn't show the lovely ruffles on the sleeves.)
I loved this green when it was all laid out... but it ended up looking very military when it was done... very Korean War. Ah well, the red & white striped & bright yellow ones made up for that & the lady I sold them to loves them.


The pink dress from the previous post, of course.
I'm also working on an acid green cotton pelisse from about 1818 as a test garment for a customer.
I've broken the 1/2 way point of the bottom border on my quilted petticoat. Yaay flu! (No, no, I really didn't mean that. Flu bad. No flu).

I'm not working as fast as I possibly can, but I am working as well as I possibly can. I've slowed down just a little, taken my time to get things done properly & started trusting my instincts a little more than the numbers. It seems to be working out quite well.

Last night I re-worked our calendar & found out that we are realistically booked right through September. (Technically August, but September is reserved for the Eastern). I'm not sure if this makes me very happy or a little flustered.

Oh yes, and our web site is a bit wonky right now. Our web master is working to fix it, but it may be a few days before everything is updated... so just in case you bounce between sites, our new order date is October unless you've made prior arrangements; the For Sale page is almost totally out of date, and I have a whole slew of pictures to post in the catalog, but most of you have already seen them here.

Wednesday, March 31, 2010

1830 Pink Day Dress

My wonderful 1830 Pink Day Dress is done or nearly so.

I'm so absurdly happy with this dress! It's completely over-the-top foofie, candy-box Romantic Era sappy perfection. I really feel like this is a case of "bigger is better." I can wear this with or without my early 19th century stays & both ways are comfortable & stay on well, the main difference being where my bustline sits & how upright I'm forced to be.

I can't decide if I feel more like a slightly daft but incredibly beautiful woman, or a little 5 year old girl twirling around in a new Sunday Dress.

This is certainly NOT a hot weather dress. It will be perfect for those damp, rainy camp days when you'd do anything for another layer.
The complete outfit: shift, stays, chemisette, corded petticoat, stockings, shoes & dress; weighs 15 lbs. No wonder all those women were labeled as 'delicate flowers'... not only did they dress like flowers, they were exhausted from carrying around all that fabric! And Heaven forbid One fall in water, One would surely perish!

I am still looking for the "right" pink silk to make the piping for the skirt border & belt. The stand-in is a mauve cotton belt and no border. Once I find the right fabric & buckle, the belt will be stitched on to cover the skirt-top join.

This dress has an amazing freedom of movement. I've rarely come across this in historic dresses. I feel like I could play baseball or kickball in the thing, though I would not want to try mountain climbing in the skirts... hiking; yes, cliff-hanging; no.

I did decide to forgo the sleeve supports. They are impractical in my profession & the idea of turning sideways to walk around my camp-store is not a happy one. So much in the same way as paniers & bustles are out, so are artificial balloon arms.

The Inspiration:
I decided to make this wonderful pink day dress from an 1830 fashion plate.
Before I started this project I wondered if it would be "Pretty in Pink" or "3 Day Old Cotton Candy."
My friend Missy decided it was "Taffy" while helping me pin up the hem, though "Strawberry Ice Cream" was another suggestion.
Whatever the case, it will not fare well near a camp fire or soot.


The Pattern:
I used the 1834 Day Dress out of Cut of Women's Clothes (see the "1830's Day Dress" post) as the base pattern. I changed some things, like lengthening the front & sleeves so I could gather them up, reshaped the sleeve to have more taper & poof. I also shortened the back a little to raise the waistline so it would be more "1830" than "1834."
I used the perline pattern from an 1827-29 dress in Janet Arnold's Patterns of Fashion and altered it to have those lovely petal points (Missy calls them Fairy Wings)... though I lengthened it way too much.
The chemisette comes from Patterns of Fashion, and is very similar to the 1800-10 version, but the collar is my own design.

Materials:
I found this fantastic pink linen at JoAnn's for $3.50/yd.
The lace was off of a trade blanket, $5.00 for a whole bunch of cards (thank you Burrito Bob!).
The lining is osnaburg scraps in a nice cream color.
The belt is a little too narrow as I chose the smaller buckle (the black thing looked terrible, I'll have to find a different buckle later). It is made from cotton canvas scrap that is dyed a brown/violet. After I find a better buckle, I'll use a darker pink silk.
The Chemisette is 100% white linen with 3 rows of ruffles, not quite a "8888" ruff as I didn't have enough fabric, it's more "~~~."
The cotton cord for piping is a thicker jeweler's cord than I use for the stays.
Everything is sewn with cotton thread, either pink or white.

The dress took 6 1/2 yds of 60" wide linen. The bodice was only 1 yd, the sleeves take 1 yard each (smaller sleeves would work well too), and the skirt was 3 widths of 40" long.
1 yd of the osnaburg (approx) for the lining.

Basic Sewing Process:

1. I cut lots & lots of bias tape out of the scraps & sewed it all together.
To get decent bias tape, you need at least 16" square, though it doesn't have to be square.


2. Made the piping.
To make piping:
Cut & sew bias tape.
Using a zipper foot, lay the cording inside the bias tape, fold in 1/2 over the cord.
Stitch as close to the cording as possible without catching it.
Ta-da!
You now have bias tape with a good seam allowance... trim to 1/2" or 5/8", whatever you prefer.


3. Sewed the bias tape & lace onto the perline pieces.
I finished the bias tape & stitched the lace on at the same time.

4. Overlock all body pieces.

5. Sew gathering stitches on bodice fronts & front 1/2 of 'dart', and on the lower part of sleeves.
Add piping to the elbow side of the sleeves.


6. Stitch up front dart without piping.


7. Sew the back(s) and back linings together (I added some piping to the back, it's really just one piece), and sew the sides & backs together.

8. Sew piping on one front only (the side that's going to be on top).
Sew the front lining on the fronts with the zipper foot so you can make the seam tight to the piping.
Clip the ends of the piping so everything sits right & you have room for the other seams.

9. Stitch the side & back of the lining to the lining fronts & then stitch all the shoulder seams together. Make sure everything is lined up right or you'll have a real convoluted mess.

10. Finish the bodice seams around the waist & neck, turn through the armholes.
Press like crazy.

11. Top-stitch all the edges & seam lines, being careful to line things up correctly... bone on the lining at this point, if you are going to.
For this garment, the bones are on the outside of the lining, not the inside. My best guess is that they were removed for washing. I did not add bones to this dress.

12. Stitch the armholes closed. (Normally I'd say to sew the lining over the raw edge of the sleeve, but in this case that would be too bulky).


13. Gather & sew the perline onto the bodice.
Be sure to mark the top of the shoulder so everything lines up correctly... the shoulder seam is several inches down the back, so try it on & mark it!


14. Sew the main sleeve seam, leaving 3" open at the cuff so you can get your hand in (you can add buttons, laces, etc. to close them).
Finish the cuffs (I used bias tape to finish the edge).

15. Sew gathering stitches by hand along the sleeve cap.
Gather the sleeve into the armscye, pin & stitch.
Check it before stitching again for reinforcement.

16. Sew the skirt panels together, press. Finish the placket(s).
Double-box pleat the skirt into a band. Stitch the band onto the bodice or bodice lining.

There are several ways to do this:
A. I chose to have one 12" placket with a slight overlap on the inside of the bodice. It closes with ties on the waistband (I was going to use hooks & eyes, but decided to go for a more adjustable waistline).
B. You can also stitch 2/3 of the skirt onto the bodice and make a drawstring to tie around the waist like an apron in front. Leave a maximum of 14" open at the sides or it will blow open as you walk (very irritating).
C. Stitch the skirt with waistband onto to the bodice with no overlap. If you do this make the placket about 8" deep.

This is where I was when I first posted.

17. Sew hooks & eyes on the front every inch. Make sure the fronts overlap far enough to stay closed & line up correctly.

18. Stitch ties on the skirt waistband & inner waist of the bodice.

19. Stitch ties to the mark at the shoulder seam & a few inches above the back of the elbow to make the sleeves the correct length. Tie these together & adjust as needed (be careful when you put the sleeves on... this can be tricky).

20. Have friend Missy mark the hemline while wearing the dress... this is very important!
Hem the dress.

This is where I am right now and this may be all I do... but I really want to complete the project as per the fashion plate.

21. Add any trim to the skirt.

22. Stitch the belt onto the side & back seams of the dress. Make sure it covers the bodice/skirt break.

Make hat.
Make corded petticoat.

Dress like a China Doll.

Wednesday, March 24, 2010

How to Sew Eyelets

Eyelets & buttonholes have been one of the most common means of holding one's clothes on... for a really, really long time.

Before 1800, hand-sewn eyelets were regularly used in bodies, stays & corsets for women, and occasionally on men's clothes. French Eyes & grommets were not widely used until the mid to late 1800's & hand-sewn eyelets continued to be used long after machine cams were developed to make them "easier."
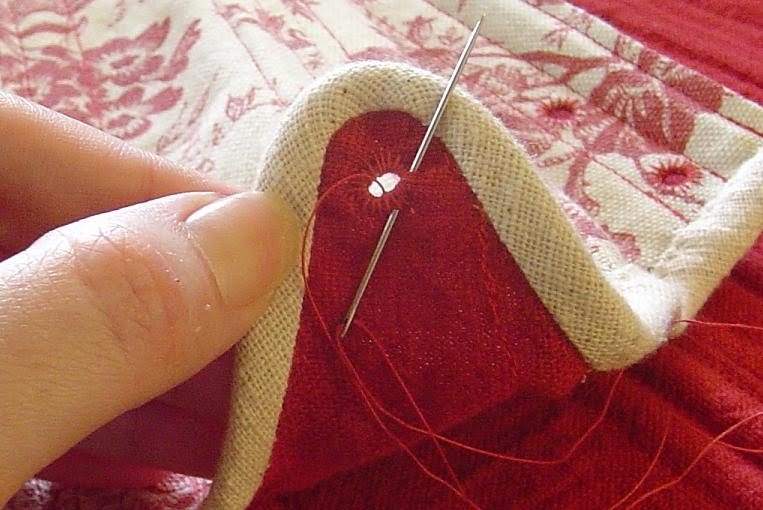
When you need a hole in a corset or similar garment, (one that is going to take some stress), it has to be a strong hole. Therefore, the threads cannot be cut or split, they must be separated or spread. If an eyelet is purely decorative, use the machine cam; it's faster & very consistent.

There are several methods of sewing eyelets, this one works quite well for me.

Making Holes:

1. Mark your holes with a removable marking tool (fabric pen, chalk, etc.)

2. Carefully poke a hole with an awl. The awl should be large enough to make the desired size eyelet, but not so large that it splits the threads of the fabric.
Some splitting may occur, but try not to create rips.
Re-open the holes with the awl prior to sewing each one to "neaten" the edges as they should tend to close back in.


Sewing Eyelets:

Turn the garment so as not to strain your hand; plan on a lot of re-arranging.

3. Lose your thread between the layers of fabric & secure it with the double-loop knot on the wrong side of the garment.


4. Pass your needle & thread to the right side of the garment & start your button hole stitch by looping the thread around the needle once, in the direction you are going. Do not change direction.


5. Continue around the hole, at a consistent distance (1/16" - 1/8") to create a star-burst pattern in thread. Pull each thread tight, but not so tight that it wrinkles the fabric. The edge of a circle should emerge. Each thread should be about 3 threads apart in the weave of the fabric.


6. Once you finish the circle you can either go around again for a classic 'finished' eyelet, placing the second row of threads between the first...
OR
pass the thread to the back side & complete the eyelet as in step 7.


7. Insert the needle between the layers of fabric next to where you started & make a circle of thread around the eyelet (between all your stitches). This adds a little stability to the eyelet. DO NOT pull it tight.
This is optional, but it works to secure your thread & shape the eyelet.

8. Either lose the thread in the fabric or go on to the next eyelet between the fabric layers.
*Only move from one eyelet to another if you know you have enough thread to finish. Never make an eyelet out of 2 separate threads (it works, but looks terrible).

Finishing the Eyelet:

9. The eyelet will be much smaller than a workable hole, so gently re-open it with an awl. This will help to re-shape the hole & make it look like a beautiful eyelet. (if you pulled too tight, you may have to use a smaller awl).

Unless your fabric is fraying badly NEVER use fray check on an eyelet. It makes it stiff & uncomfortable. If the fabric is fraying, go for it (test first).


I've found that this type of eyelet, sewn with Hand Quilting cotton thread will last for several years without repairs.
Different methods will suit different people & projects, so make sure you know what style you want on a garment before you invest the time & effort.
If you have a lot of these little darlings to do, take regular breaks to save your hands.

How to Sew a Binding on Corsets or Stays

One of the easiest & most common ways to finish a pair of stays or a corset is to sew a binding on the raw edges. This can also be used for necklines, cuffs, hems or any other raw edge that you want to cover.

Historically, this could be thin leather, fabric that matched the lining or the outer fabric, or a completely different fabric.

Bias Tape:

I prefer to cut my own bias tape as most commercial bias tape is polyester and comes in a range of terrible colors.

To figure out how much bias tape you will need, use a flexible measure tape along the edges of your garment. Add up the yards & then add a few more.

1. Cut matching or complementary fabric for bias tape. You should have several yards more than what you need in case it has to be torn off later (this happens a lot... especially when there is little to spare). I prefer to cut it the width of a wooden yard stick, laying the yard stick down & just drawing my lines that way. The tape ends up being about 1 1/4" wide... but if you want to do it the hard way, measure every 1 3/4" and go from there.

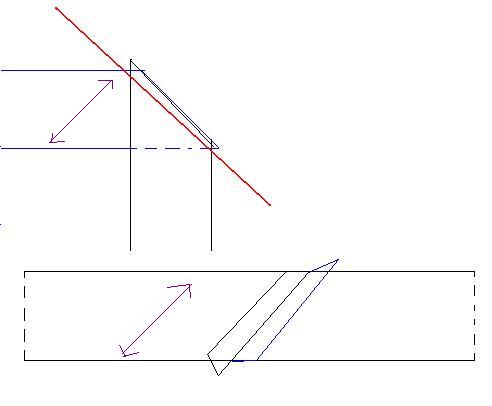
2. Sew the bias 'tape' together by forming L's or right angles between the 45 degree straight grains.
The purple lines are the grain of the fabric. Red is where you sew.
If your fabric is striped, make sure your stripes are all going the same direction.
*Do not back-stitch, it's a waste of time & makes a mess.
*To make sure all your seams are on the same side turn the new seam down on the table & lay the next piece on top of it.

3. Press the seams open & then press your bias tape flat. You may want to iron it into bias tape shape (double or single fold), but I prefer to sew it flat as I have greater flexibility when I finish it later on.

Sewing the Binding On:

4. Sew the tape onto the right side of the garment. For stays & corsets, I line up the edge of my presser foot to the edge of the garment & center the needle.
Take care when going around corners, allow for a little ease & don't let it catch folds in the tape. You may have to advance your needle by hand in sharply curved areas & angles.
This takes some practice.

5. Check over the seams, make sure you caught all the edges & that nothing will pull out when you fold it over.
Unless your machine snagged or choked a lot, don't worry about loose spots, you can catch these later. Note anywhere that will need reinforcements with tailor's chalk or tacks.
- Make sure you have enough of the tape left to turn under & over (see below).
- Clip any bits that hang out beyond the tape line to neaten the edges. Don't count on the bias tape covering these, they tend to get emphasized.... I mean the ends of seams & such... make sure you aren't re-cutting the garment... if it's that bad take the tape off & start over.

Folding & Pinning:

6. Clip the end of the binding to about 3/4" from the edge.


7. Turn the seam allowance up to be in line with the other stitching.
8. Fold the end back so it lines up with the edge of the garment.
9. Turn the bias tape down over the raw edge. You may have to clip a little triangle off so it doesn't add bulk (you'll see it after you turn the end down).
10. Fold under the other edge to create a neat, finished end. This takes a bit of practice & adjustment. This fold will give you a starting place for the rest of your binding, though you don't have to stick with it.

11. Pin the end carefully. This may need to be re-adjusted later.
12. Pin the rest of the binding down. You can do this in stages or all at once. I like to work with about 10" at a time or one 'side' of the garment at a time so I'm not pricking myself while I sew.

Hand Finishing the Binding:

13. Secure your thread in the end of the binding by losing the thread under the fold & tying a double-loop knot over the needle.
Tighten with your thumbnail.


14. Use a hem stitch or blind hem stitch to sew the binding on. When going around corners or curves, it's a good idea to further secure your stitching by making a 'buttonhole' knot every few stitches.
*If your machine made loopy threads anywhere, be sure to catch the binding on the front side at this time. I do this by making a diagonal stitch (regular hem stitch) followed by a small vertical stitch that catches all layers... be very careful that this doesn't show badly on the front side. This prevents the binding from pulling loose in the wash, or over several wears.

15. Continue on until you reach the end. Secure your thread exactly as you started it, snagging the folds on the end. I like to bring my thread back from the end with a few stitches before tying it off. Lose the end of the thread in the binding & clip.

The front & back should look almost the same. The front will have a completely 'finished' look, the back will have some small stitches showing. Be careful to consider thread color & the overall look of the garment.
For this pair of stays, I chose to machine sew the binding onto the lining and hand-stitch the binding on the outer fabric because there was a better chance of blending the stitches into the fabric.