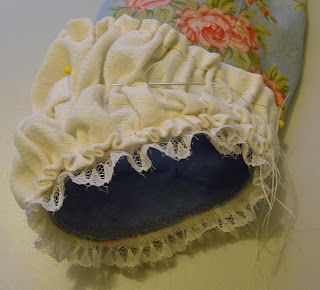
 There are many types of trim on gowns & suits of the 18th century. The white sleeve puff of 1780 has always interested me. Though I looked for a pattern, I never found one. The "ah-ha" moment came with the last English Gown that I made. I needed a way to cover up as much fabric as possible (my customer loved it, I hated it... in the end it was quite pretty), without using flounces / engageantes as she's not a fan of them.
Sleeve Puffs are most often seen on English Gowns, Polonaise dresses & jackets... anything with a fitted back. They are rarely paired with flounces, though I've seen a few museum examples set up this way; I'm not sure if this is modern interpretation or historic fact. Puffs do not appear to be as common as flounces or plain cuffs.
My best guess as to who wore them: upper house servants, the lady of the house & upper class ladies who preferred the polonaise styles.
By the time the garments filtered down to the lower and working classes, most of the lace & other decorative elements would have likely been removed, reused and/or sold... this trim is difficult to keep clean & would have to be removed for laundering, making it unlikely that a working woman would bother to fuss with it... though it doesn't require pinning up like flounced do.
 Sleeve Puffs, (if anyone knows the proper name, please tell me!), are made from lightweight fabric; muslin, lawn or even fine lace netting... usually white, that is cut to shape & gathered up into puffs on a sleeve. Very similar to decorative cuffs or an outer sleeve. Gathered lace can also be stitched in the center & left loose on top & bottom. This was usually done in layers and often accompanied the puffs.
Ruching, silk or paper flowers, lace, ribbons, bows & all manner of other stuff could be piled on top.
This is the formula I used:
2. Measure the uppermost portion where you want the puff to be (bicep). 14"
3. Measure the distance between these 2 marks up the arm. 3"
4. Decide how full you want the puffs to be & multiply by 2 or 3.
I prefer loose gathers, so I'll multiply by 2.
Cuff: 24"
Bicep: 28"
Depth: 4" - 8" (this leaves room to make the puffs... I figured 1:3 ratio)
 5. Draw the pattern to proper measurements & cut on the straight or bias (whichever looks better)
(please note, the above drawing is upside down from how you attach the puff - refer to the purple marks)
6. Sew puff ends together.
7. Finish the edges... I just turned them over rather than rolling them. This reduced bulk & the raw edges are encased at the end.
8. Run gathering stitches along the top & bottom edges.
9. Divide equally up & down into as many gathers as you want & run gathering stitches along those lines. The more lines, the more depth you will need (3).
 10. Pin in place & gather onto the cuff. Stitch in place.
 11. Pin & stitch each row, moving up the sleeve. Make sure to squish the fabric down so the puffs are evenly distributed. (you may want to pin at the top marker; -bicep- so you know where the next stitching line should fall).
 12. Finish the last row so the puff lays horizontally around the sleeve.


1 comment:
Quelle délicatesse dans ces petites manches de dentelles d'autrefois ! C'est beau, j'aime beaucoup, je rêve... Loin, ailleurs...
Tatieva, artiste vintage
Post a Comment