Sunday, September 4, 2011

Adventures in Wool: Step 1, Skirting Fleece

Long time no post. This summer has just flown by, and in other ways it has dragged - I'm in no rush for it to end despite the leaves starting to turn & fall.

I wanted to put one of those nifty word-list things along the right side of my blog. You know the ones that you click on the big or little word & it takes you to related posts? So cool. Love them.
No deal. This template doesn't support that. What it does let me do is label the post at the bottom by the comments & you can click on that to go to related posts! Yay!

I recently took a small detour from sewing when a family friend gifted me with 30 -yes THIRTY- fleeces. Raw fleeces. From sheep. Smelly, dirty, nasty, BaBa Black Sheep and oh does he ever have some wool. There's more if you want it. It's free, but you have to come get it. And I mean that too. Please... take some! (I'm offering the raw or skirted fleeces - you have to wash your own).

The sheep are hair (not a spinner's friend), Dorset & Finn. The Dorset & Finn are absolutely lovely. The hair is OK for batting, which is fine with me, I do more quilting anyway.Link
I learned A LOT about sheep, fleece, VM "vegetable matter" (a.k.a. vile muck, veritable mess, very manky), lanolin, "tags" (poop & grease - eew), shorts (second cuts), wool vs. hair, skirting, classing, scouring (ie washing - don't agitate it!), BTW is your Tetanus shot up to date? What gloves fit, how much hot water our heater holds, drying, picking, flick carding, ticks, burrs... oh boy...

Moon LOVES fleece. She's officially left me for the sheep in the basement.

I am not in any way a professional here, I'm just sharing what I learned after making some BIG mistakes.

So, without further delays, I'll tell you How To Skirt a Raw Fleece.

1: DO NOT just pull it apart & toss it in hot water! NO! Bad plan... bad, bad, bad plan.
ask me how I know this... that stuff does not "just fall right out."
2: DO get yourself the following equipment & prepare for one of the grossest things you will ever do (and the most fun).

Tools & materials for skirting wool:

To make the mess
- skirting table (how to build one) OR
- large wire rack
- Sawhorses to set the rack on
To contain the mess
- 2 plastic tarps, the kind that are waterproof & can stand up to some abuse.
- trash bags
- trash can, in my case a big pink tote
To keep you clean (ha)
- rubber gloves
- work clothes; pants, long sleeved shirt, shoes, socks, head scarf or at least a hair tie
- safety glasses (you really want these)
- dust mask; I admit I couldn't tolerate the mask & took it off.
Go for the Hazmat suit & call it a day!
To keep your clean fleece clean
- clean feed bags or cloth bags - NOT plastic bags!
Other
- paper & pen to label the skirted fleece in the bag(s)
- soap & water for hands & face
- tissues or paper towels to blow your nose
- other clean clothes before you ever go in the house
- work apron
- scissors
- broom & shovel (not a dust pan, a shovel).
Location
- NOT YOUR HOUSE!
- an outbuilding or outside is preferable. This makes a genuine mess.
- a place to store the skirted fleece, again, not in your house!

Initial Skirting:
(it will be gross)
Initial skirting should be done on site by the shearer / Shepard - but it may not be. Belly wool shouldn't even come into the main part of the fleece, but it may. So when you go see the Shepard, and are confronted with that Giant Mountain Of Manky Wool you will know what to tare off right away.
A good fleece (so I've read) will stick together even as you pull it off the pile (or out of the pile - which will then fall on you - wear long pants, long sleeves, gloves - it IS a barnyard).
- Immediately remove poop tags. These are generally located at the back end of the fleece.
- Pull off any truly heinous belly wool, it'll be right at the edges & will look like something off of a homeless sewer hippie in a bad episode of Law & Order - NOBODY gets that grungy, nobody. Except sheep, apparently.
- Bag that nasty, mucky, smelly thing so you can move on before your friend tosses the next fleece on your head. Go ahead, fill the back of the truck! There's lots more where that came from.
Don'ts & Do's
Don't take anything that's wet unless you have a place to dry it or can soak it right away (soaking is different from scouring). Wet = mold, mold = trash.
DO NOT TAKE THE RAM! ask me how I know this...
Don't take anything that is hopelessly messed up or falling apart.
Do not take a fleece that is super-dirty from the cut side. Waste of Time.

Do educate yourself on the fibers you want to use & look for those characteristics (under the grunge) hehe.
Do take fleeces that are holding together & look relatively clean from the cut side.
Do look for a Shepard who raises sheep appropriate for what you want to do (and keeps them clean - those nice little coats are just so cute).
Do look into a breed that isn't Merino. Yeah, it's the best but give another breed a chance too.
Do look into paying someone like these guys http://www.woolyknobfibermill.com/ to do this stuff for you! (or at least tell you how).

OK, so now you've got this heaping, stinking pile of greasy, vm-encrusted mess (in feed bags no less)... what do you do with it?
Well, you don't just toss the whole thing in a tub of hot water! Oh NO!

Skirting:
I did this a bit differently than it's done commercially.

Laying Out.
- First, I laid out 2 or 3 fleeces on the downwind tarp at a time (or on the floor of the little outbuilding when it was raining).
- Then I looked for the head, sides & back.
- Remove any remaining poop tags.
- Remove heavy areas of VM (vegetable matter) from the neck area.
- Remove any obvious grease tags - these look like that L&O sewer hippie's dread locks & if you squeeze them grease actually comes out (I think I just threw up a little there). DO NOT try to clean them, they don't clean.
- Remove any obviously stained areas, no point in keeping them if they don't come clean.


Throw the fleece!
- Throw the fleece cut side down onto the skirting table! It's fun. You'll like it. It'll bounce.
- cut side down, grab ahold of it & shake it a little.
- flip it over & take any obvious VM or second cuts off (short hairs that are a re-buzz on the hair cut), any remaining grease or poo tags.
- Shake the heck out of it with the lock side down. Super gross & tons of... stuff... will fall out. I mean TONS - your fleece will lose about 1/4 of it's weight right here.
- Repeat many times.
Now, the fleece is going to start to get loose & kinda fluffy & may start to fall apart a bit. This is where I separate out the different hair types & give myself smaller chunks to work with. If you are selling the fleece, you will want to keep it in one piece (apparently).
- I divided the fleece according to wool types: breech wool (back legs), nice wool (clean-er), and manky wool (pre-wash). About 15" x 15" chunks, or however they divide. (the one pictured is still in that chunk, but you can see the different hair/wool types clearly).
- Back on the table & shake, shake, shake.
Note: when shaking, keep it DOWN. Don't pull it up in the air so that awful mess goes in your face... it's a movement of the wrists & elbows, not the shoulders... get it?

Monkey Picking!
- Remove any left-over bits. Don't eat what you find.
- Maintain the lock structure! Do NOT pull the locks apart! Yes, get the ticks & burrs out, but don't separate those locks, you'll need them later. ask me how I know this...
- Shake it again both sides until it goes light & fluffy, you'll know.
(What's pictured here is actually cleanable, but if it's worse, get rid of it.)

At this point it should look like something you might not be afraid to touch with your bare hands if you have a sink & soap in the near future. Perhaps the cat won't need a bath after rolling in this fleece.

And you are done skirting! Congrats, you just did one of the grossest jobs on the face of the planet! Well done. I'm proud of you.

Storing
- If the fleece is still intact, lay it down, lock side up & then fold the ends in. Roll the fleece into a bag & label it.
Sheep Breed
Name (if it has one)
Date shorn
Date skirted
Date scoured
Date carded
Date dyed/spun/etc.
If you want, just for kicks, weigh it before & after to see how much stuff fell out of it.

If the fleece is in pieces, you can either group like with like from different sheep or keep it all in the same bag & process it as one fleece later. I suggest, if it's in pieces to group like with like even if it is from different sheep; that will make scouring & further processing much easier.

A single fleeces yields a lot of wool. Much more than the original volume, considering that it has lost over 1/2 its weight in the skirting & scouring process. I think what it loses in weight, it gains in puff.

Thursday, July 7, 2011

Making a Leather Thimble

Upon request I'm doing this tutorial on how to make a leather thimble.

This is my old, worn out thimble that is no longer effective... see the new one below!

I'll preface this tutorial by saying I hate most commercial thimbles. I know many of you probably love them, but I always get stabbed. They are never where I need them to be, always too big (except Great Grandma's, which I do use), always slip around, never hold the needle & I'm bloody more often than not with the confounded things. Also, I have fingernails & no, I'm not cutting them short.

So, here's how to make a very handy leather thimble that will last about 3 months if you hand sew all the time. Make up a bunch at once because if you are like me, you'll leave them scattered all over the place (which really freaks people out because they can look just like severed fingers out of the corner of your eye).

Materials:
thin leather with the skin (suede won't do) I prefer split pig.
sewing machine
thread
scissors
your finger!
marking pencil (optional)

1. Using the thinner more flexible parts of the leather, find a suitable piece & cut it off. It should be larger & longer than you will need. Direction does not matter, scraps are just dandy for this!


2. Wrap it around your finger & pinch it so it's snug - not cutting off circulation, but not slipping around either. Since most leather has some give, tight is better than loose, but you can always run another stitching line down it to tighten it later if you are nervous.


3. Machine stitch that line. Stop before you get to the end.

4. Put it on your finger & check the fit. If it needs adjusting, do that now. It should be snug, not turning your finger blue, but not falling off. The end is open & not fitted. It should extend well beyond the end of your finger.

5. Fold the end back & see where it bends naturally.


6. Cut along the fold lines, stopping before the crease (you will need this area to be solid when you are sewing). Depending on how flexible the leather is you may have to make several cuts to get it to lay smoothly, but do the 2 main ones first.
- image one shows where the crease & cut are (at the tip)
- image two shows the tabs straight out from the thimble.

7. Cut the excess on the end off straight, just beyond your finger (by about 2mm) so it sits neatly on the top of your fingernail or back just a bit if you have short nails. There should be some overlap in towards the pad of your finger, but not excess.


8. Cut down the center, stopping as soon as you have room to split the tabs onto either side of the seam.


9. Fold those tabs up & stitch them in place one at a time. Don't worry about holes in the leather, your thimble will wear out before the stitches pull out.


10. Your finger should be totally enclosed at this point, from just below the middle knuckle to the end of your finger. The overlaps on the pad of your finger should be smooth & comfortable.


11. Trim the excess leather on the top seam to 1/8" - 1/16".


12. Cut a scoop out of the bottom for the inside bend of your 2nd knuckle. (above)

13. Note the placement of your last knuckle bend, take the thimble off, fold it in 1/2 & cut a small wedge out of that inside bend. Repeat with the 2nd knuckle if necessary. This should give you full range of motion. Don't cut too far up to the side, you will need that leather for protection from the sewing needle.


You should have full range of motion at this point. While your leather may have been flexible before, the cut-outs make it much more comfortable.


14. Round any edges that might catch the thread. You will find out if you missed any as you sew, don't be afraid to clip an end here or there as needed.


Finished leather thimble as I sew with the side of my middle finger.


Hopefully I didn't offend anyone with any unintentional hand gestures...
Hopefully this is helpful to those few souls like me who sew with the side of their fingers rather than the tips.
Happy Fingers = Happy Sewing!

Monday, June 27, 2011

Van Dyke Trim & Pinking

I just completed an adventure in massive amounts of trim on a dress for an 1812 event at Genesee Country Village & Museum in Mumford, NY. (I got to be a tourist vs. an exhibit!)

The inspiration was this 1815 fashion plate of a bathing dress. The pattern was an 1810 dress bodice from Cut of Women's Clothes & the bottom from Patterns of Fashion. It's a wrap dress.

I used 3 different trim techniques to create the dress, 2 with success.

The first, on the upper portion of the dress is Van Dyking, or Dagging. The techniques are the same... I think these are also called Lappets when they are made individually.

I did not make them individually because I'm not insane... though if you had limited fabric this would be the way to go!


First, cut your fabric double-wide & you can either sew on the fold side or on the open side if you want a tube as a finished edge. This is good if the trim will be on the outside of the fabric. That is what I did here. I use Prismacolor pencils to draw on the fabric as it washes out (most of the time). In this case, 1" triangles were sewn by machine on cotton twill.

Next, cut the excess off, to about 1/8" seam allowance, and then clip the inner corners so they turn (not shown). You may want to fray check close clips. If you don't clip the inner edges, the shape won't turn properly (ask me how I know that after I got the first one all turned - duh!).

If it's open, just turn it, if it's in a tube, turn it with a tube-turner or a string on a bodkin (dull needle).
I use the tube turner (you can buy one at JoAnn's or similar store).

Using the end of the tube turner (has a nice dull point), I poked the points of the van dyking out & wiggled things around until it was nice & flat.

Iron flat.
This can be stitched on the outside, gathered a little, laid flat, sandwiched between seams, etc. In this case I used it on the front apron as a flat-felled seam & on the bodice front between the outside & the lining. I lightly gathered it for a nice stand-up row of trim that ended up looking like sunflower petals.

Tip: if your fabric is flimsy you may want to add a lightweight interfacing.


The second technique I tried was binding the edges with single fold bias tape. This did not work out & I ended up cutting it off, but you can see the potential here.

If I had finished it by hand I think I would have loved it, but I just can't stand machine stitched bias tape. Call me a stitch counter, but it just drives me nuts. Yet I don't mind machine top-stitching. Go figure!


The final technique I used was pinking. This ended up being an excellent choice for the finish on this dress.

On a single layer of fabric, draw the template on with colored pencil.
Tip: draw on the backside of the fabric just in case the pencil doesn't come off... so far it has, but there's always an exception...


Fray check the cutting line & let dry.


With pinking shears or a pinking punch (if you can find one, let me know where!), cut the shapes carefully. If you go over the lines, fray check again.
Tip: pinking shears are notoriously painful, I wear a knit winter glove when using them. It saves my hands & lets me use a little more force when necessary.

Here is the "finished" apron with 2 types of edging on it.
You can gather fairly heavily, depending on the type of fabric you use, but let the pinking & van dyking stand out on its own.

Tips:
- Sew lace on the edge of the van dyking.
- Cut fancier shapes if you have the patience, it will mimic the 18th & 19th c. shapes better
- Find pinking shears that cut in different shapes from the modern "vvv" format.
- Budget for at least 4 bottles of fray check! (open a window).

Saturday, June 18, 2011

Sumac Dye, Part 1

Today I began an adventure that I've been waiting to start since about mid-winter when the idea popped into my brain. You see... we have an abundance of natural dyestuffs growing all around us & simply don't use it because we either A: don't know about it, B: don't want to take the time/effort/energy to do anything about it... then there's always C: don't wanna.

I wanna, so I am.

After combing the internet & bookshelves for info on this stuff, I found that sumac is a decent dye material. Not perfect in color or fastness, but it has a wide range of colors & it's not like I have a shortage of available materials... that stuff IS a weed around here.

Sooo... I grabbed meself a little axe & hacked down some weed-trees. The barn is a bit easier to get into & I have some raw materials.
Of course, I had help...
For those of you who don't know, this is Clyde; a Cool Cat. He helped me chop trees down, strip leaves & made sure all the leaves went in the right box.

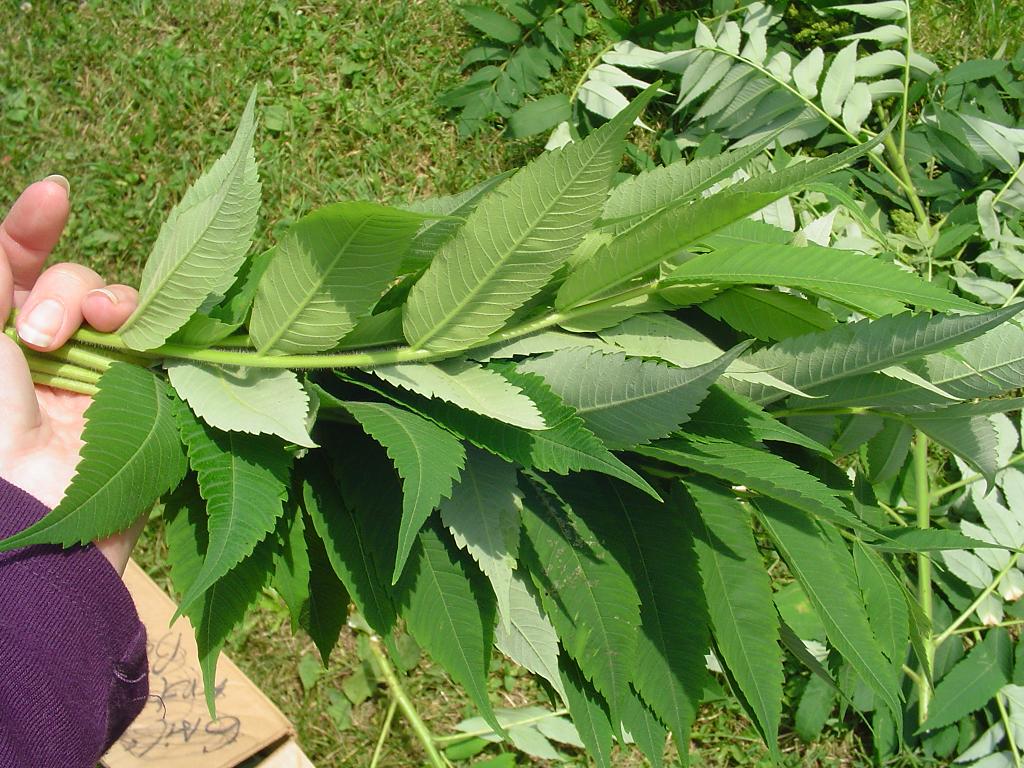
At this stage (June, new buds, fully leafed out), sumac has a main trunk with a couple branches & suckers with leaves. So I've read, it's the right time to harvest leaves & inner bark. Leaves can be harvested any time after they are fully grown, but the inner bark is soft now. Berries can be harvested after they are ripe.


I pulled the suckers off the main branches & stripped them of leaves, leaving the leaf-stems intact. This is fairly easy as the leaf stems are on alternating sides. Holding the branch upside down & doing a "spin & pluck" motion, it took me about 30 minutes to reduce the pile into leaves, trunk/branches & suckers.

Please note: I made a serious miscalculation of leaf-mass to box-volume.
PS... Clyde helped.


Now, very important, when Humans are stripping branches from trees for inexplicable reasons, Kitties must lay on their feet to make sure the Humans don't topple themselves as they are precarious, top-heavy creatures anyway (always tripping over things - like Clyde).


OK, so the pile is now reduced to 3 things: leaves, suckers & branches... and Clyde.
That's still only 3 because Clyde counts as one - always.


The main issue was finding a spot to dry the leaves. It takes up quite a bit of space & I didn't want a place where birds would mess things up. I settled on Punky's house (sad), and spread the leaves out on a canvas tarp to dry. I set the suckers upright in a few buckets to dry in case I find that they can be used as well... no harm in tossing them out later.

I will have to toss the leaves around every day until they are completely dry or risk mold. I should have some drying racks if I were doing this "properly," or I could have bundled the stems & hung them (from what?), but this seemed like a good solution for now.

Leaves will dye several colors, brown, yellow & gray depending on fabric & mordants.


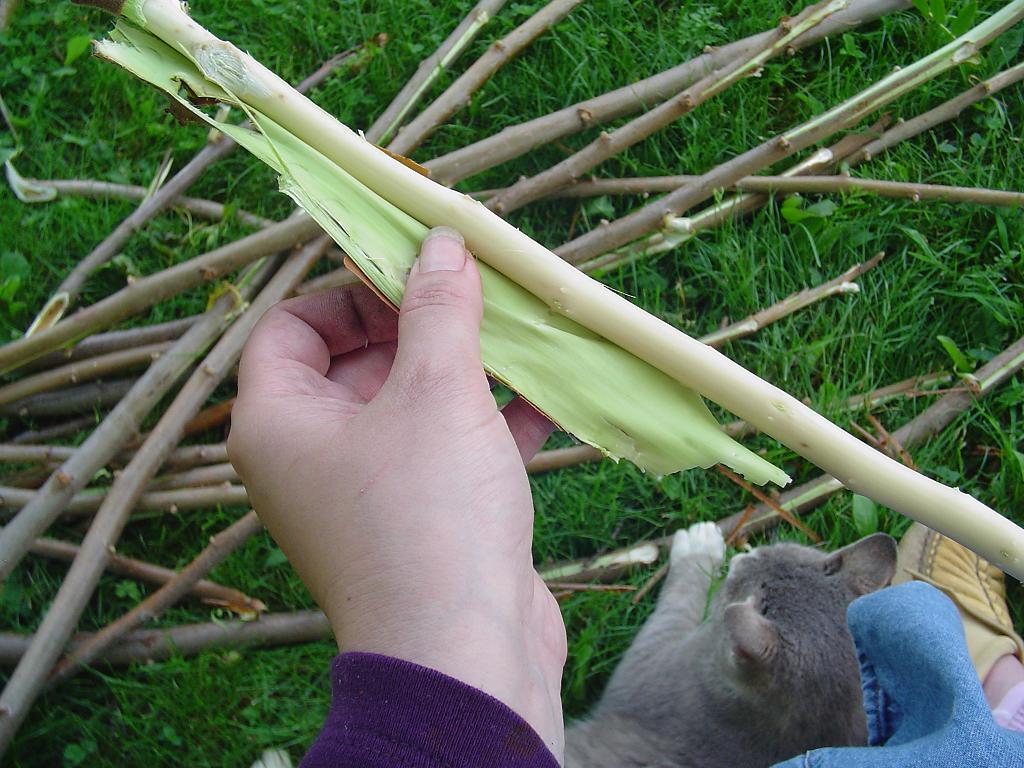
The next step in this adventure, the one I'm really after was skinning the branches for their inner bark. It's the bright green inner bark (Phloem) that we are after and it's fairly easy to get if you have a shady spot & help from Sweetie Pie.

I will admit that the sources weren't clear if I was supposed to take the Cambium too, so I did. It'll either be filler, or useful.

This dyes a bright yellow or a yellow-green.


2 different ways of doing this: stripping the bark with your fingernails, or using a knife. I found that I preferred to use my nails. Stripping from the top down worked best, as did removing the brown outer bark. When I removed it from top-down, it didn't take the green bits with it.

I'm not sure it's necessary to strip the outer bark, but all the info I found said the green inner bark is what is used. As it separated relatively easily, I figured I'd leave the brown bits off.

They are now compost.

NOTE: the Pith or most inner bark at the center of the tree also yields a bright yellow dye. Had I known this, I'd have split the sticks open. Alas.


After 3 trees & a huge pile of sticks this is what I'm left with, 1/3 of which is in the dehydrator right now... the rest will have to be laid out on newspapers for the night.


It took about 4 days of the inner bark being laid out on paper for it to dry. Fortunately we had nice, dry weather for those days. If the humidity had been up it would have taken longer.


7/21/11
The sumac leaves are completely dry. They may have been dry for a while, but I've had my hands full with other things & I figured they weren't going anywhere.

Easiest way to strip the leaves was to get a plastic grocery bag, set it open on the ground and one leaf at a time.
Holding the main vein I pulled it through my fingers & the leaves came off nice as you please. I was limited to one grocery bag because the dry bits are sharp! (also, the bird who built her nest in the building was having a fit that she couldn't get to her babies. Prettiest nest I've ever seen, she used the sumac berries & stalk bits to build it.)

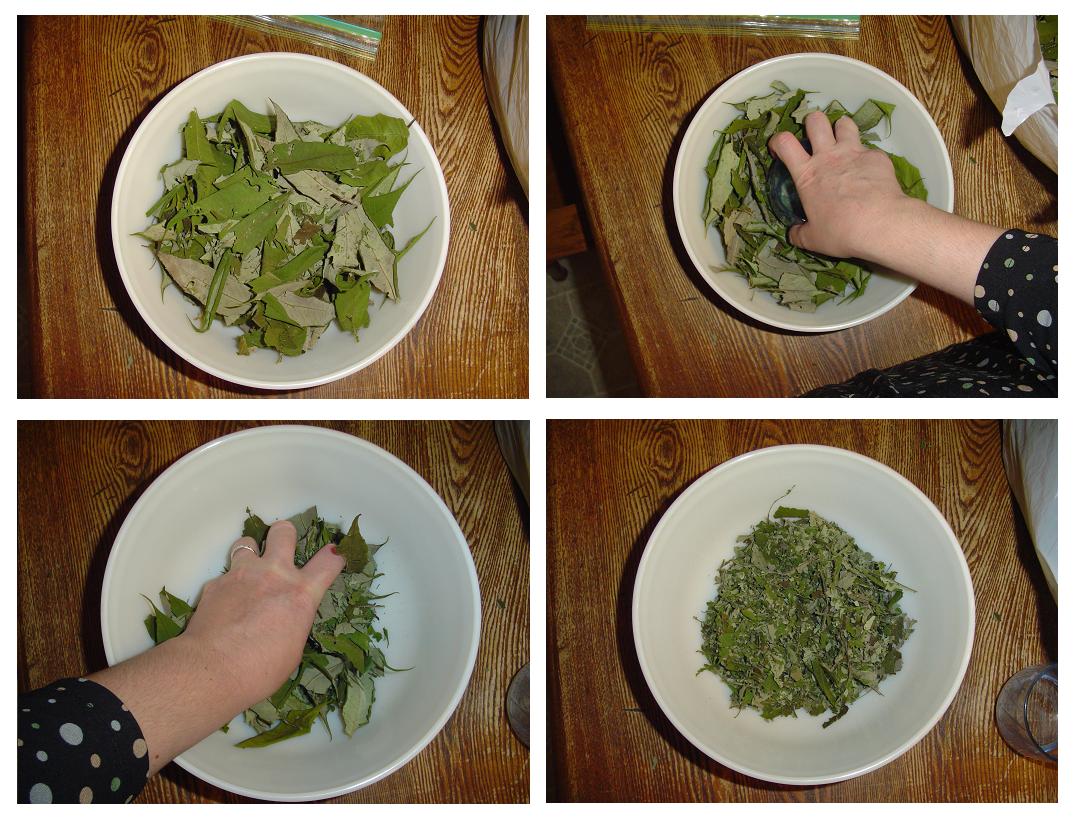
Back inside (100 in the shade today), I crushed the leaves & put them in a gallon bag. 1 grocery sack = 1 gallon in the end.
I put 2 handfuls of leaves in the bowl, crushed with a glass first & then ripped & crushed by hand. The leaves were rather silky & crushed easily. No splinters.
I did not powder the leaves because I figure that whoever is doing the final dying can handle that.