Thursday, July 26, 2012

1823 Goodridge Chemise

My wonderful friend Tamara loaned me this original "Goodridge 1823" chemise to share with all of you.
((Edit: T. tells me she paid $15 for this little gem at some random antique store in ME.))

(If this gets a bit fuzzy in some of the words, please forgive me... post-surgery days are always a bit fun when it comes to broken thoughts).  Fortunately for you, I took excellent notes & hopefully good pictures.

When Tamara offered me the opportunity to take a pattern & study this lovely piece of work, I hesitated only because it meant toting it through several states and/or sending it through the mail.  We took care to wrap it up & transport it safely.  Considering that it's rather small, this was not a problem.

Unrolling the shift/chemise for the first time was rather exciting.  It's a lovely piece, in excellent condition, only a few stains from the original wearer, with a couple age spots and one split in the CF from a grade-school show & tell mishap.  

Here you can see the 1/2 view of the chemise, which shows the shape of the side seams quite well.

 (I will try to get the pictures to orient themselves correctly, but no promises on this new format).
Here is the chemise laid out flat in all its wrinkled glory.

It is made from a very tight weave fine linen, with a small twill tape trim on the sleeves.  Seams are welted to the Outside, or butted and whip stitched.  Neck binding is pieced & cut on the grain, and folded over to the inside.   There are 11-24 stitches per inch depending on where & what technique was used.  It is a very fine piece of workmanship.

The chemise measures as follows:
Shoulder-hem: 43"
Front neck - hem: 38.5"
Back neck - hem: 40"
Back width: 21"
Neck-hole width: 13"
Shoulder width: 4"
Bust (flat) 24" (total of 48")
Hips: 29" flat (total of 58")
Hem: 76" total
Side gores: 20.25 long, 7.25 wide (2 on each side)
Sleeve length: 7.5" with 0.25" trim
Sleeve width: 12" (total)
Sleeve gusset: 4x4 finished
Sleeve set in: 10" down
Distance between gores on side seam 16" (side of chemise)
Hem turn-over: 0.75"


In no particular order...

The neckline is cut 13" wide, and 2.5" down in the back, 4.5" down in front (finished), on an oval shape.
The binding strip was cut on the straight, in pieces to help go around the corners, and then turned under and hem-stitched to the inside.  The first seam is about 15 stitches per inch (the one attaching the binding strips), which you can see in places on the outside edge.  The hemming was done with 11 stitches per inch. for a 1/8" - 1/4" wide finished hem... it is narrower going around the curves.

You can see (picture at top) where "Goodridge 1823" was printed in what I believe is walnut ink at the CF edge, (I can't be sure of this as age may have dulled the original color).

The sleeves and side seams were initially sewn with 6 tiny running & 1 back stitch on the outside, and then welted under with careful whip stitching, approximately 14 stitches per inch.

The side gores were first butted together on the salvage edges of the chemise body & gore straight edges and whip stitched in a tiny 22 stitches per inch seam. (The body & gore are sewn straight edges together).  Then the entire side seam was constructed towards the outside, and was folded over into a welted seam.  This leaves the center of the gores a bit lower than the rest of the hem, which was not evened out, it was just hemmed as-is (below).

The hem is a consistent 3/4" deep, with about 14-16 stitches per inch in a diagonal & straight hem stitch.

The sleeves were constructed as one component and set in the side seam... again, all seams are on the outside, except for the hem on the cuff, which is turned under and overcast, and the twill-tape trim folded into shape and tack-stitched to that.

The following pictures show the sleeves in various views.  Hopefully you will be able to make them large enough to see some of the details.

Left Sleeve.  You can see the trim, neckline & seams clearly here.  The gusset was cut on a square and folded over.  There was a bit of shaping to the armscye on a diagonal cut to help shape the sleevehead to the body.

Detail of trim & cuff hem.  I hope you can see the tiny stitches used to create the hem on this.


Finished Cuff Trim.  The twill tape was folded to accomplish this rather elegant trim detail.

Finished Cuff with a tape measure for sizing purposes.  The trim is remarkably even, but not perfect.  I did not find the starting & ending points of the trim, it was that well hidden.

Last detail of the trim.  If I ever get this ambitious, someone give me a gold sticker, please.

There are minor sweat stains on the front bustline where a corset would have pressed the cloth to her body, also around the back.

There is one small repaired tare along the bottom hemline that is so well done I was amazed that we found it.  It was certainly made by the original owner, as the stitching is identical to the rest of the garment.

The purpose of making this blog post was to show an original 1823 chemise to the public for free use.  The original "Goodridge 1823" chemise is privately owned, and I have full permission in the form of a big "Yes Please!" to publish the particulars.  It is our hope that this will help you in your research & costuming adventures, no matter what they may be.  We do ask that you not use this post to profit commercially (ie, make a pattern for sale), as those permissions are separate, but please do use it for educational & recreational reasons!
As this chemise is almost the same as any chemise/shift from the 1650's on, it would not be possible to prove our case, but please be honorable.

Wednesday, July 4, 2012

Solar Dehydrator for Dyestuffs (or whatever)

It Dries!
It Dries Dyes!
A while back my electric dehydrator decided to fizzle out.  The fan stopped working, so while it goes round & round, nothing is happening.  On the 3rd day of trying to dry some sage, rosemary & cilantro (food), I about had a screaming fit & just shoved everything in paper bags to finish drying. 
Around that same time I saw a FB post of the prettiest garden box ever... turned out to be a solar food dehydrator.  Massively cool.

At that point, I decided that low-tech is better & as the "sun produces enough energy in one day to power America for a year," or some such like that, Solar it is!

I looked up various versions of a solar food dehydrator & decided to go with one I could build & move, and store inside when not in use... and one that I could make from materials on hand.  The one I ended up building is similar to this
http://www.territorialseed.com/product/13577/online_specials
except not nearly as pretty & it sits on a table, not on legs (see above).  Also, no nifty temp gauge. 
If you don't like this design, or don't want to pay that much for one, just go to Google Image Search & type in "how to make a solar food dehydrator" and about a million plans will pop right up, from super-fancy to cardboard box versions. 
There is a pdf. instruction guide that I saved but can't find again "dehydrator guide with photos" and "dehydrator plans" that is really decent.

I did make the door open up vs. dropping down because while I like the shelf idea, it was just too big to be able to reach the front of the dehydrator without some serious gymnastics... and we all know stuff is going to fall at some point.  A hook & eye safety latch will take care of the "crush your head" issue.

Materials:
Purchased:
$5 Garden plastic for my "black" bits & about $7 on hardware (screws, staples, hinges) for a total of $12 in purchased materials... I may have to calk the cracks for more efficient airflow, which would bring the cost up to around $15.
Re-used:
I used scrap wood on hand, bits left over from when my parents built the addition on the house, scrap lumber that was too short for other things or too knotty for structural projects & an old window that I /think/ came out of the laundry room that they tore down years ago.  The frame is in terrible shape on the outer edges, & the glass is cracked in one place... but for this, it'll work.  I used some old metal shelves that came from ??? for my drying racks & I can put gauze or smaller mesh screen or whatever over them as needed.  Paint was left over from the addition, (which still needs more paint in places).

Since I'm using it to dry dyestuffs, not food, the food safety aspect wasn't a huge issue for me.  I was able to skimp on the food grade screens & I didn't worry about the low VOC plastics or paints.  If I ever do want to dry food, I can always switch out the screens & find different plastic (it's just stapled in).  The paint should be fine after a few weeks anyway, but please do your research if you are going to use this for food; we get enough toxins from commercial food - no point adding them to your home-grown stuff.

The basic principle of the dehydrator is that the air comes in the bottom front opening (screened over), flows up through the airspace & exits the rear top opening (screened over).  The window lets light in to provide the means of heat (sunlight).  The black in the bottom & back wall heats the air as it goes through.  It's very much like a car in a parking lot. 
You can control how much heat & light get in by turning the box toward or away from the sun, and blocking off airflow, or covering some of the black with white cloth, etc. 

While I'm not sure how long some things will take to dry, it does work quite well.  My sage was dry in 2 days & so were the day lilies that I'm collecting for orange dye.  The Queen Ann's Lace seems to be taking a bit longer, which is interesting, if nothing else.

It does have to be taken inside when it's raining as it will wear out quickly if left out in the weather.  You could potentially make a weather-proof cover for it, like the ones they have for gas grills, but personally, I'd rather just bring it in.  In theory, you could use it in a window in the wintertime.

Should be loads of fun, and it's already proving useful.  I don't have to worry so much about things molding or getting rained on if a little sprinkle comes along, or the cats spraying on my dyestuffs (yuck), or a million other problems that come with open-air solar drying.


Tuesday, July 3, 2012

Random-Medievalness in Gail-Land


1180's outfits.

I have been a very bad girl & not posted anything lately.  THINGS have been happening in my personal life that have made me throw a few other things by the wayside.  Fortunately, Things are getting straightened out after much to-do and sadness & we are nearing a resolution to the Issues. So, in light of this grand personal news, I now have a few topics to happily ramble on about!

Like... some of what I've been working on!

John & I decided to try Medieval Stuff.  Lots of fun being the Newbie! 

My Quest for Bust Support will eventually lead me into the 1400's & 1500's, because the 1100's are sadly lacking in that department, though not for lack of trying on my part.  I also like mid-plague society infinitely better than late Dark Ages, for whatever reason.  John prefers the men's fashions to the whole legging/hoes tied-to-the-belt situation. (Wait till he finds out he has to wear a codpiece with those fab jerkins).

Mirror, Mirror On the Wall,
When's the last time someone
used Windex on you?
The first try at Lift was this creative-canvas job.  It's built off of my 1820's stays, which is the equivalent of a body block, and once clothes are over it, it does a decent job of costuming me up like a Chartres Cathedral Matron... one of the fatter ones, if there is such a thing.  NOT a time frame that flatters my natural form.  No evidence of bones used at this time, so it's a total Creation in the best & worst sense of the word.

It's OK.  It works.  It'll also work for 1820's & 30's if necessary.


1180's Pink Thing
You can see how terribly unflattering this  pink cote is on me... After seeing these pics I changed things up a bit.  I made the other cotes side lacing, gave them a bit more shape, tried not to look like Girl In Sack Attacked By Strawberry Ice Cream Smoothie Machine.

It's hand-finished so I'll have to pick out my lovely stitching to turn this into something worth wearing.  I did make 2 others, one in burnt orange with white facings & one in a lovely brown linen that requires a belt so as not to trip me up.  Both are infinitely more flattering than this, but I am lacking pictures... our first event was Celtic Fire Festival, and we were Kitchen Help.  We forgot to "smile for the camera" until we were driving home, then it was too late.

I'm so terribly thrilled with it, can't you tell?
The second try for Bust Support was this lovely construction, made after the Bath House Babes of 1380... controversial, yes.  Ask my chest if I care.
Again, based off of my 1820's stays for sizing, but simplified to front & back blocks, with triangular gores in the sides & one in the bust.  Adjustable shoulder straps that have since been adjusted farther "up."
No boning, just cording, which does the job fine.  Again, no historic evidence to support this manner of support, but as it supports me quite well, I'll swallow a bit of anachronism in my historic cocktail.

It does sit straight once it has time to "relax" onto my body, and my posture isn't usually so terrible.  Must have been One of Those Days.  Horrid picture of me... why am I posting it?  Oh what I do for costumes!

1380's Bath House Babe Rendition
Here is a lovely close-up of the sides.  After talking with Charlotte, she suggests the next one I make be tight only to 2" under the bust, do a full fitted shoulder strap & neckline, and it should give me both the lift & comfort I want without the need of cording.  I think her theory is sound, we'll see if my Upper Regions agree.

It lasts for about a day & 1/2.  Then the linen & hemp start to sag around mid-day of the 2nd wear, so I'd need several of these supports for a long camp.  (Yes, I'm allergic to hemp, but it's totally encased in linen & this will NEVER touch my skin, so I think I'm safe).


SHOES!
The shoes!  Ah, turn-shoes, how I love/loathe thee!
I love how they "turn out" (ha)!, but making them is a total pain.
I tried it on some lasts, and it helped a little, but I ended up just stitching them & then flipping them right side out... which takes more time & effort than is pretty, and requires closed eyes to magically accomplish. 
(BTW, this is what happens to my ankles after eating a doughnut.  Doughnuts are BAD, do not eat doughnuts.  Doughnuts have barley, and barley is BAD.  My wrists were not quite as bad as this, but it was still awful).
Anyway, the toes have some issues, which I'm slowly learning to resolve.  I've also learned how to put a welt in between so I can glue & stitch a harder sole to the bottoms.


Thus ends my Medieval adventures for the time being. 

I've moved on to 1800's to try to finish up my remaining orders before I'm down from surgery.  We all know that'll never happen in time, but I think I can get the main ones out of the way before it's Time To Stare At The Ceiling  again.

Edit
8/17/12:
Please go read this.....
http://www.historyextra.com/lingerie 

Friday, June 1, 2012

American Duchess "Yay"!

They Are HERE!!!
I just ordered the Pompadour shoes from Lauren & am quite excited to see them. 
So, today is the last day for pre-order on these darlings.  Just so you know.  The good news for all of us is that they are going to be produced as a line because her pre-order requirement got filled.  Yay!

http://www.american-duchess.com/shoes-18th-century

I got the Georgianas when they first came out, and they've held up quite well.  I still haven't decided on a dye color for them, and I've gone & ordered another white pair of shoes (groan)... but the blacks just didn't thrill me quite as much as the prospect of being able to make them look like the to-dye-for (ha) V&A shoes below.


The shoes are very good quality & a very good price.  Honestly, I'm planning on wearing these quite a bit & not just at historic events.

I'm afraid, for a girl who spends most of her life barefoot & has gone years with exactly 2 pairs of every-day shoes, I'm becoming a bit of a shoe-horse when it comes to historic shoes.

Friday, May 25, 2012

1880-1910? Walking Dress?


I was just gifted another lovely antique dress, and I honestly have no idea what the exact date of it could be.  Best guess is 1880-1910.

The dress has no accompanying information, other than "the Ashville, MA Historic Society didn't want this," and I'm more than delighted to have it!  Again, thank you Suzi!

The silk lining on the front of the jacket is in shreds, but I believe I can stabilize it without too much difficulty.  The top of the skirt is another matter.  I hesitate to even consider touching it, it's in such bad condition.  The bottom of the skirt is in perfect condition; unless you count a bit of drag-dirt as damage & some busted pick-up ties.
(skirt is a stock petticoat that just matched in color, not part of the original outfit!)

This is the front piece, it closes with 5 hooks & eyes at the back of the neck & then fastens on to the front by hooks & loops at the sides.  One side of the bottom front has been either taken out or torn out.  The original folds are still easily visible.


The embroidery is really quite striking & very Art Nouveau. 

It is in excellent condition, no picks, no runs, no damage of any kind.  The satin is in excellent condition.


The sleeves are absolutely lovely, and one of the things that makes me think "walking dress" over Day Dress or any other kind of gown.  It could also be a traveling dress, but as I don't know enough about this era, I really can't say.  Please don't take my word as golden, I'm out of my depth here. 

The right sleeve does have a couple blow-out places along the elbow,  but otherwise both sleeves are in excellent condition, including the underarm areas, both inside & out (amazing, really).


The back of this bodice is striking, and has a multitude of pin-tuck pleats.  I'm really thrilled with how charming the back is.

The entire garment is machine sewn, with a few hand-finished areas, like hooks & eyes.

I have (had) not photographed the skirt on a dummy because the silk is in terrible condition.  The waistband is completely shot and may not be repairable (but is a replacement!  Yay!).  The upper portion of the skirt is blown out in many vertical splits which are repairable with care. 

I believe that the silk was treated with some metallic solution to make it heavier, which was a common practice in the late 1800's & early 1900's, but that makes the silk very, very fragile. 


Suzi & I did put the skirt on one of her dummies, and at that point, I readjusted my estimate of 1910's back to a possible 1880's or mid-1890's.  The skirt appears to be a bell shape, but one that would go over a fairly large bustle & may have had an overskirt to match.  This may not be the case, and I will have to examine it a little more before I reach any definitive conclusions.

 It does have a wonderful silk bow that has frayed in it's tied state, and will remain so for as long as I own it.


I have very little experience with restoration, and so I'm not going to be diving into this project with any kind of urgency.  It's lasted this long, it can wait a few more years until I can either pay a professional or gain the skill necessary to save whatever can be saved. (Yes, it came in a garbage bag - much as all good "finds" do).

Ultimately, I will be making a pattern based off of this outfit, but for now it will get packed away in a nice, acid free box with tissue paper to help protect it.

Here it is just pinned on, but you can get the general idea of what the whole outfit looks like.


I laid the skirt flat so I could see what the general shape is, and it's a bell with a shorter front & longer back, cut in triangular gores, which probably have curved seams (but I haven't measured yet).  The wool is appliqued on & tucked up, and the bottom is quite stable. 

Here you can see the inside, which is interesting in itself.  I like the reinforcement areas of the black linen for the upper decoration.

Tuesday, April 10, 2012

18th c. American Women's "Jackets"

The question of late 18th c. women's jackets has come up on several blogs & discussions, and rather than Over-Post my findings in their comment sections, I'll post them here.

The results of my search are murky & not as overwhelmingly positive as I'd like, but I think we have a definitive "yes, jackets were worn in America" if we properly define "jacket."

A "jacket," by my definition (and backed by several written sources) is similar to "sweater" in terms of the broad use of the word.
Ex:
a sweater can be a
pullover,
cable knit,
cardigan,
vest,
v-neck,
turtleneck, etc.
Just as a jacket can be a
shortgown,
bedgown,
or even occasionally, pet-en-l-aire
waistcoat, (what reenactors improperly call a "bodice")
Brunswick style (with it's 12 names, but Irish Hood seems to be the preferred NY tag),
caraco (which just means "jacket", please stop calling it a "caraco jacket", but it is a specific cut)

BUT, for just a moment, I'm looking specifically for the jacket that Hallie Larkin of At the Sign of the Golden Scissors is talking about, which is a fitted back garment with front closure (either stomacher or straight) and skirts (either attached or separate seam) to no lower than mid-thigh level. If you aren't familiar with her blog, go read it. She is conservative in her research & refreshingly picky with her terms. (if you haven't figured it out, I'm a generalist).


I've found several written references to women wearing jackets, and a one example of an imported jacket that was owned by an American woman.

"Miss Patty Parsons, cut up the embroidered sky blue satin waistcoat which had been worn by her grandfather at the English court, and who fashioned therefrom a "jockey" which was deemed "wondrous becoming." 1775, America (probably Philadelphia)
"A troopers scarlet coat was made into a beautiful jacket for a fair girl, and from the little pieces cut from the coat-tails, lapels, etc, were fashioned a perfectly fitting pair of warm winter gloves, bound with gray squirrel fur which also furnished a collar and cuffs for the jacket." 1775, America.

However, most seem to be what we would otherwise call shortgowns, bedgowns, and other informal style "jackets." Names mean quite a bit if you can pin them down.

In the Virgin Islands, you can see the widespread use of the shortgown/waistcoat/jacket as the working woman's outfit. No, it's not continental America, but the Virginia slaves & white working class seem to wear almost the same things.
http://www.lennoxhonychurch.com/brunias.cfm

Here are some slave advertisements describing clothing worn when they ran away. I would call the illustration a shortgown or waistcoat, but it also has the very wide neckline & tabs or skirts of a working class "jacket," (illustration).
Outfits of matching fabrics, even if they are a petticoat & top are occasionally called gowns, though in this instance I think it's probably a genuine gown (written).
http://www.accessible-archives.com/2011/05/10-southern-us-slave-advertisements/

It is highly unlikely that we have many working-class jackets, as very few would have survived. The Pennsylvania shortgown survives as it was so prevalent through that area. There is a little debate about how widespread that style was, but there are enough records to support it's use through New England & the Middle Colonies. This particular "jacket" or shortgown was considered quite ugly by recent English immigrants, they were shapeless, often made of homespun & were said to be a single layer of fabric (so the quote says, though surviving examples are often reversible being made of 2 imported printed cottons).

There is a silk Spittalfields jacket of 1780 in rather poor condition (with provenance) that belonged to a woman in VT. Unfortunately I did not note the source of the image, I believe it was an auction site (Vintage Textile?), but it could have been Boston Museum of Art? I kick my years-ago self for not keeping better image records.

The Met has this jacket, which I would call a bedgown, listed as American or European - not definitive. The fabric is most likely European, but the garment assembly could be either.
http://www.metmuseum.org/collections/search-the-collections/80036043?img=0
When the museum doesn't know, causal researchers are in a hopeless bind.

It's important to remember that many people ordered the latest fashions from Europe, and that many competent seamstresses & tailors here re-created those styles. So it's plausible that English (Spittalfields) jackets were worn in our major urban hubs, and that many French fashions were also brought over. "A gown in the latest fashion" and "A suit in the latest fashion" are very common clothing order phrases. Also, to save money, people would often order a pre-cut, but un-sewn garment "to be made up."

I do think it's important to recognize that very few of the surviving examples of fancier jackets in the French & English style have American roots. The one above is the only example I've ever found that was definitely worn by an American woman, in America - though it was imported from England.
It's also important to remember that immigration has never stopped. People (women especially) did not just dump all their possessions in the Thames & arrive here in the Colonies with nothing but a shift on their backs. Trade, goods, people & their belongings & styles went back & forth across The Pond on a regular basis. Not everyone traveled, and not all the time, but we have enough evidence that we know America did not exist in a fashion vacuum.

This is not to say that I want to see hundreds of silk embroidered fancy jackets at every reenactment from Quebec to St. Croix. Research your fabrics, region, cut of the "jacket", station in life & other assorted necessities. But please don't hesitate to buy a good quality jacket/shortgown/waistcoat/caraco/Irish hood from vendors, or buy a pattern to make your own - as far as I can tell, they are correct for the Colonies and (in some cases) early America.

Saturday, March 10, 2012

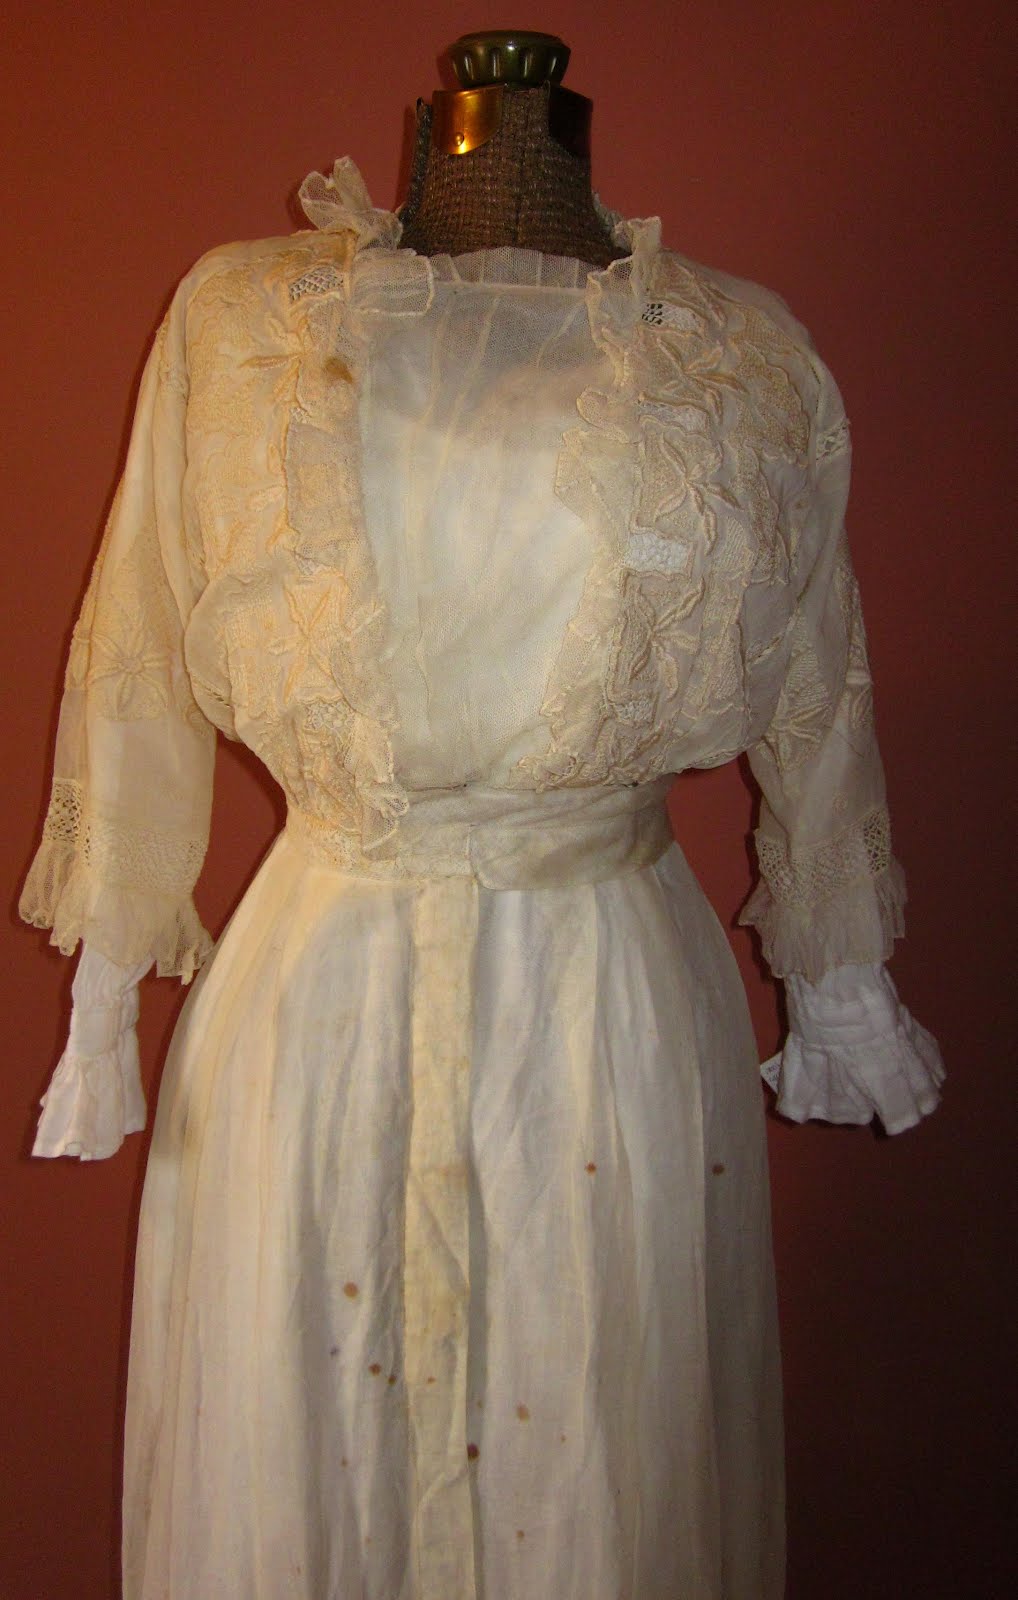
1900-1918 Wedding Dress

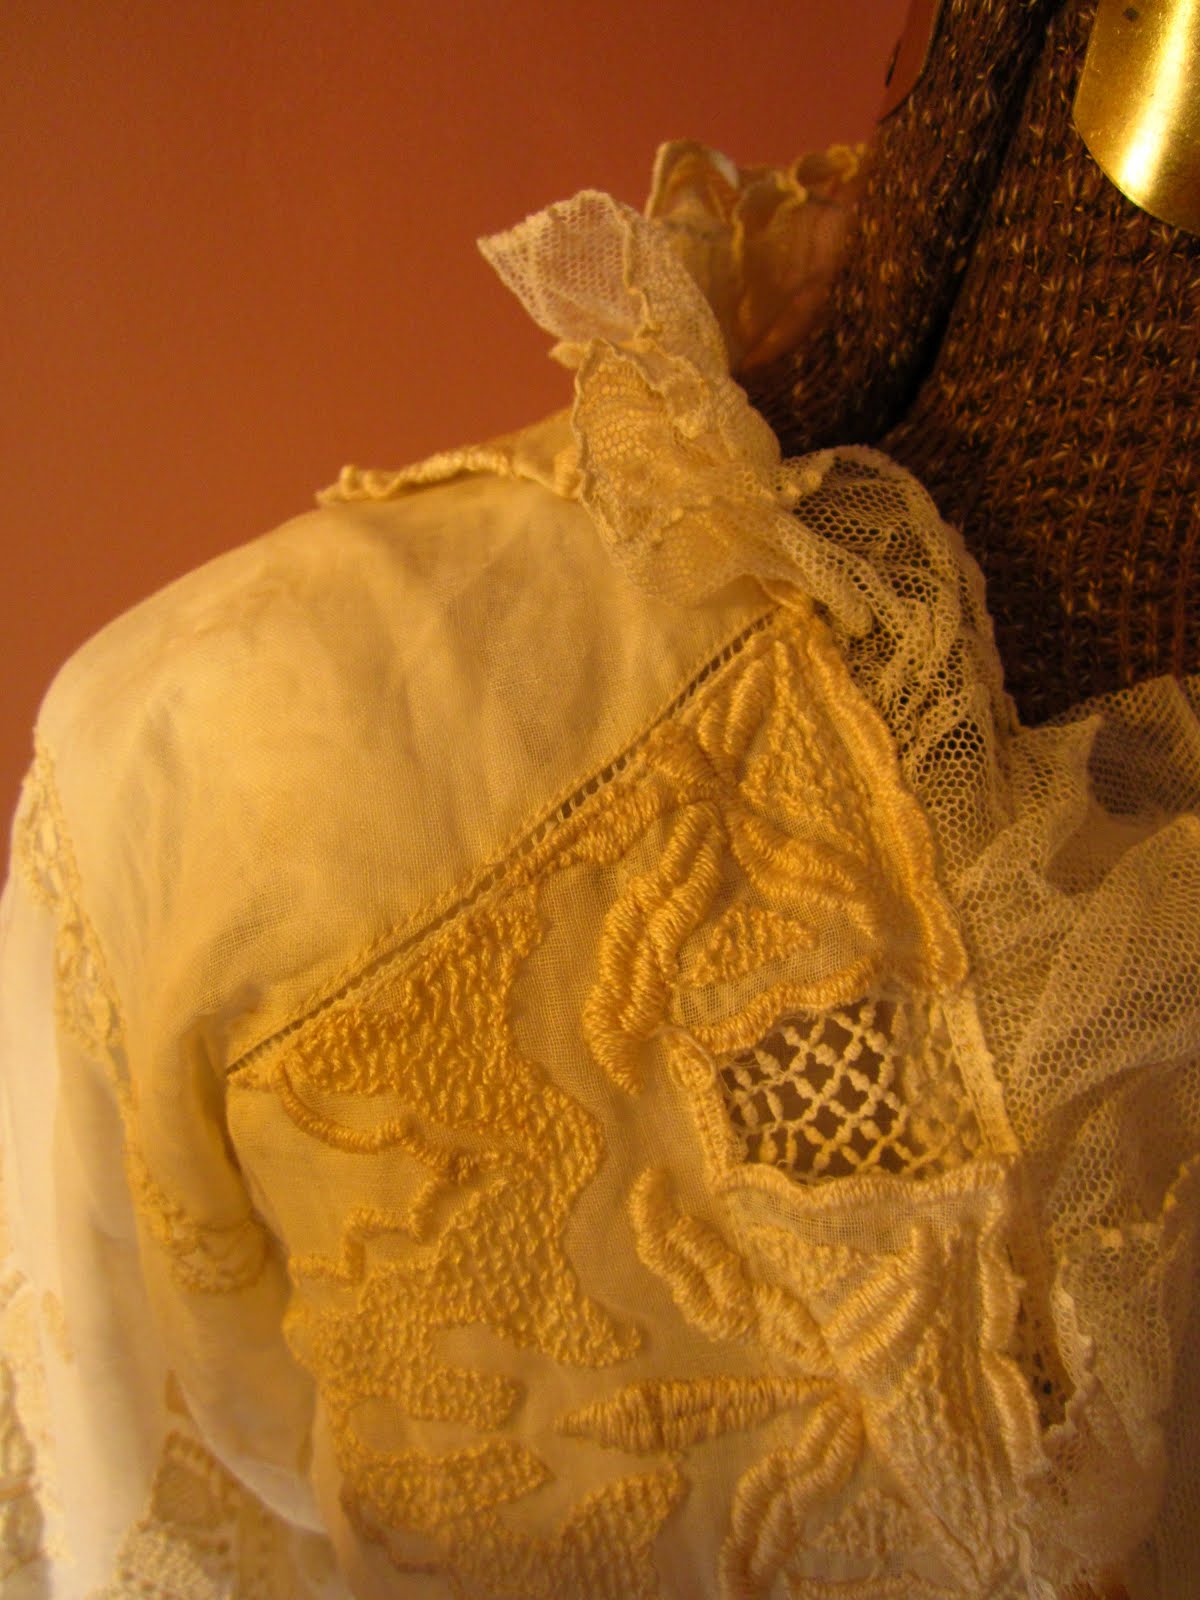
This is a 1900-1918 wedding gown that I own. It was gifted to me by a friend many years ago & I've finally gotten around to photographing it.


The family story was that Grandma Bernice "Burnie" was married in this dress, in Australia - I believe just outside of Perth. 1908 is sticking in my head, but I just don't remember. She was a rancher and a rancher's wife, of small stature & slight figure, very wiry & tough. She lived to a ripe old age, had 7 children, and her wedding gown made it to America with one of her daughters, who's daughter then gave it to me because "you'll like it, it's just trash to me."
It's true that one woman's trash is another woman's treasure.


The dress is in near perfect condition. It is all machine sewn, and is made of early machine lace, netting & lightweight linen. It has some age stains on the front & is missing 3 snaps on the center back for the belt.
It fastens down the right side front with snaps & the belt wraps to the left with snaps.
The waist measures 22" when closed.
(pictured over one of my stock chemises)


It is not a rich woman's gown by any means, but is a lovely example of a working woman's wedding dress.


Now that I've shared it with you, I'm putting it back in it's box.