Tuesday, November 27, 2012

Wool Picker

Wool Picker

Due to the mountains of fleece that I feel the need to get through, I wanted a faster way of turning them into an even bigger mountain of clean fluff.

So I looked up how to do that & discovered a wonderful little (terrifying) machine called a Wool Picker.
You can buy a few different versions here:  http://www.woolery.com/store/pc/Wool-Pickers-c606.htm or you can get plans for a few dollars online (just google it).

BUT, the cheapskate in me couldn't see paying $200+ for what amounts to a wooden box with nails stuck in it when I have scrap lumber, nails, saws & screws here.  So I looked at a few different versions and picked the best one for me (the one I wasn't terrified of), and went to the basement with safety glasses on & power tools in hand.

Here is a very basic open ended box wool picker.
It's made from pine boards (that used to be the cellar stairs that broke), 1 1/2" wood screws, 3" finishing nails and a 1" dowel... 2 2" screws for the handle.
It works great, but if I ever do it again, I'll use hardwood & space the nails at 1/2" apart vs. 1" apart in each row, though I'll keep the 1" between rows.  I also wanted it to be 36" long, but the boards were only 32".

The teeth of the picker don't actually meet, they are > < this far apart so the machine moves freely. 
You aren't trying to rip the fibers between the nails, you are trying to catch & separate them.

I'm just going to upload the pictures & do the basic "how I did it" in captions.  So, Enjoy!

Also:
WARNING!!! This is NOT a toy!  Do not operate this machine around cats, dogs, children or other curious pets or people.  It WILL rip you apart.  I highly recommend wearing thin leather gloves, or failing that having an updated tetanus shot & band-aids on hand.  Also a wire tool to pull the wool out from between the nails is preferable to using your bare fingers. 
DO NOT operate this when drunk.  Not even one glass of wine.  Seriously.  It'll cut you.

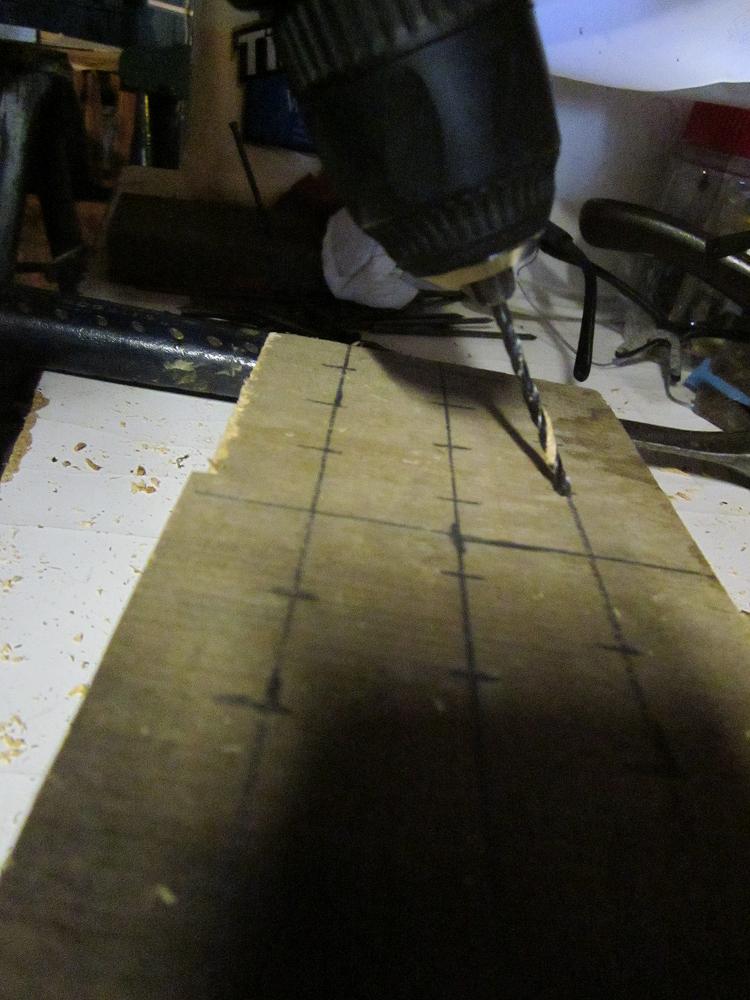
Mark out nail hole placement on 3 spike boards
I used 3 so that I could change the direction of the board, not the drill.


Drilling holes on an angle. 
If you want to be particular, use a guide.
(You can also drill straight, it works just as well)
Drill into another board so you get a clean back.

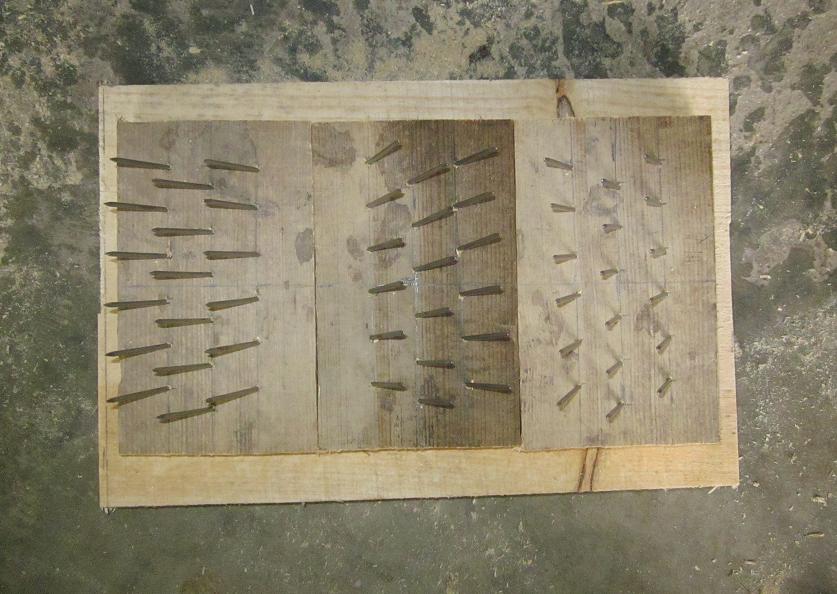
Nails in from the back, so the pointy bits come out the front.


Nails coming out the front.

3 spike boards finished (3 more to go for the handle)

Baseboard, spike boards & sides.
2 more "feeder" boards go on either side of the spikes,
mostly to have something to screw the sides into.

Closeup of the angled nails.
IN, Center, OUT

Feeder boards & Sides screwed on

3 more spike boards for the top and the top runner board.
Close-up of the top unit

Base unit & top in all their spiky scariness

Top & Base unit together

Into the Maw of the Dragon
(the nails are too close, I had to add more to keep them from scraping)

Do NOT put your hands in here.

Intake side.

More scary.
Now with 1/4" molding so the nails are not touching!

The finished wool picker
Detail of the handle
I could have done a much better job, but honestly, I was tired & it works.

Wool locks.
You'll need to hand-pick these apart &
remove anything you don't want mixed in with your final product.

First pass through the picker.

After 3 passes through the picker.
The Finn took 5 passes, so not everything is this easy.

The wool doesn't come out 100% clean, but the picker removes most of the VM.  As with any wool you want to spin or felt, throw out anything with 50% or more VM in it.  It's just not worth it & it'll wreck your yarn.
You have to use clean wool for this... no spinning in the grease if you want to use this machine.  The lanolin will make a mess of the nails, so only clean, dry wool, OK?
You also have to do a bit of prep work, just like you would with hand-picking, flicking, combing, carding, etc.  Break the locks up & start to break them apart a little.  Run it through 3-5x until it looks like it'll card well.  Discard any stubborn bits.  Dump the dust out every 3rd batch or so.  
I suggest filling up your intake box because the picker likes to have enough wool to grab onto... but don't pack it in because then it won't work.  It's simple, you'll figure it out.

This was MUCH faster than hand picking.  Not for every yarn type, but for a nice woolen with a stubborn fleece, it was about perfect.


To my knowledge, this is not a copyright design and no infringement is intended (certainly no profit was made).  It's a scrap wood project, that I hope will make my spinning life easier & please feel free to use this, or modify the machine to fit your own needs.

Tuesday, November 20, 2012

Emotionally Invested

This is going to be a little personal, but maybe more philosophical.

Today I got a FB "invite" to some Event on "why I should hate this blond lady for being a jerk at Arlington National Cemetery," or something like that.  Honestly, I didn't bother reading it, I just declined. 

The reason I declined was based on what I think of as Total Emotional Investment.  This is the amount of emotional energy that I have within myself to care about everything that I care about.  I care about many things, both real and conceptual; but in the last 2 years my focus has narrowed to the things that truly matter to me.  In the last 6 months it has narrowed even further, and I've had to give up caring about many things that were dear to me.


At the moment, my Emotional Reserve (the amount of energy I have which is set aside for random stuff) is rather low.  I'm tired.  I'm sad.  My blood pressure is screwed up.  (Cancer is gone!  Happy-face!)  But if it's not something that is directly impacting my life, I just don't have the uumph to put into it.  If it requires that I get angry, it needs to be worth me risking my life, or another stroke, or a heart attack, or at the very least another 3 days of Headache/Dizzy.

Some blond chick who has no manners or good sense?
Not worth a drop of my Emotional Reserve.

Some random obnoxious troll-chick who is horribly offended that I don't have the energy to care about some random rude stranger's 30 seconds of Rude Behavior immortalized in colored pixels?
So not my problem.


Before you scream at me, read on...

Yes, we have a sacred trust with the dead.  Culturally speaking, where we lay our dead to rest is sacred ground, and that should not be violated (never mind that it IS all the time, but that's another story).  It's why we are so horrified when punk-ass kids tip over tombstones.  It's why we are enraged when people steal bronze grave markers, especially from our veterans, our Honored Dead.  It's both a civil & moral crime that cuts to the heart of that sacred trust.  It's shameful.  It's disrespectful.  They are horrible people & deserve to go to jail for desecration.  Tombstones are also expensive.

But the dead don't care.
They don't care if a teenager tipped over their headstone or if it stands until time & rain wear it away.
They just don't.
If & when those trumpets sound, I promise they won't need a written reminder of their own name.


Those soldiers in Arlington... our great men & women who died fighting under our flag; they didn't hear her.
If by some strange twist of fate, some spirit or soul lingers there, I'm sure their shoulders are broad enough that they would not be wounded by the momentary actions of some vapid twit.
The people harmed here are the living; those who were there at the time grieving for their grandfathers, their lost loves, their brothers & sisters in arms. 

Now, who is served by hating this particular idiot on a social media site?
No one.
It certainly won't make her care or apologize.

What it will do is get a whole lot of people riled up about a person who will never change, and will likely brag to her friends that she got so many thousand people on FB pissed at her for less than 30 seconds of effort on her part.
She thoughtlessly made fun of a sign and showed her total lack of respect for that place and what it means to our nation.
That's it. 
Petty, yes.  Stupid, yup.  Disrespectful, oh yeah.
Worth my hate?  Nope.
She's not worth it.  You have to mean something to me to be worthy of my hatred.

Bandwagons have never exactly been my thing, and witch hunts even less.
Quite frankly, I just don't have the Emotional Reserve to be angry at that level of insensitivity & stupidity. 
If that makes me selfish, so be it.

I've already given both of these girls more than enough of my time; and yes, a few of my tears.


What I care about right this minute, right now in this week of Thanksgiving, is my family, my home, my job, this silly yellow waistcoat with ten million buttons, my cats, my friends - new, old, face-to-face and online, and I guess The Rosie Dog if I really have to.

I'm thankful that I'm alive, that my husband still loves me, that I'm recovering & improving every day, that the cancer is gone, that I'm warm, fed, loved... that I have people who I love.  I'm thankful that my boss can't fire me (haha).


I'm hopeful that we will have living children someday.  That I'll be able to drive again soon (without a babysitter), that things will go back to normal... that I'll find those IQ points I lost after surgery... maybe a few memories that I know are hiding in here somewhere...

My days are filled with sewing and cats, my parents & husband; spinning some days, photographs others.  A walk when I have the energy for it, history lessons when I don't.  (Rosie Dog, if I have to)...

Those things are simple and very personal.  They are also the truth.  It's what I have room for right now.

Saturday, November 3, 2012

How to Count Centuries

JMW Turner's "Stonehenge" was painted in the 19th c. (1828)


An important note on how to refer to the century you are talking about correctly:

Today's date is November 3, 2012. Which means we are in the 21st century.


If someone says "14th century" they are talking about the 1300's.
 

This is an easy concept once you understand how it works:
- The 1st century began in the year 1 AD (Anno Domini) /CE (common era). It ended in

the year 100 AD/CE.
- The 2nd century began in the year 101 AD/CE and ended in the year 200 AD/CE.
- The 3rd century began in the year 201 AD/CE and ended in the year 300 AD/CE

See how that works? You take the numerical date + 1 to get the century. 
Ex: "1776"  17 + 1 = 18... therefore "the year 1776 was in the 18th c."
 
 
Quick Reference for everyone:
1st century = 1-100 AD/CE
2nd c. = 101-200 AD/CE
3rd c. = 201-300 AD/CE
4th c. = 301-400 AD/CE
5th c. = 401-500 AD/CE
6th c. = 501-600 AD/CE
7th c. = 601-700 AD
8th c. = 701-800 AD
9th c. = 801-900 AD
10th c. = 901-1000 AD
11th c. = 1001-1100 AD
12th c. =  1101-1200 AD
13th c. = 1201-1300 AD
14th c. = 1301-1400 AD
15th c. = 1401-1500 AD
16th c. = 1501-1600 AD
17th c. = 1601-1700 AD
18th c. = 1701-1800 AD/CE
19th c. = 1801-1900 CE
20th c. = 1901-2000 CE
21st c. = 2001 - present... CE

Please, please, please... label your pictures correctly and when writing about and talking about a specific time frame, either "state the exact date" or "add one to the number." 
(If only to make my life easier when using Google Image Search.)

Friday, October 12, 2012

Making More Stuff

I wanted to do some lovely, witty blog post about all the stuff I've been making lately, but that's just not going to happen this morning.
So here are some pictures with short captions.  I may have posted some of these before, if so... sorry.

Roman Brachea (Breeches) for my friend Mr. Scott.
Super-simple Roman drawers.

Padded Gambeson for my husband (this is #2, which seems to be working as it should).
1-2-3 Fight!

Italian sleeves for Lisa (I didn't make the dress)
Sleevies!

18th c. stays from scrap fabric for Sam.
1715-60 Stays

1790-1820 outfits for the Delps
1790-1815 Waistcoat
1790-1810 Tailcoat

1805-1815 Dress
1805-1820 Pelisse
The dress & waistcoat were made this spring, the tailcoat & pelisse this fall.  Odd book-ends to my Medical Adventures, which are (hopefully) over.

There were a few other things that I can't seem to locate the jpg.s
I need to have a "finishing" day for a good number of garments that are >this< close to being done, but need accessories, buttons, hooks & eyes or hems. 

Monday, October 8, 2012

Purist

With a lot of care & work & changes
you might be able to make the McCall's into something worth the material going into it.
But probably not...


Yesterday at the Hartstone gathering (SCA) Vicki P. used a great word in reference to my "stickler for historic accuracy in all things clothing" - Purist.
I love it.
I admit, I'm not a Pure Purist.  I'm totally OK with machine sewing, modern interfacing for buttonholes, synthetic trim (when necessary) and even poly/cotton thread if Needs Must... Sometimes the design of the fabric is so very perfect, but the fiber content is a bit off, and that's OK as long as fire hazards aren't a concern.  Zip-ties for boning are A-OK with me, though I do prefer cane or reed or metal.

What I'm thinking about this morning is my personal approach when asked about historic clothes.  There, I'm a purist.
I will not give you an "incorrect" answer.  I will answer you to the best of my knowledge based on historic fact, my most current research & my best educated guess backed by that information.  I will also tell you which is guess & which is fact.
In form, function & outfit; the shape must be right, the layers must be correct and the fabric must have the proper weight & drape for the garment.

You must tell me specifics of where your persona is from.  I cannot help you if the answer is "in period" and "they traveled around."  It just doesn't work for me.  No offense to you, but you just fried my neural pathways & I have no direction to go in at all.  Tell me "French, merchant class, early 1600's" and I'm on it.  I'll give you the name of their tailor & let you know what kind of sheep they used to spin the cloth from, but don't try throwing Italy at me in the same breath.  If you want a versatile garment, tell me that.  Say "I want a generic Western European gown for the 1500's" and I can toss out a few that will work.

Patterns:
If the pattern is not available from a very reputable source,  backed up by historic information (archeology, museum pieces, literary sources, etc), it has to be a very educated guess, following the proper form, for me to say "yes, go for it."  Please, present your research to me.
I won't just say "yes."  I'm not a Yes Girl.
Please, do not hand me Simplicity or McCalls, though they can be decent when cross-referenced with real research. I know a lady who makes patterns for McCalls & she is Spot On... but she's one lady who occasionally makes patterns for that company, and they hire a lot of people who are not as careful.
When you ask me, you are going to get Janet Arnold, Norah Waugh, Linda Baumgartner, and a host of other serious scholars who have backed up their patterns/research with original garments & primary sources.  You'll also get Diderot, Gersault & Le Art du Tailor.
From there we can talk about adjusting to fit an individual portrayal; within your budget - but that's where I start.  Accurate.

Good questions to ask are:
- What garments do I need to make for this portrayal?
- Will I be comfortable in this outfit?
- What weather will this outfit/garment be suitable for?
- Can/must I combine it with other garments? (Is it versatile?  Is it a one-trick pony?)
- Would my persona have worn this or am I just making it because it's nifty?  (it is totally OK to build a persona off of a costume vs. making costumes to fit a persona; however you want to do it is fine).

Fibers & Materials:
I truly believe that using natural fibers - linen, wool, silk, cotton or a combination thereof - is the best course of action.  Care is straightforward, the garment will last for years, fire hazards are reduced to a minimum, natural fibers are more comfortable, and above all it's correct.  You can wear natural fibers to any event without worrying about looking out of place.  You don't have to gaze longingly at your pretty polyester petticoat & sigh because you can't wear it to this Uber-Accurate Event that it would otherwise be lovely for.  When it gets stained you can just throw it in the dye pot & it will take the dye evenly unlike synthetic or synthetic blends.  You can even dye it with natural dyes!
Using the appropriate weight fabric is also very important.  If you can watch t-v through it, chances are it won't make a good winter coat - but it might be perfect for a gauzy cuff or floaty dress.  Cheap cotton is just not going to cut it for a structured gown, where a nice linen, wool or silk would be perfect... even a heavier weight cotton can be lovely.

Good questions to ask & answer are:
- What fabric(s) was the original garment made from and why?
- Did it have structure built inside, or is it a soft garment?
- Was it made to go over a structured garment, or is it supposed to be worn on a natural form?
- What materials/accessories am I going to need to make this garment & how many yds. will it take?

Cost:
Yes, fabric costs money.  Period.
It will cost a lot more money if you just throw "whatever" together & have to do it again later if you decide that you really do care & want to stay in the hobby.
It will cost a lot more money if you try to make the wrong fabric work by plastering $200 in trim over it when you could have just spent $40 more on the right stuff.
It will cost a boatload more if you use a crappy synthetic that shreds & blows out the first time you wash it, or a $1/yd cotton for an outer garment that should be relegated to flat-lining for quilts or making muslin mock-ups.
Personally, I think it's best to care to begin with... that way even if you decide that you don't want to continue in the hobby, you can turn a few dollars on your old garb vs. having to toss it in the Halloween Donation bin at the local Good Will - though that's not a bad idea... better than handing it off to some poor newbie when you know for a fact it's totally incorrect.

Good questions to ask are:
What is my budget for this outfit?
Where can I obtain the correct fabrics for this outfit?
What can/can't I skimp on?
What is necessary & what can be left off until later?
How will this fabric preform? (Will it be hot/cold/damp/comfortable etc.?  Will it shrink in the wash?  Will the combination of fabrics play well together?)


So basically, when you ask a clothing history geek "What should I wear?" don't be surprised if we won't compromise on honesty.
When you ask a Purist "can I use this (ghastly) polyester (modern) print?" and we say "um, no." don't get upset.
By all means, make costumes.  Costumes are cool.
Us Stitch Counters/Purists understand that not everybody cares about what we care about.  But if you ask us for help, and then say "well, I wanna do this totally farby thing anyway" don't take the ))Face/Palm(( wrong - you just asked, we just told you... we can't make you be accurate... but if you weren't planning on it, why did you ask in the first place?  Though we do want you to ask... please ask!
Just like we are going to ask about those fantastic apple tarts...


We aren't Perfect Purists, we know that.  Research continues, improvement is the goal... And I can almost guarantee we've got Pop-Tarts in our food box...

Sunday, September 30, 2012

Fruit of Many Colors: Sumac Berries

staghorn sumac
Sumac berries are pretty all year long.  I love them.  You can eat them,* birds eat them... they are pretty.  Did I mention how pretty they are?  They are also a horrible weed.  But like most weeds they are quite useful if you know how to use them.
*if you aren't allergic.

Last year I collected quite a few sumac berry torches (that's how I think of them, as these big, bright red torches shining on the trees).  I dried them; planned on using them over the winter... never got to it.  "Now" was a good time, so I soaked them in water overnight & let them sit out in the sun in a big old pot. About 1/2 a peck.


On Day 2 I steeped the pot in warm(ing) water for 30 minutes, boiled for 30 minutes, mashing the lovely things the whole time.... OK, once in a while... at least every 10 minutes or so... until they turned kinda brownish.

Boiling sumac berries smelled soooooo goood!
Because of the size of the pot, rather than pouring out the mash, I dipped out the liquid & strained the berries out of that.

2 paper towels as final strainer

The recipe I was reading (YES, a Recipe!!!) gave a few different options for these berries. 
http://vikland.tripod.com/sumac.html 

The first batches were alum mordant on finished yarn, with various soak times & after-mordants like vinegar & ammonia.  I think you can read what the tags say (sorry it's tipped - I have no idea how to fix that on this format).  They ranged from a very nice flax color to golden yellow.


Since I got so much of it, I figured I'd do a few different things.  I liked the idea of a heathered gray, and the best way to get that is to dye the fleece and spin after. 

To get gray from sumac berries, you need to soak the wool in an iron after-bath.  To get that, you can either add ferric to the water or keep a plastic canister of rusting nails & just pour out the water once in a while... since I had neither, but plenty of Stuff That's Rusty, I went out & found a bit of junk that would fit in the pot.  Joys of farm-life.
adding rusty iron to water
Once I got the liquid free of pretty berries, I wetted some clean fleece in a mesh bag and dunked it in the pot.  (Now a much smaller pot). 
Boiled for 30 40 minutes and then transferred to the Iron pot.

sumac berry & iron dyed fleece
I've carded up a bit of it, but haven't started spinning it yet.  I'd like to get the whole chunk in rolags before I spin it.  I am losing most of the light undercoat & very dark tips, which is fine.

Saturday, August 25, 2012

Will This Thing Ever Dye? Comfrey

Well, yes, it will... but not "sage green" as the unfounded & lacking specific recipes chart said.
Actually, comfrey will make a lovely sage green, I just haven't figured out how.  I know this because I've seen it done many times on Google Image Search.  Just not by me.  By the time I find a real recipe the plants will be dead for the winter & I'll have to wait till next year.

Comfrey.  Useful. Horrible. Weed.
Anyway, Comfrey.  Multitude of uses, not least of which is Taking Over Your Flower Bed With Roots More Than Three Feet Deep.  No, really.  More than three feet.  I know this because that was the depth of the hole I dug 2 years ago trying to get rid of the nasty buggers.  Didn't work.  Filled the hole in.  Comfrey grew back.

Ooh, pretty green!  How promising...

So, in an attempt, perhaps a misguided one, to get rid of this horrid plant of many uses, I decided to chop some leaves off & cut them up into itty-bitty pieces courtesy of kitchen scissors & a blender; then toss all that green gook into a pot & boil me up some dye!  Surely this will produce a lovely soft sage green as all of the internet claims...

I can only tell you that I filled the pot, not how much things weighed.  Actually, I filled the pot twice, the second time after the first bit boiled down to an incredibly icky spinach looking thing that I don't want to contemplate eating.  So, two sauce pans of chopped green gloppy stuff to make a small dyebath.  (Surely I'll get a lovely sage green)... strained out several times through a paper towel & squeezed for any residual pigment...


Comfrey dye soup?  No thank you.
Into the pot goes the yarn!  (alum mordant)
After all that straining & draining we still have green stuff  "stuck in our teeth."  Yuck. (don't eat it).
Um... yarn's lookin' a bit yellow... OK, maybe it'll turn green later.
30 minute simmer as per (OMG there were directions!.. kinda)...
and...
Not-green comfrey dyed yarn
It's still yellow.  No, it's not green.  It's yellow.  Like a Bad Blonde Wig yellow.  OK, maybe it's not that bad.  Maybe I have to change the ph.  Maybe vinegar will work?  At least a dunk in something will help get all that horrid VM (vegetable matter) out of my nice clean wool!  Vinegar it is...

Not noodle soup, really.

Um... no green.  The green literally leached out into the vinegar leaving me with even MORE yellow.  Wasn't happy about that at the time. (Note to Self: vinegar makes things lighter - sometimes).

Best Pasta Impression of the Year
But after about 20 minutes of rinsing the stuff in cold water the comfrey bits finally let go of my poor yarn (mostly) and I got a nice pale yellow that seems rather stable.  Perhaps my dismay came from the pasta impression; "pasta = pain" for me.

Not-pasta yellow.
It's really not bad... it still looks a bit like spaghetti to me, but it is a nice pretty light yellow.  I'm not dissatisfied.  It just wasn't the sage green I was expecting.  I think next time I'll skip the mordant & see what happens.

Comfrey Yellow Dye Recipe:
1 saucepan of pureed comfrey (put it in a mesh bag, ok?) boiled/simmered for 1 hour.
Strain.  [Compost goop... or incinerate it in a Biohazard bag - that stuff will grow anywhere!]
1 skein of alum mordant wool yarn.
30 min. simmer.
Water/vinegar 4:1 rinse bath after-mordant
lots & lots of cold water to get the icky green bits out.
Spin wool out (Salad Spinner!), hang or lay to dry.