Wednesday, January 23, 2008

How to hem a dress

I'm finishing the blue linen cotehardie that I started months ago. It has a hand-sewn hem and neckline. The rest of the garment is machine stitched, including the buttonholes in the side. I really should have taken the time to do those by hand, and I may re-work that later.

I love the blind hem stitch. Depending on the type of fabric, garment style and time period that you are re-creating, you should use variations on this fold and stitch. Most wool works well just turned over once and hemmed using a diagonal stitch. Silk must be enclosed in a double fold or it frays. Some linens can be turned once, but the one I'm using now frays easily and had to be turned over twice to hide the white over-locking.

Many reenactors leave dress hems unfinished, and this is fine if you have everything dry cleaned or don't mind hand-washing your garments. I like my washing machine because I get into poison ivy and mud wherever I go... so I hem.

Here are simple directions on how to do a blind hem stitch:
Arrows indicate the direction of the thread and the purple line is the top of the hem fold.

1. Cut thread to desired length, I use one short arm length (about 20")
2. Thread your needle and pull thread so it is roughly 1/2 the total length. For this stitch you should use a single thread, not a double. As you sew, let the thread out so it doesn't double up.
3. Attach the thread to the garment by burying it in the hem and making a few small overcast stitches. (see diagram 1A, 1B, 1C).
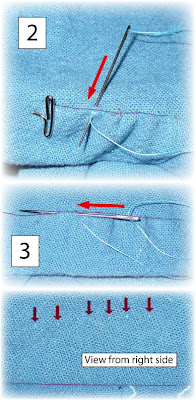
4. Pass the needle through all layers of fabric, catching 2 or 3 threads on the right side. Bring the needle back to the hem-side through the top fold of the hem. (see diagram 2) This is one movement.
5. Turn the needle sideways and make a 1/8"-1/4" stitch under the fold and repeat #4. (see diagram 3)

6. When you reach the end of the thread (when there's 4" left), make several overcast stitches in the same place and bury the thread in the hem fold. Cut excess. Repeat steps 1-6 until the hem is finished.

Without a thimble I can sew about 6" in 5 minutes. Longer needles are easiest to use as you can get more leverage.
If you like using thimbles, shorter needles work better and you can go even faster. (Thimbles are worn on the ring finger and only work for people with short nails. They need to fit properly).

Use thick or thin needles according to the weave of the fabric. Thick needles work well with loosely woven fabrics, like this blue linen. Thin needles work well with tight or finely woven fabrics like silk or lightweight cotton. If you are working with a combination, as I will be later, use a needle that is strong enough to go through the heavier fabric without pulling the threads of the lighter-weight fabric.

When working on a curved hem like the one on this cotehardie, you should expect some bunching. This can be minimized on the back by evenly distributing the excess fabric between stitches, and if done properly it won't show on the front at all. If the curve is very pronounced, you can clip the raw hem to make it fit better, though I don't recommend doing this unless absolutely necessary as it weakens the garment.

In step 3 (text, not diagram) I am burying the thread in the fabric. This is not an historic method, but I throw my reenacting clothes in the washing machine and simple knots don't hold up well to that kind of treatment. I rarely use the running stitch in garments that I know are going to see heavy use, because if the thread gets caught it has a tendency to pull or break. I did use the running stitch in the neckline of this dress because I plan on covering that hem with the gold silk, so the stitching will be completely enclosed.

In the final illustration you can see that the hem stitches show a little. If you use a thread that matches the fabric, you will never see these stitches. (I used this thread so it would photograph well without being too obvious in the finished garment). The hem is not perfectly even all around due to the curvature in the fabric. It is better to sacrifice the evenness of the hem than to have the finished garment bunch on the outside.

When the entire hem is finished, I will press it with a steam iron. Pressing means setting the iron down on the fabric, applying a little pressure, and letting it steam for a count of 3. It does NOT mean moving the iron back and forth over the hem. There is an unsubtle difference between ironing something flat and setting a fold. If you move the iron back and forth it may create a triple fold (where the fabric looks like a Y or Z), which will be difficult to iron out later. Always follow the recommended temperatures on your iron, or use a pressing cloth to avoid scorching or melting your garment. I melted my veil the day before my wedding and had to re-make the entire thing. Since Linen can practically withstand fire, I'm not too worried about it, but once I add the silk I will need to be careful when ironing the finished garment.
Monday, January 14, 2008

Trouble understanding the Random Art Chart?

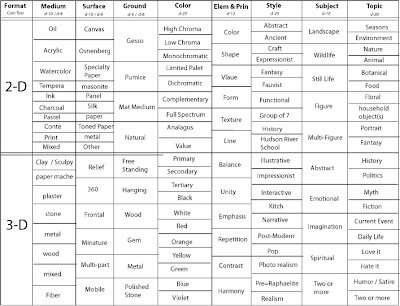
Apparently I'm the only one who understands this. So, here's step-by-step instructions and 2 more examples with my thought processes.

The headings are at the top of the graph. You can use whatever category you want, but let's say it's completely random and you need to roll for all of them.
The first thing you decide is if it's a 2-dimensional or 3-dimensional project.
1. Flip a coin (heads = 2-D, tails = 3-D)
or
roll a die (evens = 2-D, odds = 3-D)

The 2-D / 3-D choices are separated by the double line that goes between 2-D and 3-D. See it? It goes through the first 4 columns then stops.

2. If it's 2-D, the next thing you determine is the Medium (this will depend on what you have available). Roll a d-10 (10 sided die) to choose from the first 10 options.
If it's 3-D, you also need to choose the medium, which you can roll a d-8 for (I have 8 choices listed).

3. Now, for 2-D you need to roll for a Surface to paint/draw on. You have 10 choices, so you roll a d-10. Some of these will work, some will not. Watercolor will not work on metal, so you would re-roll. However, it will work on silk.
For 3-D you choose a Format (listed as Surface, I just simplified it for space). You have 6 choices, so roll the familiar 6 sided die.

4. The next column is Ground for 2-D. Sometimes this isn't necessary, but I rolled anyway to see what ideas would spring to mind. You have 4 choices, so roll a d-4. This is how you treat the surface to accept the medium.
In terms of 3-D it refers to the Base or Support for the sculpture. You have 6 choices, so roll a d-6.

From here on out, all choices apply to both 2-D and 3-D, so you are using the whole column.

5. Color refers to the overall color scheme of the artwork. There are 20 choices in the column, so roll a d-20 and count down to get the result. If you roll "monochromatic," which is #3 on a d-20, you would then either choose a color or roll a d-6 for a random color (they are all listed together at the bottom). Monochromatic means one color + black and white, so they don't count for that option.

6. Elem & Prin stand for "Elements and Principles of Design," which I am using as the main element or principle of design. This does not mean that you ignore the others in your composition, it just means that if you roll a 5 on a d-12 that the main focus of your piece is Texture. This could mean that you are painting on a textured surface, adding oleopasto to oil paint to make it thicker, working with materials that have a distinct texture, focusing on the textural appearance of the objects in a still life, etc.

7. Style is next. You have 20 choices, so roll a d-20. I'm using this to determine how to make the artwork look. If I roll 14 on a d-20 it will be Kitch, which means I could buy it at a mall gift shop. If I roll a 12 it will be Impressionist, which means I pay attention to colors and light as they appear and let the edges go soft. You can put in any art movement or representational styles that you like. I used these because they are the ones I like the most and work in most often. I also chose some that I never work in to force myself out of my comfort zone.

8. Subject is next. There are 10 choices, so roll a d-10. Let's say you roll a 2. The subject is Wildlife. This could mean that you are painting an outdoor scene, sculpting a bear or even a drinking scene at the local pub (urban wildlife).

9. Topic is what's in the artwork. There are 20 choices, so roll a d-20. If you roll an 8, the topic is Portrait. So you are doing a portrait of someone or something or some place. All "portrait" means is that you are representing something specific, not something general. This means that if you got "abstract" as a style, and Wildlife as a subject, then portrait as a topic, you could do an abstract sculpture of a songbird that lives in your tree. It's not just any songbird, it's an individual. Get it?

OK, so here's 2 more examples with my thought processes.

Format: 2-D (I rolled a #2 on a d-4)
Medium: Watercolor (I rolled a #3 on a d-10)
Surface: Panel (I rolled a 5 twice on a d-10, not sure this will work, but I can get rid of this later if necessary and substitute regular watercolor paper).
Ground: Mat Medium (I rolled a #3 on a d-4, watercolor will not stick to this, so I may re-roll depending on what I get later).
Color: Full Spectrum (I rolled a 7 on a d-20)
Elem & Prin: Value. (I rolled a #3 on a d-12)
Style: Fantasy (I rolled a #5 on a d-20)
Subject: Abstract (a #6 on a d-10)
Topic: Daily Life (a 16 on a d-20)

Now, because watercolor will not stick to a panel with a mat medium ground, I'm going to look for the medium(s) that will work with that; and I've got Acrylic and Mixed. Acrylic = heads, Mixed = tails. I got heads, so it's Acrylic. Or I could just choose.

Here's the final criteria:
2-D
Acrylic
Panel
Mat Medium ground
Full spectrum color
Value as main element
Fantasy style
Abstract
Daily Life

Ideas: I know this will be a full-color acrylic on panel with a mat medium ground. Value is important so I want lights and darks. My topic is daily life, so I want something I do all the time. It has to have a fantasy feel to it, and it needs to be a bit abstracted.
What do I do every day? I drive.
Value: high contrast values happen at night.
Driving at night.
So now, I know that I want to do an acrylic on panel of driving in a car at night. Lights streaking by, the painted lines emerging from darkness, etc. Maybe using the way the light streaks as my inspiration for the abstraction and giving the painting a light shattered quality.


Let's try one that's 3-D.

Criteria:
Format: 3-D (given 'cuz we wants it).
Medium: wood (6 on a d-8)
Format 2: Multi-Part (5 on a d-6)
Base: polished stone (6 on a d-6)
Color: blue (19 on a d-20)
Principle: Repetition (10 on a d-12)
Style: Pop (17 on a d-20)
Subject: Imagination (7 on a d-10)
Topic: Fiction (14 on a d-20)
Ideas: I have a multi-part wooden sculpture on a polished stone base where the main color is blue. I need to repeat some themes.
My topic is fiction, so I need to choose a book, comic, movie or something like that. Pop is my style, I can work from Pop Art or Pop Culture.. or Pop Music. Imagination is my subject.
I'm having trouble here...
Ah, yes, one of Cori's favorite topics. Mother Mary. Blue bath-tub Mary.
Let's be irreverent and choose the Bible as our fictional source.
We can only imagine what little Mary looked like, but there's enough Pop Culture images that it automatically qualifies as Pop if not Kitch, but we want to keep it in Pop Culture or Art.
So...
Multi-part wooden sculpture of Mother Mary (using JC as another part) on a stone base. Lots of blue paint or stain, choose a passage from the Bible... maybe the "water into wine wedding scene" with her as the focus, maybe grabbing his ear and wagging her finger at him to do what she says and keep the party going. Keep the forms very rounded in Pop style.

See how this works?


If you wanted to simplify this, you could use a standard 6 sided die and only put 6 things in each category. That would still give you 100's of options.
I hope this clears things up rather than muddying the waters.

Sunday, January 13, 2008

Random art generator


One of my favorite things to do is play D&D. Another favorite thing is to paint, draw or sculpt something. Occasionally I get hit with the dreaded Artist's Block and need a way to get past it. This seemed like a good idea at midnight last night and since I'm still having fun with it today I figured I'd post it.

I also sent it to every artist I know via e-mail, so it's probably going up on several other blogs.

I should mention that Doug Anderson, one of my professors at SUNY Geneseo was the first to introduce me to this concept. As I recall, his chart had 10 columns up and across and you did some kind of diagonal thing to get to the project idea. I must admit that I never understood it despite the rest of my fellow students grasping it immediately. I promptly lost the paper, but never forgot the concept.

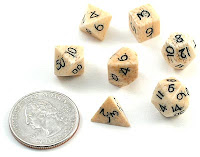
To use the chart as-is you will need a set of gamer-dice and a coin. See all the pretty shapes?


How it works:
If you have no idea what you want to do, start with the first column. 2-D or 3-D can be determined by flipping a coin or an odds / evens die roll.
Let's say you got heads for 2-D
Now, roll a d-10 (a 10 sided dice), I rolled a 3, so I count down the column and come to watercolor
Roll another d-10 for surface (only a few apply). I got paper (watercolor paper) and we know it's going to be natural, not treated with anything.
For color, roll a d-20 (the almost round one that lives under heavy couches) and we come up with complementary. Then again for a completely random selection of blue. So blue and orange are our colors.
Main element or principle will be a d-12 that turns out to be line.
Style is a d-20 roll of 1 which is Abstract
For subject I roll a d-10 and get multi-figure.
And for topic I roll another d-20 and get botanical.

Now, here is what I've got in short:
2-D
watercolor
paper
complementary colors: blue & orange
line
abstract
multi-figure
botanical

Here are a couple things I could do with this:
- A blue & orange watercolor of linear abstracted ferns. Wet-on-dry so the colors vibrate.
- A range of neutrals from blue & orange in the background with linear abstracted lichens or mosses covering the surface of the paper.

If you have an idea of what you want to do, but need to flesh it out, or make an assignment into something more, just use a few columns.
"I am going to paint a nude figure in oils on gessoed canvas today."
You can roll for style, topic, elements & principles and major color themes.
Given:
2-D
oil
canvas
gesso
figure
Random:
color - violet
Element - value
style - Realism
topic - Fantasy
Idea: Now I know that I am using mainly violets in this painting with an emphasis on value. I'm going to keep it realistic, so it's probably not going to get too distorted with either color or form, it'll just have a lot of violet with a full range of darks and lights. I'm also adding a fantasy element, so depending on the pose I may add a critter, costume or interesting environment. The final product will probably end up being more Surreal than Real, but I'm OK with that.

This can be general or very specific. Totally up to you. If something doesn't work, just re-roll.

This chart will work best if you fill it in with your own ideas for mediums, surfaces, grounds, styles, subjects and topics. It can be used to generate lesson plans for art teachers, fleshing out hazy ideas and getting rid of a bad case of Artist's Block.

I'm happy with it and have had a lot of fun playing with it today.