I love the blind hem stitch. Depending on the type of fabric, garment style and time period that you are re-creating, you should use variations on this fold and stitch. Most wool works well just turned over once and hemmed using a diagonal stitch. Silk must be enclosed in a double fold or it frays. Some linens can be turned once, but the one I'm using now frays easily and had to be turned over twice to hide the white over-locking.
Many reenactors leave dress hems unfinished, and this is fine if you have everything dry cleaned or don't mind hand-washing your garments. I like my washing machine because I get into poison ivy and mud wherever I go... so I hem.
Here are simple directions on how to do a blind hem stitch:
Arrows indicate the direction of the thread and the purple line is the top of the hem fold.
 1. Cut thread to desired length, I use one short arm length (about 20")
2. Thread your needle and pull thread so it is roughly 1/2 the total length. For this stitch you should use a single thread, not a double. As you sew, let the thread out so it doesn't double up.
3. Attach the thread to the garment by burying it in the hem and making a few small overcast stitches. (see diagram 1A, 1B, 1C).
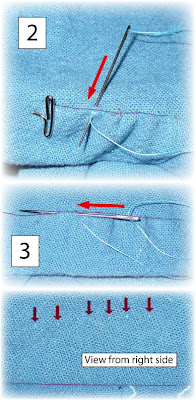
4. Pass the needle through all layers of fabric, catching 2 or 3 threads on the right side. Bring the needle back to the hem-side through the top fold of the hem. (see diagram 2) This is one movement.
5. Turn the needle sideways and make a 1/8"-1/4" stitch under the fold and repeat #4. (see diagram 3)
 6. When you reach the end of the thread (when there's 4" left), make several overcast stitches in the same place and bury the thread in the hem fold. Cut excess. Repeat steps 1-6 until the hem is finished.
Without a thimble I can sew about 6" in 5 minutes. Longer needles are easiest to use as you can get more leverage.
If you like using thimbles, shorter needles work better and you can go even faster. (Thimbles are worn on the ring finger and only work for people with short nails. They need to fit properly).
Use thick or thin needles according to the weave of the fabric. Thick needles work well with loosely woven fabrics, like this blue linen. Thin needles work well with tight or finely woven fabrics like silk or lightweight cotton. If you are working with a combination, as I will be later, use a needle that is strong enough to go through the heavier fabric without pulling the threads of the lighter-weight fabric.
When working on a curved hem like the one on this cotehardie, you should expect some bunching. This can be minimized on the back by evenly distributing the excess fabric between stitches, and if done properly it won't show on the front at all. If the curve is very pronounced, you can clip the raw hem to make it fit better, though I don't recommend doing this unless absolutely necessary as it weakens the garment.
In step 3 (text, not diagram) I am burying the thread in the fabric. This is not an historic method, but I throw my reenacting clothes in the washing machine and simple knots don't hold up well to that kind of treatment. I rarely use the running stitch in garments that I know are going to see heavy use, because if the thread gets caught it has a tendency to pull or break. I did use the running stitch in the neckline of this dress because I plan on covering that hem with the gold silk, so the stitching will be completely enclosed.
In the final illustration you can see that the hem stitches show a little. If you use a thread that matches the fabric, you will never see these stitches. (I used this thread so it would photograph well without being too obvious in the finished garment). The hem is not perfectly even all around due to the curvature in the fabric. It is better to sacrifice the evenness of the hem than to have the finished garment bunch on the outside.
When the entire hem is finished, I will press it with a steam iron. Pressing means setting the iron down on the fabric, applying a little pressure, and letting it steam for a count of 3. It does NOT mean moving the iron back and forth over the hem. There is an unsubtle difference between ironing something flat and setting a fold. If you move the iron back and forth it may create a triple fold (where the fabric looks like a Y or Z), which will be difficult to iron out later. Always follow the recommended temperatures on your iron, or use a pressing cloth to avoid scorching or melting your garment. I melted my veil the day before my wedding and had to re-make the entire thing. Since Linen can practically withstand fire, I'm not too worried about it, but once I add the silk I will need to be careful when ironing the finished garment.
No comments:
Post a Comment