Sunday, November 22, 2009

Quilt Frame

I've been looking all over the internet and antique stores for an affordable quilting frame for the quilted petticoat. I'm tired of fighting with the hoops & cats wanting to be in my lap with such a pretty 'blanket'. Much to my dismay, the type of table quilting frame I'm looking for would be stretching my current budget.

After hemming & hawing about building vs. buying, I decided to re-purpose an old card table that was a gift from a friend.

Normally I would hesitate to bust apart an antique, but the top was warped & water stained with pen doodles all over the design. And the bottom is just lovely.


Materials:
Antique wood card table (or at least a wooden table base)
rubber mallet
pliers
soap, water & wash rag
measure stick/tape
1"x 2" board OR L-shaped oak/maple trim (if you want it fancy)
pencil/pen
Saw
sand paper
8 clamps (plastic tips, not metal as these will touch your fabric).


Step 1: Make sure the top will actually come off, and that there is room to work on the underside of the table (you can see this open space on the right side of this picture).

Step 2: Using the rubber mallet "gently" hammer off the cardboard top from the underside.
I turned the table on its side & went around the edges until it was free.


Step 3: using the pliers remove any staples or other sharp metal bits that may be lurking. Put these in a container & throw them away... don't leave them on the living room floor for your guests to step on.

Step 4: wash all those years of dust off the upper part of the table.... and while you're at it, you might as well wash the whole thing. Now that's the power of Pine-Sol baby!


Step 5: Measure the outer edges of the table - 27" x 25".

Step 6: Cut some 1x2's to match those measurements. I had one board that would work, but the sides ended up being a little short. This will be fine as I just want to hold the fabric, not stretch it. More importantly I don't want to compress the corners & accidentally stretch the fabric.

Step 7: Sand all rough edges.
You can stain the boards, but I'm leaving them for now.


Step 8: Lay the quilt over the frame & clamp the front edge.
Now clamp the back, lightly pulling the quilt straight.
Clamp each side to make it lay flat with no sagging. Do not pull it tight.


I haven't figured out how to hold the rest of the petticoat. Right now I've folded it & laid it across the back half of the table.
I may be able to wind it around some tubing hung from the underside of the table frame. Setting it on the floor is not an option.

This table folds up and stands on it's own. I think it will still work with the petticoat attached.
It doesn't tip, and I'll comment on how comfortable it is to use.


Here is the quilt frame I wanted to begin with, and the link to where you can buy it.

Saturday, November 21, 2009

How to re-size a historic pattern: front & back

Continuing the topic of re-sizing historic patterns, here is how to re-size the back & front of a waistcoat. You can use this method for any jacket/top, even if it has more parts than just front & back.

Begin with your original scale drawing (this is a 1770 sleeved waistcoat from Cut of Men's Clothes). This is the one you keep on file & don't cut.

Don't try to copy these images, the camera angles have distorted things.

The pieces are:
Front
Back
Upper sleeve
Under sleeve
Gusset
Pocket Flap
Pocket (not shown)


Trace the back onto another piece of pattern paper, (this is the one you will cut).

Measure the back waist, Paul's is 21". This is the base of the neck to the natural waist in back. The actual garment measurement will depend on the cut, but this one is exactly the same, 21". Lengthen or shorten at the middle of the back, about where the ribs start. (this is not pictured here, the original pattern was right for him).

Measure across the back & multiply by 2. This is the current back width of the pattern. (I'm lazy & fold the tape measure over).
Measure your back width, (from where your arm meets the back, across the back, standing naturally).
You should add 1" to your back-width minimum.


Paul's has a 19" back width. He will need a minimum of 20" to be able to move, but no more than 21" as it will be too big for him.

Extend the back width evenly on either side.
If more is needed, continue to extend the measurements.
(Depending on the garment I may add more to the center back than the side back, you will get a feel for this if you do enough.)

Draw in the new center back (do not draw in the new side-back yet). Extend this measurement all the way down (this may get re-adjusted later, but this helps to maintain the shape of the garment).

note: always measure in the middle of the ruler, ie: 2"-3" rather than the 0"- 1" as your lines will be more accurate.


Trace out the front.

Make any length adjustments that you need.
Be careful to match the side seams in length. This may change as you make adjustments, but it's a helpful guideline. The underarm-waist measurement will be useful here.

Measure the chest on the front (minus button space) and add it to the chest measurement in back.
For an average size person, you will need 3-6" of ease depending on the garment. This one needs 1" in back & 3" in front, including the buttons... so 4" larger than the chest, total.
Make any adjustments to the chest & re-check.


Repeat for the waist. Depending on the shape of the individual, you may be adding more to the center front than to the sides.
Always add equal amounts to the side front & side back seams.

Remember to extend the skirts in proportion to the body, but maintain the angles unless the individual is heavy, then increase the angles.


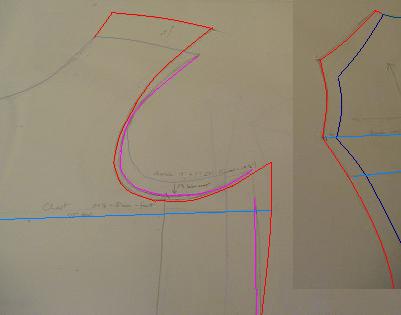
Adjust the armhole, shoulder & neck accordingly.
(See the previous post).

In this illustration you can see how some of the shoulder angles have changed.

When you lower the armhole, do not go much lower than 2" for 18th century garments. If the person wants more movement, cut away from the front of the armhole rather than the underarm. Even then, only cut away what is absolutely necessary. Make sure it isn't cutting off circulation at the back of the arm.

Double & triple check all your measurements to make sure everything will fit together. Clean up your lines & measure again.
Now you can move on to the small parts.


For the pocket, trace the original onto your sized pattern (green) & increase it accordingly (red).
Maintain the angle & line placement from the original garment. If your person is much taller (Paul isn't), extend the pocket too.

Be careful that it doesn't get too big, but make it large enough for the wearer to comfortably get their hands in. If this is sized-down for a child, make the pockets "mommy" size so you/she can fish out whatever lovely things the little darling has collected.

The pocket itself should end 1/2" -1" above the hemline, or no longer than standing fingertips. This prevents the pocket from catching when you line it, and the "lean & fish" while you wear it. It should be the same width as the top of the pocket flap, but the hole should be 1" in on either side, so there's no chance it will show. If the pocket flap is curved, make a smiley face hole, if the flap is straight, make a rectangular hole.


Draw your final lines in pen or marker.

Remember to add in your grain line, button placement, clip marks, etc.
Also include the garment name, date, person it was made for, individual measurements (in case you run across someone the same size), and where the pattern came from.


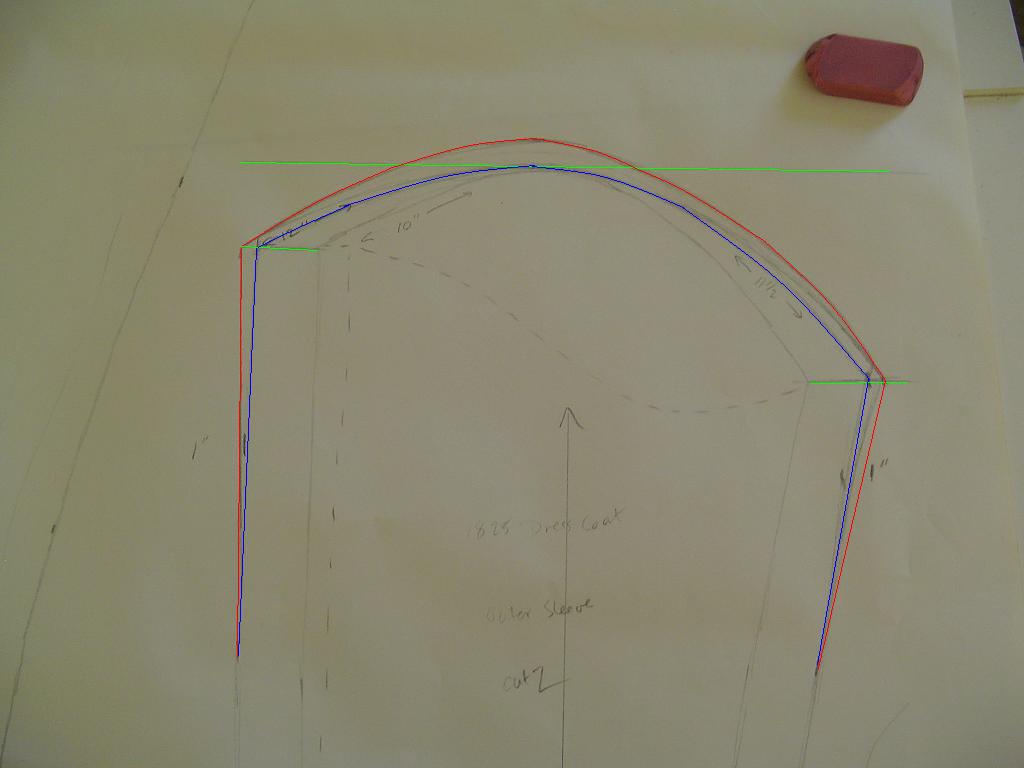
Size your sleeve accordingly & re-trace the under sleeve. Make up whatever you can in the gusset, remember to keep things in proportion.

(I cut& pasted the gusset here, it's not in proportion).
The upper sleeve has the under sleeve marked in as well, but is not cut from the same pattern piece.

Add in your seam allowance, I prefer 1/2", but 5/8" works just as well.

Tuesday, November 17, 2009

How to re-size a historic pattern: armhole & sleeve

Historic patterns are wonderful to use, but often uncomfortable for modern people to wear. They tend to restrict arm movement & are very small in comparison to what we are accustomed to.

Here is how to re-size an armhole & sleeve for more comfortable modern wear, but maintain the integrity of the original pattern.
(I'm using the 1825 Dress Coat pattern from COMC).
You can use this method in pre-made patterns as well.

Add 4" -6" ease to the original armhole measurement (19 1/2"). Do not add more as it will lose the historic look.
*Working class garments had much more arm movement than leisure class... add 5-8" depending on the garment.

I want a 24 1/2" finished arm hole. This should give Brian enough room for his clothes & some arm movement.
*If someone is dancing or riding in this garment, I would add a little more in the upper sleeve.
**If this is for a theatrical event, ask the costume manager if they want a truly historic look or if they want the actors to be able to have full movement.


Once you have the correct length on the sleeve (add X" to bicep & forearm), mark your width increases according to the individual.
In this case I had to add 2 1/2", so 1 1/4" to each side of the bicep.

If the wrist is correct as it was here, and the forearm needs to be larger, make gradual changes from one area to the other.

Alternatively, you can split the sleeve down the center line & add more there.

I prefer to add onto the outside along the horizontal guidelines as that is a little more forgiving. (Guidelines are in green).


Set in your new sleeve-width measurements & lightly draw the new lines. Keep the shape of the sleeve.
(new lines are in green, old lines are in blue).

For this dress coat, I want 5" ease in the armhole,
3-4" ease in the bicep,
2-3" ease in the forearm
& 2" ease at the wrist.


Using a triangle or T-square, mark the top of the sleeve cap in both directions. This will give you a good guideline for re-adjusting the upper sleeve.


Re-draw the sleeve cap, making it meet the same place as the original cap.


Now measure again & add more by measuring up from the highest point of the sleeve cap & re-draw the lines.

I re-drew this line 4 times before I got the measurement & shape I wanted. Be patient & don't get discouraged. You may have to readjust after you have played with the under sleeve too.

Do not erase the original pattern, but if your adjustment lines get too confusing, erase them as you go.


Once your upper sleeve is "set", draw in guidelines for your under sleeve.

Guidelines should be at the lowest & highest points, and mark where the lines intersect.

Measure how many inches you increased the width, then move the lowest/highest point accordingly.
IE: if there is 1/2" difference on the left side of the lower & upper sleeve, mark 1/2" from the edge of the upper & under sleeve.


Readjust the lines for the under sleeve. If you need more inches, lower the low parts & raise the high parts, but be careful to maintain the original shape as much as possible.

The guidelines are marked in green, the original line in blue & the adjustments in red.

Measure a final time & make sure your upper sleeve & under sleeve measurements are 24 1/2" or more.

I prefer to have 1/2"-1" more for a perfectly fitted sleeve as I can account for the ease, but don't like stretching the body of the coat.


Re-draw the vertical lines to match up with the final edge of your top sleeves.

Make sure they meet up where they should (in this case it's just above the elbow).


Re-check your measurements & shapes one last time & erase any old lines.

I prefer to use colored Sharpie markers to finalize my patterns.

Add seam allowance (I like 1/2") to the outside of whatever needs it (if you are working with cut edges, do not add seam allowance).

Be sure to label all pattern pieces with the following:
Garment name
Pattern piece
Grain lines
Number of pieces to cut
Customer name
Measurements

This will make it very easy to make another garment when your returning customers say "I want another one JUST LIKE THAT ONE!" Or if you have a customer with almost the same measurements, you don't have to reinvent the wheel.

I fold up my patterns & put them in gallon plastic storage bags with the garment & customer name on the front.
I also store my patterns according to male/female & century.

All of the original adjustments were made in pencil, any colors have been added on the computer for clarification. If you have any trouble understanding the directions here, please let me know... I'm a bit low on blood sugar & it's past time for lunch.

Saturday, November 14, 2009

More Artwork

Here are some more of my paintings.

The first two are integlio prints that are part of a poisonous plant Art Book project I did while I was at RIT.

That wonderful university has a very Modern sensibility in the art they want students to produce.

The green one is oleander, and the mushrooms are either Death's Head or Angle's Cap, I don't remember which.


This is a painting done from memory. I always exaggerate the colors in my mind, and thought it would be fun to play this one up quite a bit. It's sunrise over some corn fields.


One of the few good things about going on vacation to FL was getting to stay in my husband's uncle's $2 million condo on the Indian River. We got to see dolphins hunting fish, manatee bubbles and lots & lots of birds on Pelican Island. I did not enjoy FL all that much for various reasons... but mostly because I'm terrified of the ocean and Dear Husband's family are beach lovers. I read a lot and got to paint this wonderfully subtle sunrise.


This is a close-up of morning glories at some place I went to to paint. I'm pretty sure it was a marina on Lake Onterio... Pultneyville sticks in my head. Not a huge fan of this painting, but I do love the neutral colors.


Mendon Ponds in the middle of freezing winter. The ponds hadn't completely frozen over, but it was close.


High Tour in Naples NY. This was the hottest day ever. I kept soaking my shirt in water just to be able to stay out there.


Another Nunda view. This was early September. I love these hills.


Vermont hills & rocks. I had a great vacation here. This day was so wet that the acrylic paint took over an hour to dry enough to touch.