
Yes I'm still alive. I have a very busy boy who loves everything and is into everything and keeps me busy & too tired to blog. I intend to pick this up again soonish along with the other one.
Mini-update: betta fish. snails. angora rabbits. SCA. dairy-free cooking.
Tuesday, January 17, 2017
Sunday, January 10, 2016
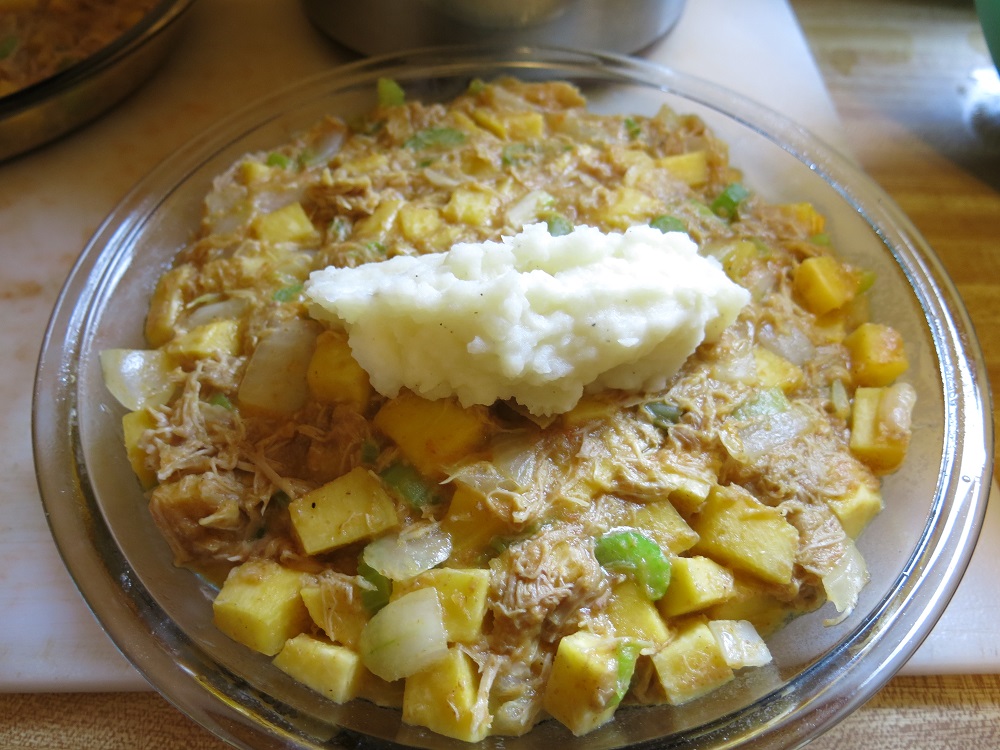
"Meat & Potatoes" Shepard's Pie
Historical Food Fortnightly has started again and I'm back to blogging about food.
This time around the stipulation is that the recipes have to be from the original source, so no redactions. I'm fine with this as my collection of historic cook books has expanded a bit since last year. A short-term goal is to use as much from the pantry, cellar and freezers as possible because we are full up of everything. I'd also like to make some preserved foods for in between times, so that is another possibility.
.
Meat-and-Potatoes (January 1 - January 14) They’re a staple for the tables in the most
rustic cottages as well as the fanciest banquet tables - and it’s also an idiom
meaning a staple or the most basic parts of something. Make a historic
“meat-and-potatoes” recipe - however you interpret it.
- Shepard’s Pie, 193, 194 The Household Searchlight, Topika Kansas, 1935
- Mashed Potatoes, 273, same. Sub: soy milk for dairy.
This time around I chose Shepard's Pie from 'The Household Searchlight Recipe Book,' Topika Kansas, 1935. There were substitutions, but it tasted OK. I got the feel of it vs. reproducing exactly. I decided to stay true to the Depression Era philosophy of using what you have on hand. We were nearly out of carrots and I'm allergic to peppers. A rutabaga came to the rescue, though it ended up slightly undercooked. I think this would have been much improved with more carrots and no rutabaga. The other glaringly non-historic substitution was soy milk in place of cow's milk, and no butter as my son still turns into Hive Boy at the slightest hint of dairy.
I diced everything, thawed the already cooked turkey (good bye Holiday bird!), used the broth from the same, and cooked everything in the pan together. Potatoes were boiling, mashed and then mixed with salt & pepper and the soy milk. Oiled the pie plates and plopped everything in (I made a double batch). The mashed potatoes barely covered everything, and if I were to do it again, I'd go easier on the veggies and more on the potatoes. Just as an FYI, there was one large potato and 5 smalls, so it would have been plenty for one pie. Shepard's pie can be made with any meat, but mutton or lamb is the first choice. Turkey was it this time because it needed to be used.
400F for 30 minutes, then turned the oven off & let it all sit a bit more. I had to put foil on the rack under because they both dripped. It cut easily and came out well, but serve this in a bowl not on a plate.
It's good, but not fabulous. Hearty, slightly bland, and filling; overall a passable meal. I can see doing this with leftovers just to make something interesting that will actually be gone at the end of the meal.
This time around the stipulation is that the recipes have to be from the original source, so no redactions. I'm fine with this as my collection of historic cook books has expanded a bit since last year. A short-term goal is to use as much from the pantry, cellar and freezers as possible because we are full up of everything. I'd also like to make some preserved foods for in between times, so that is another possibility.
 |
| And hating how I can't turn images in Blogger... |
- Shepard’s Pie, 193, 194 The Household Searchlight, Topika Kansas, 1935
- Mashed Potatoes, 273, same. Sub: soy milk for dairy.
This time around I chose Shepard's Pie from 'The Household Searchlight Recipe Book,' Topika Kansas, 1935. There were substitutions, but it tasted OK. I got the feel of it vs. reproducing exactly. I decided to stay true to the Depression Era philosophy of using what you have on hand. We were nearly out of carrots and I'm allergic to peppers. A rutabaga came to the rescue, though it ended up slightly undercooked. I think this would have been much improved with more carrots and no rutabaga. The other glaringly non-historic substitution was soy milk in place of cow's milk, and no butter as my son still turns into Hive Boy at the slightest hint of dairy.
 |
| Prep was easy, though it took a few pots & pans. |
400F for 30 minutes, then turned the oven off & let it all sit a bit more. I had to put foil on the rack under because they both dripped. It cut easily and came out well, but serve this in a bowl not on a plate.
It's good, but not fabulous. Hearty, slightly bland, and filling; overall a passable meal. I can see doing this with leftovers just to make something interesting that will actually be gone at the end of the meal.
 |
| I'm full. |
Friday, March 20, 2015
The Pig Head Party
| Yes, that is a pig being stuck. Today we kill them first. |
WARNING: Some content may be disturbing to some readers... others may find it "OMG that is sooo cooool!". If you don't want to look at the face of a dead pig, you can read down for the recipe and instructions then stop when I start singing; though if you don't want to see the face of a dead pig I can't imagine why you would want to know how to stuff one... in any case, the pictures are after the song.
While this was not intended as a Historical Food Fortnightly challenge, it fits a missed challenge to a T, so I'll toss #18 in and check it off the list. "Descriptive Food January 25 - February 7
We all know those recipes that come attached to interesting and
imaginative names - slumps, crumbles, buckles, trifles, flummery. Pick a
historic recipe that has a descriptive title." Boar's Head isn't a funny name, but you know exactly what you are getting.While this was not intended as a Historical Food Fortnightly challenge, it fits a missed challenge to a T, so I'll toss #18 in and check it off the list. "Descriptive Food January 25 - February 7
The Boar's Head feast was a traditional dish served around Christmas in Medieval Europe, Elizabethan times and later centuries, predominantly in France and England, but also America. Usually sometime during the 12 days of Christmas, which are December 25th to January 5th, for those of you who don't know. Advent is what comes before, from Nov 29th to Dec 24th. There seems to be a modern confusion of those blocks of time.
I didn't make it for Christmas as we had originally planned. This and that delayed the project and it actually ended up being a week into Lent. Oops.
Also, what I had originally planned as being a full Christmas dinner turned into a dish-to-pass party, which worked out very well; but no king cake, or plum pudding or gingerbread. I did what I had the time and resources for.
There are a few redactions and original recipes that I pulled information from, and some things I'd do differently next time (har), but it turned out OK. The main thing I regret, aside from forgetting the ears (oops), was not having sprigs of rosemary to surround Miss Piggy. That was a major oversight, but again, I did what I could with the resources I had. Mistakes aside, I'm insanely pleased with how things turned out.* It's a rich meat and fruit pudding/stuffing, and it certainly made a statement.
*I cackled.
"Take a head, large or small. Boil it in water and wine, and when it is boiled make sure that the bones all stay together next to one another. And remove all the meat from the bones of the head. Strip the skin carefully, the white part from the meat and chop the other meat from the boar’s head very small. Put it in a pan. Spice it well with pepper, ginger, and a little cloves, nutmeg, saffron, and let it get very hot over the fire in the broth in which the head was boiled. Next take the boiled head and lay it in a white cloth and lay the skin under it on the cloth. Then spread the chopped meat all around on the head and cover it with the flayed skin. And if you have too little meat from one head, then take it from two and cover the head entirely as if it were whole. Next, pull the snout and the ears out through the cloth. Also, pull the teeth together again with the cloth, so the head is held together while it is still warm, and let it lie overnight. In the morning cut the cloth from around the head. In that way it will stay whole. Then serve it with a cold farce made with apples, almonds, raisins. Thus you have a lordly dish."
Marianne Hansen. “And Thus You Have a Lordly Dish: Fancy and Showpiece Cookery in an Augsberg Patrician Kitchen.” Medieval Food and Drink, Acta, vol. xxi. 1995. (Many thanks to http://dream-designs.net/roxalana/?p=476 for posting several recipes & redactions)
This is the one I was going to do to the letter, but disliked the way some of her teeth looked, and didn't want to chance that she had an abscess* so I did not boil the bones or use them as a base to re-dress the head. I pickled the skin in a wine mixture
1 c. salt
1 c. apple cider vinegar
3 c. cheap sherry (bottom shelf)
water to cover.
Heated this and let the skin sit for 3 days in the cool basement (about 40F).
Then proceeded as stated above, but without bones, so the face skin ended up being a sack. I left much of the facial muscle structure intact so that she had some character without the bones. On the down-side, I had to buy A LOT more meat to fill this. I served it hot due to time constraints, so it was more like stuffing than pudding.
*(rotten teeth, abscesses & enlarged livers happen due to high grain & dairy diet in pigs, the diet is common in American feeder pigs, which usually don't live long enough to suffer the ill effects; but is not so good for a keeper who is expected to breed, and my guess is that this pregnancy didn't take due to a dietary imbalance & her enlarged liver. Fine to eat the meat, but if she had been human her doctor would have put her on medicine and told her she needed a change in lifestyle and diet).
OK, I've dithered long enough, if you haven't figured it out, the gore is about to appear. So, if you don't want to see it, bail now. You've been warned.
do
rae
me
fa
so
la
tea
do!!!
Monday, February 23, 2015
Herb Pot Pie, or Totally Change Everything

It’s a two part challenge! Either create a dish that relies on borrowed ingredients, or create a dish that involves the color blue. Bonus points if you can achieve both!
Herb Pot Pie
a redaction from "French Taste in Atlantic Canada, 1604-1758, A gastronomic History"
The book is borrowed... the redaction is borrowed... heck, I borrowed nearly every single ingredient going into this thing!
Since this book doesn't provide the originals I have hesitated to use it, and while I don't question the quality of the authors work, it also doesn't provide much information as to when/where/who a particular recipe was recorded.
1 1/2 portion of pate fine (p 78) - (I "borrowed" my own lard crust as the kid can't eat butter, it's very close to the one listed).
1 egg yolk for glaze
1 lb spinach, arugula or lettuce leaves scrubbed & well dried (baby spinach and asparagus as that's what was green in the fridge)
2 tbsp butter (omitted)
1/2 c. white sugar
1 c. day-old bread without crust, diced
1/2 c. ground almonds
1/2 c. mixed pine nuts & golden sultanas (I used sunflower seeds as I was out of pine nuts - curses! Another substitution! and currants <-- blue="" br=""> 1 tbsp candied lemon peel (aack! I'm out! orange peel, curse it)
1/2 tsp rosewater (are you kidding me, that's gone too?!? orange juice)
1/2 tsp "epices douces du patissier" (p 86) (which is NOT on p. 86, and my french is horrific, so I guessed they were talking about "mild spices for the pastry chef and added a few dashes of the following: white pepper, ginger, cloves, cinnamon & nutmeg in approximate proportions).
Butter for dish (omitted)
This left me wondering if it's even the same recipe because I "borrowed" so many ingredients, some planned, some by accident.
In any case, it was very delicious. Much sweeter than I anticipated, but very, very good. I like the white pepper with the traditional sweet pie seasonings.
Please note, I was planning on doing a full blue table setting, and pumpkin soup and a few other things for dinner, but my father brought home a new beagle "pup" who led us on a merry chase over frozen fields & icy roads after he slipped his harness chasing a cat. The lady said he was trained. He is not. He doesn't even know his own name. So anyway, I chased a dog vs. setting a delicious table. He is a very nice dog and loves my kid already, so if all goes well at his vet appt today, he'll be a keeper.
Monday, January 26, 2015
The Beast Is Rising... um, I mean Yeast. The Yeast is Rising.
 |
| My first yeast bread as an adult. Cuz I'm A Big Girl Now! |
I've always had this irrational fear of bread making.
Yeah, I know. But it's true. So I finally decided to have my mother buy the uber-scary yeast (which I then tossed in the cupboard like a dead snake - if you've ever done hay you know what I'm talking about) and specifically avoided it for a few weeks.
Today, spurred on by the lack of smell in the positively mouth-watering picture of my friend's homemade bread, I decided to scale this particular cliff, confront and slay the Evil Yeast Beast and MAKE BREAD.
Using a modern recipe:
http://www.tasteofhome.com/recipes/basic-homemade-bread
The reason for this is that it's (slightly) more certain than a historic recipe. It also has reviews. Good ones.
I'm using 1/2 pastry, 1/2 whole wheat flour vs. all purpose, mostly because it's what I had on hand.
This was much easier than what I remember making bread being like... which is a huge, horrible, stinky, sticky mess. This was not that at all.

First, it was scary (yeast is scary). No, it really is scary. Trust me.

Mixing it up was scary easy.

I was afraid it would be really sticky, and it was for like 8 seconds.

OK, maybe 12 seconds...
Then I kneaded it for 10 minutes, during which time I was no longer afraid. Nor did I take pictures because my hands were all flour... however, it got scary after that because raw bread dough covered in oil is like a monster that will eat you alive in your sleep. Don't leave this stuff in the fridge over night, it'll ooze out & swallow the dog like a giant D&D monster ooze from the Monster's Handbook.

Letting it rise was scary. Yeast is scary stuff. Trust me... see? Terrifying. It's ALIVE!!! ALIVE!!!

Punching it down was way scary (and ridiculously easy) I vant to suck yur bluud...

Loading the loaf pans was not scary, and very easy.

This may have been the single easiest thing I've ever baked in my life. Not even kidding.

So, yeast bread is not scary. It's stupid-easy. WHY do we buy bread? I have no idea. It was insanely cheap and while it took 3 hrs start to finish, it was really only a few minutes of hands-on work. Like 20 minutes literally. 3 to mix, 10 kneading, 3 to punch it down and form it into loaves, 2 to pop it in the oven & take it out. Allot a bit to clean up and you are done. No monsters, no vampires, no D&D oozes. Which is a shame, because if I remember correctly those things can eat swords and armor as snacks.
Subscribe to:
Posts (Atom)