Wednesday, November 26, 2008

hunting shirt... I mean coat...

This was a not-so-interesting project that turned out very nicely.

The "hunting shirt" is an uncertain garment from the 18th century that was made to go over other clothes (so it was big) to keep them from getting wrecked while you, (the man), went hunting. This goes in the same category as the "fringed frock coat," which I've found few reliable historic references to... yes, I know it's a Rev war coat and was issued to several companies, but I can't find a picture from the time period, only written descriptions. So much can be lost in writing, especially when it's a visual thing... you try describing how to knit a sock without diagrams...

In any case, the "hunting shirt" was BIG, went over your other clothes and could be a pull-over like a regular shirt, or split down the middle like this one. Aside from that I've only come across references to buckskin hunting shirts (and some of the originals still exist). I'm not saying the references aren't out there, I just haven't found them yet.

My dress dummy has cardboard shoulders on it for a man, and they are a little too wide for this customer, but perfect for another long-term project, so I didn't change it for the photos... I know it looks funny with a man's shoulders and a woman's bust.

This hunting shirt is made from linen/hemp fabric and lined with wool. The color contrast is fabulous! I'm so happy he picked brown.
My customer sent me the linen/hemp blend, which was a joy to work with. I had to wear barrier cream on my hands & face because I'm allergic to hemp, but it has the most wonderful texture, and is truly beautiful. The linen/hemp is silver, cream and soft gray... really beautiful. The wool is "100%" from JoAnn's, (but any wool from there is really 3% acrylic to help it keep its shape). It's a delicious red-brown that doesn't show up well on the computer.
Both fabrics were felted (meaning I washed the heck out it in really hot water a couple times, then tumbled dry to "fuzz" it up).

The small pieces (cuffs, collar, neck gussets & arm gussets) are all cut over-sized due to the thickness of the fabric. The large pieces (bodies & sleeves) are cut "normal" size, but long as requested.

The only parts that are lined are the body and sleeves. The fabric was so thick that it became too stiff to work with as it was layered. I did a lot of clipping seams to get things to lay flat, especially in areas where there is pleating (cuffs, sleeves & neckline). After clipping, I overlocked those edges to make the garment more stable. This helped flatten the seams, but it made them stiffer. Then I cut them to 1/4" to reduce the bulk even more. I made a diagram... click on it for a full sized image.

The front & hem are fringed to 1".

The best part of this hunting shirt is that it's hand finished. This means all seams that show (except the sleeve gusset) are hand stitched. The collar & cuffs are finished by hand, so is the neck gusset. The lining is hand stitched to the sleeves on the inside, and hand stitched to the body along the opening & hem. It's set back a little so it doesn't show from the top side. I used a combination of overcast & back stitch for this. Both work well. I could have used a running stitch if I knew the shirt wouldn't get thrown in the washing machine... but I'd rather be safe than fix it later.

If you click on this image you should be able to see the light stitching on the center front. I used thread that matched the outer fabric. I like the way the lighter thread looks against the red-brown wool. You can't even see the thread from the front unless you look really hard from very close up.

The finished garment is very heavy, almost 5 lbs. It should be a warm coat for the rest of hunting season!

Thursday, November 20, 2008

Artistic Dress: the Countess Brownlow Dress in blue

This was an exciting project (well, exciting to me) and I really enjoyed working on it. It was supposed to be simple, yet these things never work out as planned.

An Artistic Dress can be just about anything, but they were inspired by the Pre-Raphaelites, and the idea was to do away with the heavy corsets and body shaping that was so common for several hundred years. Artistic Dresses can be very simple or incredibly complex. My prices start at $100 because the simplest types of artistic dresses are very much like the chemise dresses of the late 1700's, which are super-easy to make... and very beautiful.

Last year I made an outfit for an English Country Dancer (early 1800's) and he was very happy with it. His wife, L., ordered this dress about 2 months ago. I've had a huge backlog, so it took me a while to get to it. Her event is Saturday. Talk about the skin of my teeth.

We looked at all different artistic dresses, and pricing it out we came up with this one. It's Countess Brownlow, painted by her husband, Leighton Brownlow in 1879. Isn't that gown fabulous?
It's essentially a chemise dress with a fixed yoke, fitted undersleeves, poofy drawstring oversleeves and a self-fabric belt (sash, whatever). As far as I can tell it would close in the front with the belt fastening in back. The petticoat is satin, and most likely a gored skirt without a bustle. She is probably wearing a chemise under everything, and at this point drawers... though I'm not sure about lady's underwear in the Artistic movement, I've never come across that information.

L. wanted the dress in blue cotton from the beginning, and we decided to go with the satin petticoat as well. Unfortunately genuine (ie, not poly) satin is quite expensive, so we (I) settled for a cotton/poly blend, which is quite pretty and fairly durable, and OK for what she wants it for. I used silk to trim the yoke, and standard cheep nylon/poly ribbons for sleeves & drawstrings. The thing has a million snaps.


Construction:
BODY: I started out with the chemise dress pattern (Cut of Women's Clothes) and modified it from there. First I raised the neckline, both front and back, then got rid of the train and scoop neck (to create a more square neckline). This naturally increased the size of the armholes, which is good as she has to have full arm movement.
I got rid of the drawstring under the bust, but kept the one at the waist.
Increased the size of the shoulder straps and reduced the amount of fabric due to the thickness... it's a thin cotton, but for chemise dresses you need something you could watch t-v through, and she's a small woman.

SLEEVES: I increased the size by a lot. Added 6 drawstrings instead of the original 2. This is designed as a 1/2 sleeve, which will end just above or below the elbow. It was 32" long.
The next thing was to mount it on a long undersleeve to give it structure and the lower sleeves that stick out. I used some Edwardian cut that I didn't take note of, other than it was the shape I wanted. It's really quite comfortable.

PETTICOAT: I used an original magazine pattern (1886 from Goodeys, I think) for an All Round Skirt, that is super-pretty and works well for a variety of styles. The butt is pleated and can fit over a small bustle, or train on the ground. I left this one short so she could dance without tripping over it... hopefully. It has a fitted waistband and closes with hook & eyes and one lonely snap.

My dress dummy always makes things look stubby; it needs a new stand.

Sewing:
1. I fit the top together like a chemise dress (real helpful, I know) then sewed the sleeves and set them.
2. I sewed the front together leaving 4" open below the waist so she could get it over her head.
3. Then I draped it over the dress dummy (too big for my customer) and arranged the folds to look nice. That took some time.
4. It took a while to figure out what trim we liked, I did a lot of pinning and picture taking. She settled on the bi-colored silk, which I loved too. I also really liked the white lace (at left), though that made it much more Edwardian than Artistic.
5. I hand stitched the silk onto the dress, creating the fixed yoke. I didn't sew through all the layers, this gives it more dimension and better shape.
6. It took even more time to figure out how I was going to close the front. I finally settled on snaps and discovered that I HATE sewing the bloody things on. A button takes 30 seconds. A snap takes 10 minutes. No joke. Figure that in for your time if you ever decide to use snaps. I used 20 of the little buggers. Get thin needles.
Snaps were common in Edwardian garments, I'm not sure about the historic accuracy for the 1870's.
7. Sewed the satin hem on, and finished off the sleeves with a narrow satin bias tape.
Note
: I always cut my own bias tape from the same fabric. It looks better and wears better.
8. The hem is hand-stitched. Watched Pirates of the Caribean while doing that. "Cuffs" are hand-stitched too.
There was a lot of hand-stitching.
9. Cut & sewed the petticoat. I used French seams and did a machine hem due to time constraints. It looks OK. Because it's a gored skirt the hem is a little crinkled on the inside, but looks great on the outside.
10. Attached the waistband and then sewed on the hooks & eyes and the last, lone snap.
11. Pressed the heck out of everything then boxed it up to get wrinkled and carted 1/2 way across the state in a Fed-Ex truck.

The dress and petticoat came to $175 before tax and shipping.

I took pictures, but in my typical fashion, not the ones I should have.
Here are some more Artistic Dresses for your viewing pleasure.

Symphony in White
Whistler
1862
(This is the one she wanted to begin with, but it prices out at around $250)... not including the polar bear rug.
This is a very fitted dress, it's got a pleated bodice that probably goes over a cut base (that's how I'd do it), long undersleeves with poofy oversleeves and cuffs. A gored, trained skirt (attached), belt and tons of buttons. Lace at the collar. The most complex thing about this dress is the bodice. It probably has a hidden button placket down the front to get in and out of it.


Jane Morris in a blue silk dress
Not sure if this is the title... probably not.
Rosetti
1868

You can see how this one is a little more fitted than the Brownlow dress. It's got a top very similar to contemporary garments, without the bones. It may be a sack-type dress with a separate belt, or the belt may be part of it... could go either way.
If I were making this I would want to use silk, but just to sew it would probably be around between $150 and $200. The belt with silk flowers would add to that.


Portrait of Francis Leyland
Whistler
1872-73

Dear God I love this dress! Someone please order it so I've got an excuse to make it.
This is a super-complex garment, yet the simple elegance makes it one of the most beautiful dresses I've ever seen. I LOVE this dress.

It's a princess cut base ($250), with a separate yoke gathered at the shoulders in elegant little lines. I love the trim that connects the yoke with the body in back.
The sheer overlay is a sack-back tea gown ($200) with embroidered blossoms. Another overlay in blue makes up the sleeves and part of the yoke.
Then that fabulous collar! Heavy metallic trim with lace framing the neck.
And the cording that wraps her arms!
To make it would be somewhere between $500 and $1,000 depending on the fabrics. With hand embroidery or appliqued silk flowers it would be quite a bit more... but worth every penny.
Have I mentioned that I love this dress???

Monday, September 8, 2008

18th century trim: Rosettes

A rosette is a strip of fabric or ribbon gathered or pleated into a round shape. It can be single or layered with other rosettes or trims, like beads, lace, silk flowers, jewels, etc. Rosettes were accessories that could be worn on almost any garment.

There are several kinds of rosettes, and a lot of them were used on 18th century clothes, hats and shoes. You can see one on a French Revolution hat here, I think it's ribbon, but it could be a metal medallion made to look like a rosette.

You can use ribbons, lace or fabric strips to make these. Ribbons work the best, and striped grosgrain ribbon works the best of all. In fact, any striped material will totally rock with this trim.

The first type is a round fabric rosette. Cut a length of fabric (the wider the strip, the longer you will need). I used about 10" of fabric to make a 3" rosette (1.5" strip). You need to have enough fabric to go around the outside of the circle without curling in, and enough to turn over at the ends. You will need more if you want a frillier rosette.

Finish the ends of your strip however you want, I rolled a small hem for this one.

Depending on the material, you can do one of 2 things.

1. Tie your thread at one end, make a running stitch along the "inside" edge, then pull the thread tight. The fabric or ribbon will make a nice neat circle and you can stitch the center closed from the bottom. Leave the ends of the thread if you are going to sew it onto a garment, cut them if you are attaching it to a pin or clip.
This works well for lightweight fabric or ribbon.

2. Anchor your thread at one end, make a very small pleat and overcast stitch it in place. Make the next pleat with a slight curve toward the center. Stitch in place again. Repeat. You may have to make several stitches to keep the pleats in place, but don't panic if they slip around a bit.
This works well for thicker fabrics or large rosettes. You will have to finish the inside with a button hole stitch, or put a smaller rosette (or bead) on top to cover the hole.

The next kind is a folded ribbon rosette, which I'm too tired to make tonight, but you can see a great video of it here. She's a bit sloppy, (because it's modern), but the first one she makes is one of the more commonly worn types of the 18th century. If your edges and folds are a bit neater, it's perfect. The cut bit she gets into is more along the lines of silk flowers rather than true rosettes, and is more 19th century than 18th.

18th century trim: Chain Puffs

I'm sure there is a correct name for these things, but I haven't come across it, so I'm calling them Chain Puffs. This is a really nice trim, it's easy and takes a lot less fabric than ruffles or ruching. It was very common on gowns and petticoats in the 18th century.

It can be cut on the straight or the bias, but I think straight is easier.

Step 1: Cut or rip fabric strips. These can be self-fabric or a contrasting fabric. Lightweight fabric (silk, taffeta, cotton, etc.) works well and 3" is a good width to start with. You can use heavier fabrics, but plan on covering the ends with something else... like a rosette!
Step 2: Sew all strips together (see comment on Ruching post)
Step 3: Sew strips into a tube and turn. DO NOT press. Leave it puffy. If you use sheer fabric, you can stuff the tube with a smaller tube at this point.
Step 4: measure & mark the intervals you want the puffs to be. I marked every 2" on this garment and it looks great. You could do shorter with lighter fabric, or longer if you used a wider tube.
Step 5: Gather the fabric into a W shape by pinching up the center then pulling up the edges at your marks. Make a small stitch in the center or at the bottom. Do not overcast onto the top side, you don't want your stitches to show. Tie your thread off and repeat until you've pinched the length of the tube. At this point your puffs will be a bit sloppy, don't panic you'll finish them later. Bury the ends of your threads or cut them very short.
Step 6: Arrange the chain on your garment and pin each puff. Don't stretch them sideways too far or they will pull on the fabric. Make sure there is a little give length-wise so there is room for more "puff".
Step 7: Cut a comfortable length of hand-stitching thread and stitch the ends under the first puff or plan on covering the raw edge.
Tack each side down and then tighten the pinch with several passes through the center near the top of the pinch. Tack the pinch to the garment.
Try to keep your stitches small, and make sure you don't pull too tight. Keep the threads between the fabric & lining, or inside the puffs so it doesn't show. Keep your stitches small and hidden. The blue line shows the easiest thread path.
Step 8: Tuck the raw end under the last puff or cover it with another bit of trim.

Here's a close-up of the finished chain puffs.
Sorry it's dark, I'm on my husband's computer and he doesn't have an image-editing program.

This chain was made with a heavy cotton, and is very heavy. It's the look I wanted, but I won't be using something that thick again. You could actually iron these things and they wouldn't flatten much.

Use lightweight fabric if you decide to do this.

18th century trim: Ruching

I've looked for a nice site that tells how to make trim for 18th century garments, but the closest thing to helpful that I've found are sites on modern ribbon crafts or quilt applique.

The first trim I want to show is Ruching.
This is a ribbon or fabric strip that is gathered and stitched down.
The most common place this was seen in the 18th century was on Sack-back gowns or Brunswicks like this one.

This is Lady Mary Fox, and I want this Brunswick... without the dog.

If you are using self-fabric, (the same fabric the dress is mad out of), which was the most common thing to do in the 18th century, you have to decide if you are cutting on the bias or the straight grain. Each looks different, so try it out and see what you like. (If you are doing lots of curves, cut on the bias). This takes up quite a bit of fabric, so plan on buying at least 2 yds for trim.
Sew all your strips together end to end... make sure all your seams are on the same side.
Next you need to finish the edges. Sometimes it was turned over, pinked, or a decorative stitch was added. I've seen some paintings where it looks like there is separate trim of the same color. This could be dyed lace, or a crocheted edge... I'm not sure.

There are many variations in the stitch, here are 2 basics.
The first is a straight running stitch that is gathered. Make sure to gather and then backstitch every 10 stitches if you are using one thread.
You can do 2 running stitches side-by-side and gather the material all at once.
Modern sewing machines do a great job if you are making doll clothes, costumes or are in a rush.
To make even gathers, measure every 3" and gather into 1", or something like that.

There is no substitute for hand stitching historic garments.

The next looks best on finished edges, wide trim 3" or more, or ribbon. It doesn't work well with pinked edges... which I'm using anyway.

Mark your trim at even intervals. Sew a running stitch from point to point, looping over the edges. Pull the thread straight and you get a squiggly looking ruche.

A nice variation is a curved line rather than a triangle, it's very historic.


These are the 2 finished ruching styles. They can be edged, stitched down once or several times, paired with beads, lace, other trims, etc. Just look at some paintings or historic garments.

The fabric I used here was cut on the bias and is a very narrow scrap, about 3/4". Use wider stuff unless you are making doll clothes or sleeve trim.

A nice combination is stitched pleats with ruched edges. This was done by sewing gathering stitches on the straight fabric, stitching down the pleated center and then pulling the threads tight on the outside. You can see this in several sack back gowns from the mid 1700's.

Here is a doll dress I made as a test garment for a sack-back gown from one of Diderot's illustrations. This was more to figure out the lining than anything else, but it's a nice doll dress... to bad I still have to make the doll to go with it. The ruching isn't perfect, but it's a nice example.

I will eventually make a sack-back gown for myself and it will have loads of ruching on the gown and the petticoat. First I need paniers and fabric... then I need some serious time.

Why, oh why do I want a dress that will make my hips look even bigger???

Thursday, April 17, 2008

How to make a wedding dress in one week.


I have been painfully reminded why weddings take so long to plan and why the dresses cost so bloody much. It's because they are expensive (materials) and labor intensive.

The back-story...
I made a tailcoat for this gentleman, and he loved it. He'd told me it was for a wedding in early April, but he didn't say it was his wedding. Good man to lie and give me a date a few weeks ahead of time. Good job! (no, I mean this, ALWAYS lie to your clothing suppliers and tell them the date is sooner than it really is... So then he e-mails me back and says "help! my fiance's dress isn't done and the woman we ordered it from has stopped calling!" I told him to contact the woman and tell her to call you back and let you know if the dress will be there, or if you have to make other arrangements.
A whole week went by and I heard nothing back. Then the fiance e-mails me HELP!

So that's how I came to make a wedding dress in 7 days.
The process normally goes something like this:
Customer orders. I find an historic pattern and whip up a test garment in their size (or mine just to see if it works). I try it on someone of approximately the same size and then make any necessary adjustments. I get fabric, wash, iron, etc. Cut pattern, Sew. Take photos, send off and hope it fits. If it's really complex, (like a wedding dress) I make a sloper and send it to them to make sure I've got the right shape.

This is how THIS dress went:
Day 1 (I've got the flu)
I got a frantic e-mail... didn't hear back... started looking for patterns anyway.
Found 3 great patterns.
Got the e-mail without payment or measurement information (which means no actual order).

Day 2 Start 3:00 pm

Started tracing out the pattern anyway in the original size.
Got the e-mail with payment and measurement information, get phone call with specific info.
Re-sized the pattern and made design changes.
Cut & sewed a test garment, re-cut & sewed a test garment that would fit a human.
Checked measurements and made notes.
End11:20 pm

Day 3 Start 6:40 am
Made new test garment & figured out mechanics of bodice.
Went shopping for fabric ($ from credit hadn't come through yet... Mom paid for it)
Cut "actual" bodice & sewed together
IT DOESNT FIT!!!
End 3:20 am

Day 4 Start 7:20 am

Re-fit pattern, cut new bodice.
Cut skirt, sew.
NO GO, IT DOESN'T FIT!!!!!! AARGH!
Re-work pattern again.
Re-cut (praying I've got enough fabric)
Re-sew.
FITS!!!
End 9:00 pm

Day 5 Start 7:50 am
Sew skirt, it fits!
Cut overskirt (lace)
Sew that.
LUNCH & shopping for odds & ends.
Sew bodice
Sew sleeves
End 11:00 pm

Day 6 Start 7:30 am
Pin everything together
Re-vamp sleeves.
Sew together.
arrange skirts,
pin, sew, attach.
Hand stitch trim on neckline
finish hooks & eyes at back.
Take pictures, mail the sucker (not 100% finished... but wearable)
End 8:15 pm

Day 7 Start 1:00 pm
Make bow & lower detachable sleeves
Send
End 4:45 pm.

This whole thing cost her $500 + $100 shipping. Holy Cow! I really hope this fits her.

Saturday, April 5, 2008

Blue Cotehardie


Here is the finished blue linen cotehardie. It's been done for quite some time, but today I got good pictures. The chemise is a 1500's version, and not for this dress. However, when modeling for paintings, historic accuracy often takes a backseat to artistic license. Note the relatively modern spinning wheel and fully modern blinds. I think my coffee cup is in the window sill.

I'm very pleased with this series of photos, and just wish I'd been able to wear the right chemise (see the previous entry on the 1400's cotehardie for the inspiration painting) and my veil. I may re-do the photos for my online gallery, but these will do for now.

This modeling session made me very interested in the process of spinning. After holding that small hank of wool for so many hours, I can see how it would be a meditative past time. It had a very pleasant pull and felt smooth. I think I would really enjoy spinning. This may be something I will look into in the future.

As of right now, I'd like to replace the machine stitched button holes with hand-stitched holes and the commercial ribbon with a 4 strand cord. I'm working on a fairly big order at the moment, getting ready for an event in May and making more test garments, so I really don't have time for these alterations. I may or may not get to them before summer.

I love this dress. It's comfortable, pretty and has a divine power to resist stains of all kinds (including coffee and oil paint). It's not quite as long as an historic gown, the back just touches the ground, but in these modern germ-infested times, who wants to drag your train through the mud? I may add a white linen boarder for length... if I do I will replace the gold edging with white... and drag that through the mud...

Tuesday, March 11, 2008

An analogy for emotional... baggage


About 10 years ago, one of my friends was having trouble letting go of emotional baggage. Someone would say or do something that hurt her and she would carry it around, mull it over, let it pace around inside her head until it practically drove her mad.

Another friend provided this extended analogy for her situation. I though he was very wise. (this is my dad's dog Punky, btw)

A man has a dog, and he loves his dog. They go to the park and play fetch, they go for long walks in the morning and afternoon. They sit together by the fireplace at night while the man reads and the dog enjoys his bone.
As with all living things, the dog eats, sleeps and, well... poops.
The man has several choices available to him post-poop.
He can
A. Pick up the poop and throw it in the trash (or flush it).
B. Leave the poop.
or
C. Put it in a paper bag and leave it on his neighbor's doorstep (perhaps even light it on fire), then ring the door bell and run away to hide behind some bushes to watch the outcome with glee.

The responsible, kind person A will pick up the poop and throw it out so that no one steps in it, or has to step around it, or smell it, or look at it. This is the attitude of "poop happens, clean it up." A is the type of person who simply deals with life as it comes and doesn't sweat the small stuff. After all, he has this wonderful dog as his friend, so what if there is the occasional mess that must be taken care of? It's all part of being a pet person.

Option B is the lazy thing to do. B doesn't have to plan ahead by bringing a plastic bag when he walks the dog, and once the dog does it's business, he moves on. The poop is behind him, and he has forgotten about it. Most importantly, he don't have to carry icky-poo anywhere!
Occasionally someone will step in the poop, and if B sees it he will laugh. Or more rarely and even more ironically, he himself may step in week-old poop and become angry that no one has cleaned up this awful mess, and now look what's happened!
B is the type of person who doesn't realize that his actions affect others, or himself. He do not understand that there won't always be someone else to pick up his mess, or that poop can hurt those around him. He is carefree, and often careless. He blames others for his shortcomings, and offers half-hearted apologies when he gets caught. He isn't mean; he simply doesn't care.

Option C is the one few people take, but everyone thinks about every once in a while. C is usually a kid playing jokes, not thinking about the consequences of his actions, not translating his joy in the joke to the other person's horror at finding a flaming bag of dog poop on their doorstep. Of course, C can be any age, and doesn't necessarily need to light the bag on fire to get a giggle out of it. Usually just the look on the unsuspecting victim's face is enough for him to get his jollies. What it comes down to, is that C is just plain mean. He takes joy in the discomfort of others and doesn't give a thought to anyone but himself. He probably don't even feed the dog... he only want the fun stuff!

Now, dear readers, let's look at this from the neighbor's point of view.

The neighbor of person A will most likely come out and have nice chats with A, they may even visit for coffee in the mornings and have pool parties in the summertime. They will think of person A with respect and fondness, and occasionally marvel at A's ability to deal so gracefully with poop when it happens. They never need to worry about stepping in A's dog's poo.

The neighbor of person B knows to watch out for dog-bombs along the sidewalk. They know to 'tread carefully' when walking the same paths, and they may say hello, but never get into deep conversations for fear of being associated with B, who leaves dog poo on the sidewalk. They may occasionally forget to be cautious and end up stepping in what was left behind. Neighbor B, now has 3 options.
1. They can scrape off the poo on the grass and wash the rest off with a garden hose.
2. They can curse and throw away the poo-smeared shoes.
3. They can bemoan the fate that has befallen them and walk around life wearing shoes with dog poop on them.

The neighbor of C learns to be cautious. They build a fence with a locked gate, or put the house up for sale and move to a safer community. They always check the ground before walking out the door, and they never, EVER let their guard down. They live in a constant state of anxiety about what terrible dog-poop thing will happen next...


Now, my friend was the 'neighbor' of 'dog-owner C.' She was always on her guard against certain people, and eventually against everyone. She expected to be hurt, so even when A was being responsible, she was offended at the his interaction with the poop, and eventually mad at the dog for producing it, then mad at A for having a dog that made poop!

Now, if you are neighbor C, and someone leaves a steaming(or smoking) bag of dog poop on your front porch, what are you going to do?
Well, anyone's first reaction is going to be EEEEEEWWWWW!
Then you will likely put the fire out. (As I recall, the point of the joke is to watch the person stomp on the bag only to get dog poop on their shoes)...
You know this is an all-around bad situation and that someone is being blatantly mean. So what do you do after putting out the fire? Do you wash off your shoes, throw them out, or walk around covered in dog poo all day?

What wold you do if someone left a pretty paper bag on your porch?
You could leave it there, call the bomb squad, or pick it up and open it...
I'd open it.
Then you find there is dog poop under your nose. Ick. So now what?
You can throw it away,
Give it to another neighbor (or leave it for your spouse to find)
or carry it around with you forever... after all, it was a gift that came in a pretty paper bag!

No matter how C delivered the "gift," it's still dog poop! Blatant or sneaky, it's still a mean joke!

No one wants to carry around a steaming, then cold, then old bag of dog poop, so why, oh why do we carry around these emotional burdens of past events that are done and over, and really just a part of life that should be tossed? Why re-open that bag to look at the same poop? It's just older poop! It's not going to change. Dog poop isn't going to get nicer with time!

Just throw it away. Enjoy the dog, if you can't deal with poop, give the dog away.

Wednesday, March 5, 2008

Regency Tailcoats

I've been getting a lot of orders for Regency Tailcoats lately. By a lot I mean 3. There are a few Jean Austin Balls coming up, and the guys are getting ready. I now have 2 gray coats in stock. One is double breasted, the other single breasted. Both are quite pretty ($200 if anyone is interested). This picture is of my husband reluctantly modeling the single breasted tailcoat, (unfinished in the photo), over his jeans and t-shirt. I must say, it suits him much better than a sweatshirt. This coat is a little big for him, but fits me quite well. I look great in a tailcoat and 1812 stand-up collar!

I got the pattern from The Cut of Men's Clothes, a truly wonderful book and a good investment for anyone interested in costuming. (I'm saving for Cut of Women's Clothes, and Corsets & Crinolines). Most of these patterns require an extensive knowledge of period tailoring, modern sewing and pattern-making experience. I started by blowing up the pattern as-is, then adjusted it to fit my customers. None of the drawings include seam allowances, so if you work from them, be sure to add 1/2" allowances (much easier to calculate than 5/8"). If I thought in metric it'd be even easier.

I like to draw all of my patterns free-hand and check everything with a ruler and measure tape many times. I also use grids and plum lines. The T-square is my friend! Someone suggested that I pick up one of those curve-makers at JoAnn's, but I've found them difficult to use, and for me it's easier to just re-draw a curve by hand. There have been a few garments that I've made miniatures of, just to understand the proper assembly and finishing techniques. Doing this saves fabric and prevents nasty surprises (like, the directions didn't mention the gown had a bodice lining that is totally different from the outside!)

One thing I noticed is that most of the CoMC patterns are quite small. At first I thought the tailcoat was for a child or very young man, but then I looked at the back-waist measurement (17") and realized that the person was actually a little taller than my petite 5'2". They were just very, very narrow. In the last 200 years Americans have gained a lot of weight! Our shoulders and chest have gotten broader, we have grown taller (my great grandmother was 4'10 and only a little under average), and we have gotten much bigger around.
This is a generalization, of course, one of my many-great grandfathers was over 7' tall, he may have been a giant.

The small waist could be explained by a men's corset, but I don't think the person who wore this coat needed any help in that department. Corsets were commonly worn by men in the Regency and Victorian eras, and helped give them that wasp-waist / pigeon-breast look that was so popular for both genders. Puffed sleeves made shoulders look wider without adding bulk to the midsection.

You can see in the cartoon how a good deal of the body was artifice and clever engineering. One of my friends who also makes historic clothes made calf pads for a guy who did 1720's reenacting. He had very small legs and wanted calf muscles to look good in his stockings!

After making several of these tailcoats, I know doesn't have to be as complicated as the cartoon portrays. The coat is tight at the waist, then flairs at the hips and chest, making the waist look smaller, no matter what size it really is. The collar is heavily stiffened (I use a heavy wool with a fusible interfacing), and the chest is padded with the same material. The stiffness of the front and collar make it stand out from the body, making those areas look even bigger (instant pigeon-breast without a corset!).

In addition to the clever cut of the coat, the shirt has a wide stand-up collar, the cravat adds considerable bulk, and the waistcoat adds quite a bit of poof & foof to the whole look, while keeping it very 'clean'. You can see the white-on-white look was quite popular. I love the combination of royal blue and warm brown. Very striking. This particular gentlemen (Nicolas -Pierre Tiolier, 1817) is not nearly as romance-novel-worthy as another gent in similar clothes, but alas, his painting doesn't show the clothes as well.

As to the shirt, I've been using another CoMC pattern, the 1700-1810 shirt, with very wide cuffs, no ruffles, and a collar from Tailor's Guide (I turned the Highlander collar upside-down for a perfect 1812 collar). I could also use a very wide rectangular collar and get a similar effect, but I got a kick of turning theirs upside-down. For this last customer, I added a straight button placket to the front instead of leaving it open. I didn't think he would appreciate having an open chest, and I have found one example of an 1812 shirt with a 2 button closure. Unfortunately, painters didn't revel in painting men in their shirtsleeves like they did women in their chemises...

Fern Stomacher


After months of sitting, the stomacher is finally finished. I worked on it over a long weekend at Mom's house, and decided to go with light gold for the left fern. I'm not sure if I love the finished product, but I'm happy with the embroidery.

I tried adding darker threads to the gold stem, but the stitching is so close it was not possible, even with a 2 strand thread. Pulling that out was difficult without damaging the existing embroidery.

I finished embroidering about a month ago, and the material sat on my sewing table getting things piled on top of it, and being ignored until tonight when I decided to finish it off. It took about 5 minutes.

It is made of a linen cotton blend, lined with the same material. The stiff interlining is a heavy drill cloth (light green) that will never show, but will keep the stomacher from wrinkling. I could still add tabs, hooks / eyes or back-side lacing loops. Or I could leave it as a free-standing garment to be laced in.

The little white thing in the third leaf up is a stray thread. There are gaps in the embroidery where I wanted the leaves to look split. Again, I'm not sure how much I love that idea.

The next project I work on will be more realistic, and much more traditional. I hadn't intended this to be super-historic, but now that I've made one, I am looking forward to making another, much more historically correct design. I think I'll work on white linen or silk next time.

I may add a bottom and side section (see 18th c. stomacher post below for original). It will depend on what garment this ends up with. One of my upcoming projects is a Sacque back gown, or an open gown, which this could be worn with. I'm very much in favor of the sacque, but I would be limited as to where I could wear it.... which saddens me. I need to find a group that likes to dress up instead of dressing down.

Wednesday, January 23, 2008

How to hem a dress

I'm finishing the blue linen cotehardie that I started months ago. It has a hand-sewn hem and neckline. The rest of the garment is machine stitched, including the buttonholes in the side. I really should have taken the time to do those by hand, and I may re-work that later.

I love the blind hem stitch. Depending on the type of fabric, garment style and time period that you are re-creating, you should use variations on this fold and stitch. Most wool works well just turned over once and hemmed using a diagonal stitch. Silk must be enclosed in a double fold or it frays. Some linens can be turned once, but the one I'm using now frays easily and had to be turned over twice to hide the white over-locking.

Many reenactors leave dress hems unfinished, and this is fine if you have everything dry cleaned or don't mind hand-washing your garments. I like my washing machine because I get into poison ivy and mud wherever I go... so I hem.

Here are simple directions on how to do a blind hem stitch:
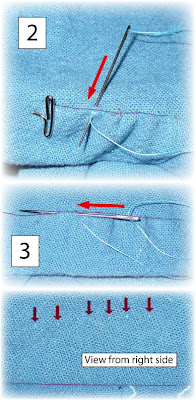
Arrows indicate the direction of the thread and the purple line is the top of the hem fold.

1. Cut thread to desired length, I use one short arm length (about 20")
2. Thread your needle and pull thread so it is roughly 1/2 the total length. For this stitch you should use a single thread, not a double. As you sew, let the thread out so it doesn't double up.
3. Attach the thread to the garment by burying it in the hem and making a few small overcast stitches. (see diagram 1A, 1B, 1C).
4. Pass the needle through all layers of fabric, catching 2 or 3 threads on the right side. Bring the needle back to the hem-side through the top fold of the hem. (see diagram 2) This is one movement.
5. Turn the needle sideways and make a 1/8"-1/4" stitch under the fold and repeat #4. (see diagram 3)


6. When you reach the end of the thread (when there's 4" left), make several overcast stitches in the same place and bury the thread in the hem fold. Cut excess. Repeat steps 1-6 until the hem is finished.

Without a thimble I can sew about 6" in 5 minutes. Longer needles are easiest to use as you can get more leverage.
If you like using thimbles, shorter needles work better and you can go even faster. (Thimbles are worn on the ring finger and only work for people with short nails. They need to fit properly).

Use thick or thin needles according to the weave of the fabric. Thick needles work well with loosely woven fabrics, like this blue linen. Thin needles work well with tight or finely woven fabrics like silk or lightweight cotton. If you are working with a combination, as I will be later, use a needle that is strong enough to go through the heavier fabric without pulling the threads of the lighter-weight fabric.

When working on a curved hem like the one on this cotehardie, you should expect some bunching. This can be minimized on the back by evenly distributing the excess fabric between stitches, and if done properly it won't show on the front at all. If the curve is very pronounced, you can clip the raw hem to make it fit better, though I don't recommend doing this unless absolutely necessary as it weakens the garment.

In step 3 (text, not diagram) I am burying the thread in the fabric. This is not an historic method, but I throw my reenacting clothes in the washing machine and simple knots don't hold up well to that kind of treatment. I rarely use the running stitch in garments that I know are going to see heavy use, because if the thread gets caught it has a tendency to pull or break. I did use the running stitch in the neckline of this dress because I plan on covering that hem with the gold silk, so the stitching will be completely enclosed.

In the final illustration you can see that the hem stitches show a little. If you use a thread that matches the fabric, you will never see these stitches. (I used this thread so it would photograph well without being too obvious in the finished garment). The hem is not perfectly even all around due to the curvature in the fabric. It is better to sacrifice the evenness of the hem than to have the finished garment bunch on the outside.

When the entire hem is finished, I will press it with a steam iron. Pressing means setting the iron down on the fabric, applying a little pressure, and letting it steam for a count of 3. It does NOT mean moving the iron back and forth over the hem. There is an unsubtle difference between ironing something flat and setting a fold. If you move the iron back and forth it may create a triple fold (where the fabric looks like a Y or Z), which will be difficult to iron out later. Always follow the recommended temperatures on your iron, or use a pressing cloth to avoid scorching or melting your garment. I melted my veil the day before my wedding and had to re-make the entire thing. Since Linen can practically withstand fire, I'm not too worried about it, but once I add the silk I will need to be careful when ironing the finished garment.

Monday, January 14, 2008

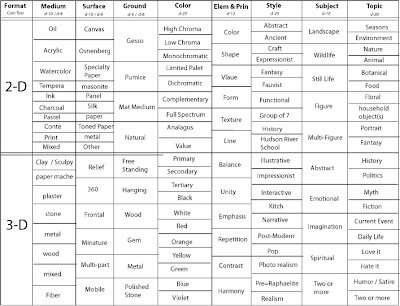
Trouble understanding the Random Art Chart?

Apparently I'm the only one who understands this. So, here's step-by-step instructions and 2 more examples with my thought processes.

The headings are at the top of the graph. You can use whatever category you want, but let's say it's completely random and you need to roll for all of them.
The first thing you decide is if it's a 2-dimensional or 3-dimensional project.
1. Flip a coin (heads = 2-D, tails = 3-D)
or
roll a die (evens = 2-D, odds = 3-D)

The 2-D / 3-D choices are separated by the double line that goes between 2-D and 3-D. See it? It goes through the first 4 columns then stops.

2. If it's 2-D, the next thing you determine is the Medium (this will depend on what you have available). Roll a d-10 (10 sided die) to choose from the first 10 options.
If it's 3-D, you also need to choose the medium, which you can roll a d-8 for (I have 8 choices listed).

3. Now, for 2-D you need to roll for a Surface to paint/draw on. You have 10 choices, so you roll a d-10. Some of these will work, some will not. Watercolor will not work on metal, so you would re-roll. However, it will work on silk.
For 3-D you choose a Format (listed as Surface, I just simplified it for space). You have 6 choices, so roll the familiar 6 sided die.

4. The next column is Ground for 2-D. Sometimes this isn't necessary, but I rolled anyway to see what ideas would spring to mind. You have 4 choices, so roll a d-4. This is how you treat the surface to accept the medium.
In terms of 3-D it refers to the Base or Support for the sculpture. You have 6 choices, so roll a d-6.

From here on out, all choices apply to both 2-D and 3-D, so you are using the whole column.

5. Color refers to the overall color scheme of the artwork. There are 20 choices in the column, so roll a d-20 and count down to get the result. If you roll "monochromatic," which is #3 on a d-20, you would then either choose a color or roll a d-6 for a random color (they are all listed together at the bottom). Monochromatic means one color + black and white, so they don't count for that option.

6. Elem & Prin stand for "Elements and Principles of Design," which I am using as the main element or principle of design. This does not mean that you ignore the others in your composition, it just means that if you roll a 5 on a d-12 that the main focus of your piece is Texture. This could mean that you are painting on a textured surface, adding oleopasto to oil paint to make it thicker, working with materials that have a distinct texture, focusing on the textural appearance of the objects in a still life, etc.

7. Style is next. You have 20 choices, so roll a d-20. I'm using this to determine how to make the artwork look. If I roll 14 on a d-20 it will be Kitch, which means I could buy it at a mall gift shop. If I roll a 12 it will be Impressionist, which means I pay attention to colors and light as they appear and let the edges go soft. You can put in any art movement or representational styles that you like. I used these because they are the ones I like the most and work in most often. I also chose some that I never work in to force myself out of my comfort zone.

8. Subject is next. There are 10 choices, so roll a d-10. Let's say you roll a 2. The subject is Wildlife. This could mean that you are painting an outdoor scene, sculpting a bear or even a drinking scene at the local pub (urban wildlife).

9. Topic is what's in the artwork. There are 20 choices, so roll a d-20. If you roll an 8, the topic is Portrait. So you are doing a portrait of someone or something or some place. All "portrait" means is that you are representing something specific, not something general. This means that if you got "abstract" as a style, and Wildlife as a subject, then portrait as a topic, you could do an abstract sculpture of a songbird that lives in your tree. It's not just any songbird, it's an individual. Get it?

OK, so here's 2 more examples with my thought processes.

Format: 2-D (I rolled a #2 on a d-4)
Medium: Watercolor (I rolled a #3 on a d-10)
Surface: Panel (I rolled a 5 twice on a d-10, not sure this will work, but I can get rid of this later if necessary and substitute regular watercolor paper).
Ground: Mat Medium (I rolled a #3 on a d-4, watercolor will not stick to this, so I may re-roll depending on what I get later).
Color: Full Spectrum (I rolled a 7 on a d-20)
Elem & Prin: Value. (I rolled a #3 on a d-12)
Style: Fantasy (I rolled a #5 on a d-20)
Subject: Abstract (a #6 on a d-10)
Topic: Daily Life (a 16 on a d-20)

Now, because watercolor will not stick to a panel with a mat medium ground, I'm going to look for the medium(s) that will work with that; and I've got Acrylic and Mixed. Acrylic = heads, Mixed = tails. I got heads, so it's Acrylic. Or I could just choose.

Here's the final criteria:
2-D
Acrylic
Panel
Mat Medium ground
Full spectrum color
Value as main element
Fantasy style
Abstract
Daily Life

Ideas: I know this will be a full-color acrylic on panel with a mat medium ground. Value is important so I want lights and darks. My topic is daily life, so I want something I do all the time. It has to have a fantasy feel to it, and it needs to be a bit abstracted.
What do I do every day? I drive.
Value: high contrast values happen at night.
Driving at night.
So now, I know that I want to do an acrylic on panel of driving in a car at night. Lights streaking by, the painted lines emerging from darkness, etc. Maybe using the way the light streaks as my inspiration for the abstraction and giving the painting a light shattered quality.


Let's try one that's 3-D.

Criteria:
Format: 3-D (given 'cuz we wants it).
Medium: wood (6 on a d-8)
Format 2: Multi-Part (5 on a d-6)
Base: polished stone (6 on a d-6)
Color: blue (19 on a d-20)
Principle: Repetition (10 on a d-12)
Style: Pop (17 on a d-20)
Subject: Imagination (7 on a d-10)
Topic: Fiction (14 on a d-20)
Ideas: I have a multi-part wooden sculpture on a polished stone base where the main color is blue. I need to repeat some themes.
My topic is fiction, so I need to choose a book, comic, movie or something like that. Pop is my style, I can work from Pop Art or Pop Culture.. or Pop Music. Imagination is my subject.
I'm having trouble here...
Ah, yes, one of Cori's favorite topics. Mother Mary. Blue bath-tub Mary.
Let's be irreverent and choose the Bible as our fictional source.
We can only imagine what little Mary looked like, but there's enough Pop Culture images that it automatically qualifies as Pop if not Kitch, but we want to keep it in Pop Culture or Art.
So...
Multi-part wooden sculpture of Mother Mary (using JC as another part) on a stone base. Lots of blue paint or stain, choose a passage from the Bible... maybe the "water into wine wedding scene" with her as the focus, maybe grabbing his ear and wagging her finger at him to do what she says and keep the party going. Keep the forms very rounded in Pop style.

See how this works?


If you wanted to simplify this, you could use a standard 6 sided die and only put 6 things in each category. That would still give you 100's of options.
I hope this clears things up rather than muddying the waters.

Sunday, January 13, 2008

Random art generator


One of my favorite things to do is play D&D. Another favorite thing is to paint, draw or sculpt something. Occasionally I get hit with the dreaded Artist's Block and need a way to get past it. This seemed like a good idea at midnight last night and since I'm still having fun with it today I figured I'd post it.

I also sent it to every artist I know via e-mail, so it's probably going up on several other blogs.

I should mention that Doug Anderson, one of my professors at SUNY Geneseo was the first to introduce me to this concept. As I recall, his chart had 10 columns up and across and you did some kind of diagonal thing to get to the project idea. I must admit that I never understood it despite the rest of my fellow students grasping it immediately. I promptly lost the paper, but never forgot the concept.

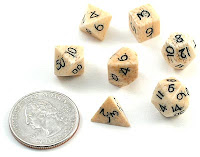
To use the chart as-is you will need a set of gamer-dice and a coin. See all the pretty shapes?


How it works:
If you have no idea what you want to do, start with the first column. 2-D or 3-D can be determined by flipping a coin or an odds / evens die roll.
Let's say you got heads for 2-D
Now, roll a d-10 (a 10 sided dice), I rolled a 3, so I count down the column and come to watercolor
Roll another d-10 for surface (only a few apply). I got paper (watercolor paper) and we know it's going to be natural, not treated with anything.
For color, roll a d-20 (the almost round one that lives under heavy couches) and we come up with complementary. Then again for a completely random selection of blue. So blue and orange are our colors.
Main element or principle will be a d-12 that turns out to be line.
Style is a d-20 roll of 1 which is Abstract
For subject I roll a d-10 and get multi-figure.
And for topic I roll another d-20 and get botanical.

Now, here is what I've got in short:
2-D
watercolor
paper
complementary colors: blue & orange
line
abstract
multi-figure
botanical

Here are a couple things I could do with this:
- A blue & orange watercolor of linear abstracted ferns. Wet-on-dry so the colors vibrate.
- A range of neutrals from blue & orange in the background with linear abstracted lichens or mosses covering the surface of the paper.

If you have an idea of what you want to do, but need to flesh it out, or make an assignment into something more, just use a few columns.
"I am going to paint a nude figure in oils on gessoed canvas today."
You can roll for style, topic, elements & principles and major color themes.
Given:
2-D
oil
canvas
gesso
figure
Random:
color - violet
Element - value
style - Realism
topic - Fantasy
Idea: Now I know that I am using mainly violets in this painting with an emphasis on value. I'm going to keep it realistic, so it's probably not going to get too distorted with either color or form, it'll just have a lot of violet with a full range of darks and lights. I'm also adding a fantasy element, so depending on the pose I may add a critter, costume or interesting environment. The final product will probably end up being more Surreal than Real, but I'm OK with that.

This can be general or very specific. Totally up to you. If something doesn't work, just re-roll.

This chart will work best if you fill it in with your own ideas for mediums, surfaces, grounds, styles, subjects and topics. It can be used to generate lesson plans for art teachers, fleshing out hazy ideas and getting rid of a bad case of Artist's Block.

I'm happy with it and have had a lot of fun playing with it today.