Saturday, September 19, 2009

Mass Production Hiccoughs

I've got 3 days before my biggest and (thankfully last) event of the year. I've been in high-gear production mode for the past 2 weeks and my poor little sewing machine doesn't know what hit it. No time for hand-sewing at all. Poor Mom has been trapped behind her sewing machine too, and stuck on white of all things. ( We sold our last 2 white shirts to a theater company in Princeton NJ... and now our customers will have nothing to wear!!!). She also made me some petticoats because we were out of those as well.

Now I'm wondering exactly how much we can get done in the next 3 days.

So sew ladies sew!

Then nature hit me and I feel like someone tripped over my power cord, siphoned all the caffene right out of my veins and force-fed me sleeping pills all at once. So rather than doing what I should be doing (which is parking myself behind the sewing machine or cutting table), I'm blogging to re-charge the batteries.

Here is what I've been working on...


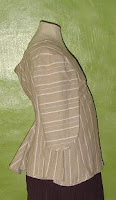
1775 jackets. I love these.
Yes the center one is on my husband's dummy, but it was the best fit I had... I made 4 of these, the black is pictured below on Mom.
They are as follows: polished cotton lined with green cotton. Cotton/linen blend in stripes, unlined (it's really pretty). Printed cotton bound with pink linen bias tape, unlined in a very small size... thinking of making a stomacher to go with it so it may fit more people.

Nothing makes One feel more special than placing One's husband & best friends' dress dolls on One's own dress doll stand... and they look like they are wearing paniers & a bum roll. Thankfully I've lost some weight since then.

Rev War procession anyone?
Late 1700's English gown in brown cotton, with matching petticoat & pockets, boned bodice.
I really like this dress. I want to keep it... My husband really likes it too. I told him if he wanted me to have one he'd have to buy the fabric for me. It's lovely. I really, really, REALLY want it. But alas, must fill the store.
1775 outfit, jacket with petticoat. She should have a cap, modesty cloth & ruffled cuffs too... but Mom looks so silly in hats it's not even funny... OK, it's really funny. We tried 3 caps and by the time we were done our faces were red from giggling so much.

Sunday, September 13, 2009

How to make hand-sewn buttonholes

In all historic clothing (pre-1870) the buttonholes are hand-stitched, and many after that have hand-worked buttonholes. Sometimes they were worked using an overcast stitch, other times a button-hole stitch. Overcast buttonholes tend to be stiffer and are good for rarely-used areas. Button-hole stitch buttonholes (say that 3 times fast) are great for much used areas of a garment, they are flexible & last a long time. They use less thread than overcast holes and lay flatter.

Occasionally in modern clothing you will find that your machine won't make the necessary stitches. Either the fabric is too thick, slick or delicate... or your machine is out-of-wack & needs to be tuned up by a professional.
And sometimes you just want that beautifully tailored look that hand-sewn buttonholes give a garment.

Here is a simple method of making hand-sewn buttonholes (by no means the only way). It's on wool, using 3 strands of cotton embroidery thread for the finish.
Sorry about the dark colors, I've included line drawings next to them in case you can't see the photos on your screen. The photos are better than the drawings...
Click on the pictures for a larger view.


1. Mark the location of your buttonholes with tailor's chalk, or some other removable fabric marker.

Alternatively, you can use pins or tailor's tacks (those little knotted threads that you put through the fabric).

Make sure all of your buttonholes are marked evenly & consistently. (Three separate buttonholes are featured in this tutorial, the one at the collar is lower than the cuff holes).

2. Back-stitch around the buttonhole* using very small stitches. The buttonhole should be narrow-ish, but no narrower than 1/16" or you won't have room to slit between the fibers and may end up cutting fabric that you don't want to.
This holds the fabric layers together & reinforces the sides of the buttonhole. It also gives you a guide for your hand-stitching.
*You can create some really interesting buttonhole shapes at this stage.

3. Slit the buttonhole** with a razor or seam ripper.
**You may want to fray-check before you do this.
Start from one side & go to the center.
Stop.
Start from the other side & go to the center to complete the slit.
Doing it this way prevents the "oh sugar!" of slitting through your fabric.


4. Sew the buttonhole.
Secure your buttonhole thread from the back.
(no picture: bring the thread in from the side. Let the needle & thread come out between the layers of the buttonhole until the end of the thread is lost in the fabric. Insert your needle in the edge of the buttonhole again & loop the thread around it twice. Pull tight... gently... and tighten the knot with your thumbnail. The thread should be at the edge of the buttonhole. You may now start your buttonhole from the front of the garment.)

All work is done on the top side of the garment.
Starting from the open slit, pass your needle 1/2 way through the fabric to the outer edge of the back-stitching line. Stop.
Loop the thread over the needle once (like passing a car on the right in the USA, or passing legally in the UK) or twice (for an 18th c. buttonhole stitch).
See picture above (by #4).

Pull the thread tight, making sure your "knot" ends up right on the edge of the buttonhole.
Start the next stitch the same way.
The "knots" should be almost invisible when you are done.

-Make any corner stitches close together & keep your length-wise stitches even.
-Make sure all of your stitches are on the outside of the back-stitch line.

Continue until the buttonhole is competed.
You may want to provide some extra reinforcement on the end where the stress is (the outside edge) by making a few more stitches.
You can continue with the buttonhole stitch or use a tack stitch for the end of the buttonhole.

Tie off your thread the same way you attached it... wrap the thread around the needle twice. Pull the knot tight & pass the thread under the stitching on the back side, (you can go all the way around the buttonhole, but it's not necessary). Lose the end in the fabric & cut.

The back of the buttonhole is pictured here. You may be able to see where I "lost" the thread between stitches.


The really wonderful thing about hand-sewn buttonholes, aside from looking great is that you can do so many interesting things with them... without buying expensive cams for your sewing machine.

Most buttonholes (1" long) take about 10 minutes to complete.

Make buttonholes 1/4" larger than large buttons, 1/8" larger than small buttons. Check the fit after the first hole, or make a test version out of similar fabric before marking up your garment.
If you've never done this before, start on a test swatch, or some out-of-the-way place on your garment... don't make your first buttonhole at the front neckline of your bridal gown...

If you have any questions, or need clarification please leave a comment. I'm on cold meds, so the directions may not be as clear as I think they are.

Saturday, September 12, 2009

How to starch a ruff

There are several good directions on how to starch a ruff using the "soaking in starch" method. Here's a version using spray starch & basic laundry & hair care equipment.

You can use this method for any kind of starched ruffle.
Anybody can do this... really.

Picture 1: Unstarched
Picture 2: Starched (to be added, it was very blurry)


Gather your tools:
Heavy spray starch
Iron - no steam
3/4" - 1 1/2" Curling iron with a smooth end (without that metal guard)
Hair dryer
Tailor's Ham or some kind of form to pin your ruff on (no plastic, you have to be able to iron on it)
Pins
Towel for work surface.


Begin with a dry ruff.***
Lay it over a ham outside up (the way you would wear it) and spray starch the first section of the neckband.
Use a hot iron on the band only.
Move around the neckband until it's a little stiff & then pin it to the ham or form.
Finish starching the neckband.


To starch the ruffles, spray the inside of the ruffles, (2 or 3 at a time).
Using the curling iron on high, set the starch by "curling" the ruffles for 4-5 seconds then move to the next section.
Work back & forth over the ruffles until they are relatively dry & standing up-ish.
You'll get a feel for this pretty quickly.
They will still be damp.


To make it really stiff, use the hair dryer on hot air / low pressure to "fluff" up the ruffles. (Safety tip: tie up any long hair)
- Spray the outside of the band & the base of the ruffles again.
- Blow directly into the center of the ruffle** & hold the hair dryer there until the starch is dry. ** You may have to gently pull each ruffle straight out as you do this so they don't crinkle up.
- Dry everything completely with the hair dryer.
(sorry there's no picture of the hair dryer, it was too hard to manage that much stuff on my own).


Unpin & put on a storage form, or ready to wear.
Wipe the starch off of the cold iron & curling iron with a damp cloth.
Wash your work surface towel.


To wash the starch out, soak in warm water, rinse; use mild soap, rinse, then wash normally. Line dry. Re-starch.


*** The ruff I'm starting with has wire ribbon in the "hem" to help keep it stiff. This method will work well even if you don't have that. It may take longer to get your ruffles to stand up, but stand up they will!

Friday, September 11, 2009

How 'Bout Them Apples???

I spent today canning & drying apples and making venison jerky. Mom made pickled & frozen peppers.


Putting up the apples came from three thoughts.
One: "I'd really like some dried fruit to go camping with."
Two: "Gee, I'm tired of paying for corn syrup in my applesauce!"
And Three: "Wow, those apples on the hill look REALLY good... am I too old to climb a tree? Te-he-he!"

And so, with pack basket and garden rake in hand, I traveled up the cat path, fought through the lilacs, tromped down the golden rod and made my way to the glorious apple tree!
After picking what I could reach, I hooked a few branches with the rake & gently shook.
After shaking off the lower ripe apples I hoisted myself & said rake up into the tree and hooked & shook some more.
With basket full and very little gone to waste I again fought my way through golden rod, rose bushes & lilac's back down the cat path to put the rake away & begin the long day of cooking & canning.

(Mom says the apples are "strawberry apples" or "sheep's nose", they are a very old variety. If you bite into one the taste screams "APPLE!!!"). They are prone to worms & seed rot, so you can't just cook them, you have to cut them in 1/2 and core them. The cores tend to be crooked, so have a paring knife handy.


Dried Apples
Use fresh, pesticide free apples. They should be very flavorful or tart.
Cut out any bruises, rotten spots, worms, etc. You can leave the peels on if you like. You can even leave the cores in, just remove the seeds. They have to be really perfect.
Slice 1/4" or thinner.
Soak in citrus water (orange, lemon, lime, etc. will work great).
Put in a food dehydrator & dry according to the directions in the booklet, or dry in the oven on 150 for 5-12 hours.
Check every 3 hours, turn over for even drying. Remove from heat once they are dry. Some may take longer than others.
Store in a sealed container at room-temp, in a dry place.

--I'll be lucky if any of them make it to the Eastern. I'm replacing candy with these things. And 4 or 5 slices are a perfect snack.


Applesauce
Core apples (peeling optional)
Boil in water & 1 tbsp. lemon juice about 20 minutes.
Put through Foley Food Processor to remove peels, or just mash to leave peels in.
For every 2 lbs of apples, Mix:
1/4 cup sugar (I used brown sugar)
1 tsp ground cinnamon
1 tsp ground allspice
Refrigerate over night to serve that week, or can to serve all year.
See below for canning instructions (they aren't the best, check out some other directions).

I think there's something you can do with the peels, but honestly, I just tossed them.


Apple Butter
Any apples, peels, cores that are OK. No seeds.
Boil in water (just enough to cover apples) for about 20 minutes, remove from water & put through "NEW Foley Food Processor!" to remove skins & other hard-bits. (Or you can use a spoon & colander like I did the first time... it's a pain. Get the food processor.) Set aside.
For every 4 lbs of apples combine:
2 cups brown sugar (make sure it's all natural).
1 cup water that you boiled the apples in (or apple cider if it's all natural & no preservatives... just use the water, it's there, it doesn't cost more.)
pinch of salt
1 tsp cinnamon
1/2 tsp cloves
1/2 tsp allspice
3 tbsp lemon juice or juice from 1 lemon + zest.
-Mix it all up & cook on low heat for a long, long time (about 1 hour for each 4 lbs). Stir a lot to keep it from burning on the bottom. Get a book & prepare to be burned several times in the last 30 minutes.
-Or you can do like Betty & instead of stirring like mad for 2 or 3 hours, you can put the whole mix in a crock pot on 200 overnight, and only stir once in a while. I think Betty is super-smart.
-When it glops & stands up on it's own (like when you dip your spoon in it and it doesn't slide off without shaking it, it's done). It will reduce by about 1/2.
-To can it: Pre-heat your lids & jars, have your water for hot-packing ready to go.
-Put the yumminess in the jars 1/2" from the top with a canning funnel.
-Wipe the rim & tighten the lids on the jars.
-Put jars in the water bath & heat to boiling. Boil 10 minutes, let sit 5-10, remove & cover with a towel overnight. Check the seal on the jars the next morning. Anything that isn't sealed must be frozen or eaten soon.
-Wash your sticky dishes so you don't get ants & put that huge mess you just made back where it belongs.
-Remember to share the goodness with your friends, but don't expect your little jars back.
(yes, these last two instructions are part of making apple butter).

Apple Butter was a Colonial American favorite. It was traditionally cooked in an huge cast iron pot over an outdoor fire with a lot of people helping. They used a HUGE paddle to stir the pot.

Tuesday, September 8, 2009

Late 1820's stays

My most recent "me" garment is a pair of late 1820's stays from Corsets & Crinolines by The Goddess of Historic Fashion, Norah Waugh.

Since I didn't go camping over Labor Day weekend, I decided to park myself behind the sewing machine and skip on into the Regency & Romantic eras. (The next "me" garments will be Federal & Romantic day dresses).

Way to take a weekend off Gail!


The stays went together like a dream in less than two days, but are completely machine sewn. I figured none of my thread-counter friends will ever see this, and I wanted it fast.

I used 2 layers of very stiff, tight-weave cotton. The inside is mis-matched colors that we couldn't use for stock garments (slightly pink vs. slightly yellow). The outside has some staining, but the fabric is sound. Stitching is in a darker cream color, and the 1/4" wide bones are plastic. I sewed the channels at 1/2" and that seemed to work very well.

Materials:
1 1/2 yds tight-weave cotton
1 yd stiff linen or coutil (interlining, optional)
cotton thread
plastic boning (cane/reed/metal, etc).
3 yds double-fold cotton bias tape for binding
old yard stick / wooden busk
ribbon / cotton cording

Tools:
scissors
sewing machine
ruler
pencil or washable fabric pen
saw or utility knife & sand paper (if cutting yard stick for busk)
(I didn't use pins for this, you can if you want).

This pair is almost exactly like the ones in the book, the main difference is the 'quilting.' I used the presser foot as a guide and was rather sloppy with the inside decorative stitching (setting 13 on my machine, it's kinda triangles/zig-zag). It works well to stiffen up the fabric.

As there is no stress on the ties, I decided to use machine buttonholes. They seem to be working fine. I sewed them in vertically, so the stress is on many threads rather than a few, and poked the holes with an awl rather than slitting them. It's a pain to lace.

Basic Directions:
1. Transfer pattern from Goddess Norah Waugh book.
2. Re-size to fit you (4" smaller than bust, underbust, waist & hips... waist & underbust should be the same measurement in the stays, they will not close).
3. Cut 2 outside, 2 lining, 2 interlining.
4. Sew gussets in bust & sides.
5. Sew all pieces together, leaving back open.
6. Sew lining to fabric, turn & press.
7. Align seams & sew up either side of them for added stability (I've found this makes the stays/corsets last longer without pulling out... it doesn't always look great, but it works beautifully).
8. Mark boning channels & stitch.
9. Do decorative quilting / cording (optional).
10. Measure for front busk pocket, sew right sides together, turn & press. (this is not part of the original pattern, it's my own answer to the 'flap' problem).
11. Sew busk pocket in front & make button-holes or eyelets in flap.
12. Sew button holes or eyelets in back, spiral lacing.
12. Insert boning & cording.
13. Sew on binding.
14. Sew on ribbon for busk pocket.
15. Cut yard stick to length, sand & insert in busk pocket. Lace it closed & tie a pretty bow.
16. Lace up & wear!

This isn't as "flat" a shape as earlier Regency stays, and not nearly as curved as Romantic & early Victorian corsets. It does put my bust up around my chest when I sit, but I think it will look fine once I've got clothes over it.
Beware this pattern if you have larger than a C-cup... you can compensate by lowering the bust gores & slits, that should help quite a bit (I lowered from 3 1/2" to 4 1/2").

It's pretty comfortable. I've worn the stays for about 18 hours all told, but 8 hours seems to be the limit for a day. The main area that gets uncomfortable is the shoulders. If I ever make another pair for myself, I'll move the straps in about 1". Straps should be lengthened to sew them on the front, but it may be better to use ribbons like I did to make them adjustable.

And Mom's home!!!

Monday, September 7, 2009

I got an Amadeus Award!

http://lithiablack18thcentury.blogspot.com/ gave me an Amadeus Award!
How cool is that?

And how interesting is it that the ones she picked, I would pick too?

Quilted Petticoat cont... (2)

I'm posting about the quilted petticoat in numbers from here on out as I don't know how often I'll actually work on it. I think it's going to be my 'feeling blah' project.
Although today is a beautifully cloudy day, I'm feeling very blah. Perhaps it has to do with missing Mom, who is coming home tomorrow! singing & dancing the happy dance!

Anyway...
when we last left out intrepid quilting adventure, I had:
- cut the batting to shape. (the top is still to the top, not at the finished level... which will be below the pocket slits).
- finished the design.
- quit for the night.

The most recent progress was:
9/06/09
- making a "stencil" of the pattern.
- transferring the pattern to the silk (yay Prismacolor!)
9/07/09
- decided not to sew the back seam together right away as per the directions in Fitting & Proper and after examining several originals (via Google Image search).
- started quilting.


The stencil was pretty easy.
-I used card stock and transferred the design from the Frankenstein original by putting it on the window & tracing. (First grade art class to the rescue!)
-Then I put packaging tape over the design to make it a little more stable, as there are some very delicate areas.
-Cut it out with an exacto knife, leaving a few key places to hold everything together. (This was after the pin-hole fiasco...).


Transferring it was a bit tricky and not an exact science.
(The first thing I tried was the pin-hole & powder trick. It didn't work.
I tried cinnamon, mustard, cornstarch and paprika and they all made an ungodly mess. Though they smell wonderful individually, they don't smell that yummy mixed together with paper & silk.)

-I measured 5" up on the first panel and marked that, then 5 1/2" on the second, tapering to 5" as it nears the other side to make up for the difference in length.
-I marked the silk with a Prismacolor Pencil (peach) and then filled in the missing bits after moving the template. My friend Randy has assured me that Prismacolor washes off. He'd better be right. Had to sharpen the pencil after each tracing.
The repeat worked out pretty well, not perfect, but I'm too lazy to say "do-over," and it's only a few leaves off.
Shadow likes the quilt, but won't walk on it. This didn't prevent him from trying to climb it while Moon was sitting on it... on the work table... where she isn't supposed to be. But then I was working on HER quilt. She sat in the chair & watched the entire time.

Quilting is going OK.
I can't use the modern rocking stitch as it's too big for this design. Tried backstitching, which looked great on the silk side, but not so hot on the linen. I really want this to look good from both sides.
- Instead I'm using a 2 handed back & forth stitch, one stitch at a time. This way, I've got 8-10 stitches per inch vs. 4-6 the other.
- I am a bit confused on how to secure my thread at the end, but by the time this monster is done, I'll have it figured out.
- The first flower & the two small leaf-bit things took about 2 hours.
I may finish before the world ends in 2012... but more likely I'll stop watching t-v while working on this project and it'll go a lot faster... and perhaps my snarky mood will pass for more uplifting things!

9/9/09
Quilted more. Finished first repeat.

Friday, September 4, 2009

Quilted Petticoat

The new "Project" is a hand-quilted petticoat. It was a bit of a toss-up between an 1810 man's embroidered waistcoat, 1820-40 hand corded stays , and a quilted petticoat. I guess with the cool weather coming I wanted something a little warmer to work on, and honestly, I'm tired of embroidery right now. Maybe by spring I'll have it done! (yeah right, more like next year).

I'm using JoAnn's specials for this. I wish I could afford better materials, but at $30/yd, high quality silk is just not possible without an order. The silk is red dupioni. It was $4/yd on Red tag 50% off sale! Fortunately it's a low-texture dupioni.

I've lined it with brown linen ($7/yd on 60% off).

Cotton batting... which is getting harder & harder to find, so I bought many. Two baby blankets ($5 each when 50% off) work great for a quilted petticoat. The blankets tend to be a little too wide, so they have to be cut down after it's quilted. I'm not planning to cut them before it's completely basted and/or quilted... we'll see how dirty it gets.

Red cotton thread (yeah, it should be silk, but I'm cheep).

Materials:
2 1/2 yds 66" wide silk
3 yds 60" wide linen
2 cotton batting baby blanket(s)
pins
quilting needle(s)
machine sewing thread
hand quilting thread (green for basting) (red for quilting).
cotton cording?

Total cost: $50
$10 silk
$18 linen
$10 batting
$10 thread (guessing)

Moon is absolutely crazy about anything RED. And this was possibly the reddest thing she's ever seen. The cat will eat red roses, steal Christmas ornaments, my winter coat gets tackled whenever I leave it within reach. She just fell in love with this length of fabric. She actually fought me when I was laying it out, she didn't want to get off of it, or even let me touch it.
After I got it neatly laid out she raced in & slid into home base!
Then she watched me like a hawk while I was basting it.

I may add a row or 3 of cording at the bottom, but again, not sure yet. In the finished petticoat, the batting will not go all the way to the top, but for now it's basted in all-over... it may end at the bottom of the pocket slits.

I'm doing a lot of guess-work while making this garment, and it should be an interesting experience.

Rather than sewing the two sides separately I've sewn the panels together along one seam, so it'll be more like a full-size blanket while I'm basting it. (overlocked the edges of the silk to prevent fraying).
Aligned the top edge of the linen & silk, with some overlap of the batting. The bottom edge of the silk & batting match up... kinda.

Basting stitches are in rows, approximately 6" apart. This seems to be working well. (Green thread).
After it's basted & the design drawn on, I'll sew the panels together into the pre-petticoat tube. I may not finish the bottom until the quilting is done because I know just how funky that can get... we'll see what happens.
I'll turn over the bottom & stitch it to the lining, rather than binding the hem.
I'll worry about the pocket slits after it's sewn together.

The top will be turned over & sewn under so the length will be adjustable from the waistband rather than the hem. This is very historic & makes my life a lot easier.
The fabric is 44" long right now, so it should be tall enough to accommodate just about any height. There are 3 yds of fabric in the body (the width of 2 panels)... so a total 88" off the bolt.

Made the mistake of ripping the linen, the edges are very warped. I know better than to do this, but at 9:00 last night, my brain took a mini-vacation. So the lining may be a little wrinkly at the edges. Fortunately any distortions will be covered by hem & waistband (I hope).

While looking for directions on how to do this, I learned that I should sew the petticoat into a loop before quilting. http://www.jennylafleur.com/diary/quilt05.htm and http://brocadegoddess.wordpress.com/quilted-petticoat/ were both incredibly helpful. I'll just have to make sure that my pattern repeat will match up along the seam when I draw it on.

The tentative design plan is to make diamonds on the top half with a floral-ish border on the hem, and a rise in the front of the floral motif. Although I love the leaf pattern in Jenny's petticoat, the red screams "flowers!" so flowers it will be.
Like Jenny, I'm rather lazy when it comes to hand quilting, so I will be using the outline design rather than the fill-ins. I also really like the petticoat from mfa.org (see below), the medallions are great, and if I can do them in outline rather than fill-in, that'd be perfect. My friend Randy Cook is an excellent quilter and would sigh at me if he knew how incredibly lazy I'm being about this. (Randy is a former drawing & painting student of mine and he's very driven).

I have made quilted petticoats in the past, but they were all machine quilted and for working-class characters. (see the nice, simple diamond pattern in the blue one? This is lined with plaid flannel and is just about the warmest thing I've ever worn. I wore it winter camping at 5 degrees and it was perfect).

September 3, 2009
Cut & sewed panels together (flat).
1/4 of the length basted.

September 4, 2009
Did preliminary design from mfa.org petticoat. Just the main section, not the whole thing.
Finished basting the flat petticoat.
Cut off the excess batting.
Figured out 103" /9 = 11.5" pattern repeat.
This is my tentative design plan. Let's hear it for mechanical drafting and too many years of Art School! Look Mom, I can draw flowers with coffee cups & a ruler!
I may get rid of the center leaves on the 'ferns' and may make the little doo-hickeys on the top & bottom of the posies bigger. John & I have decided that rabbits, deer & flowers will work well as the center motifs rather than that strange acorn / pineapple thing. With 9 repeats I'll get 3 of each... or go for broke & do a different animal/flower in each space!
I had a killer headache all day, so did no 'real' work. This was therapeutic & I didn't have to deal with ruffles... or shirts... or ripping out loads of stuff.

For images of original quilted petticoats go here:
http://www.vintagetextile.com/new_page_492.htm
http://www.vintagetextile.com/new_page_572.htm
http://www.costumes.org/HISTORY/v&amuseum/1.jpg
http://www.history.org/Foundation/journal/Winter08/stuff.cfm
http://www.mfa.org/collections/search_art.asp?recview=true&id=117000 I like this one a lot.