
 One of the easiest & most common ways to finish a pair of stays or a corset is to sew a binding on the raw edges. This can also be used for necklines, cuffs, hems or any other raw edge that you want to cover.
Historically, this could be thin leather, fabric that matched the lining or the outer fabric, or a completely different fabric.
Bias Tape:
I prefer to cut my own bias tape as most commercial bias tape is polyester and comes in a range of terrible colors.
To figure out how much bias tape you will need, use a flexible measure tape along the edges of your garment. Add up the yards & then add a few more.
1. Cut matching or complementary fabric for bias tape. You should have several yards more than what you need in case it has to be torn off later (this happens a lot... especially when there is little to spare). I prefer to cut it the width of a wooden yard stick, laying the yard stick down & just drawing my lines that way. The tape ends up being about 1 1/4" wide... but if you want to do it the hard way, measure every 1 3/4" and go from there.
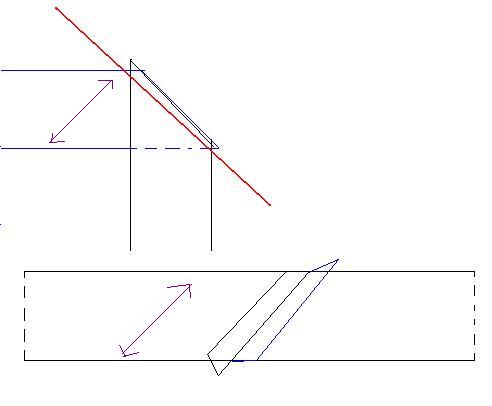 2. Sew the bias 'tape' together by forming L's or right angles between the 45 degree straight grains.
The purple lines are the grain of the fabric. Red is where you sew.
If your fabric is striped, make sure your stripes are all going the same direction.
*Do not back-stitch, it's a waste of time & makes a mess.
*To make sure all your seams are on the same side turn the new seam down on the table & lay the next piece on top of it.
3. Press the seams open & then press your bias tape flat. You may want to iron it into bias tape shape (double or single fold), but I prefer to sew it flat as I have greater flexibility when I finish it later on.
Sewing the Binding On:
 4. Sew the tape onto the right side of the garment. For stays & corsets, I line up the edge of my presser foot to the edge of the garment & center the needle.
Take care when going around corners, allow for a little ease & don't let it catch folds in the tape. You may have to advance your needle by hand in sharply curved areas & angles.
This takes some practice.
5. Check over the seams, make sure you caught all the edges & that nothing will pull out when you fold it over.
Unless your machine snagged or choked a lot, don't worry about loose spots, you can catch these later. Note anywhere that will need reinforcements with tailor's chalk or tacks.
- Make sure you have enough of the tape left to turn under & over (see below).
- Clip any bits that hang out beyond the tape line to neaten the edges. Don't count on the bias tape covering these, they tend to get emphasized.... I mean the ends of seams & such... make sure you aren't re-cutting the garment... if it's that bad take the tape off & start over.
Folding & Pinning:
 6. Clip the end of the binding to about 3/4" from the edge.
 7. Turn the seam allowance up to be in line with the other stitching.
8. Fold the end back so it lines up with the edge of the garment.
9. Turn the bias tape down over the raw edge. You may have to clip a little triangle off so it doesn't add bulk (you'll see it after you turn the end down).
10. Fold under the other edge to create a neat, finished end. This takes a bit of practice & adjustment. This fold will give you a starting place for the rest of your binding, though you don't have to stick with it.
 11. Pin the end carefully. This may need to be re-adjusted later.
12. Pin the rest of the binding down. You can do this in stages or all at once. I like to work with about 10" at a time or one 'side' of the garment at a time so I'm not pricking myself while I sew.
Hand Finishing the Binding:
 13. Secure your thread in the end of the binding by losing the thread under the fold & tying a double-loop knot over the needle.
Tighten with your thumbnail.
 14. Use a hem stitch or blind hem stitch to sew the binding on. When going around corners or curves, it's a good idea to further secure your stitching by making a 'buttonhole' knot every few stitches.
*If your machine made loopy threads anywhere, be sure to catch the binding on the front side at this time. I do this by making a diagonal stitch (regular hem stitch) followed by a small vertical stitch that catches all layers... be very careful that this doesn't show badly on the front side. This prevents the binding from pulling loose in the wash, or over several wears.
15. Continue on until you reach the end. Secure your thread exactly as you started it, snagging the folds on the end. I like to bring my thread back from the end with a few stitches before tying it off. Lose the end of the thread in the binding & clip.

 The front & back should look almost the same. The front will have a completely 'finished' look, the back will have some small stitches showing. Be careful to consider thread color & the overall look of the garment.
For this pair of stays, I chose to machine sew the binding onto the lining and hand-stitch the binding on the outer fabric because there was a better chance of blending the stitches into the fabric.
1 comment:
A note on keeping your bias tape neat:
Once you've gone to all the work of making yards & yards of bias tape, don't just leave it in a heap (unless you REALLY like to iron).
Cut a cereal box apart, fold the front in 1/2 lengthwise and cut an H shape out. Tape the edges & wind your bias tape around that, seam side out (so it's easier to sew).
This also works for trim, lace, etc & is far cheaper than those plastic things and goes with the 'reuse' part of the 3R's.
Post a Comment