
Here is how to re-size an armhole & sleeve for more comfortable modern wear, but maintain the integrity of the original pattern.
(I'm using the 1825 Dress Coat pattern from COMC).
You can use this method in pre-made patterns as well.

 Add 4" -6" ease to the original armhole measurement (19 1/2"). Do not add more as it will lose the historic look.
*Working class garments had much more arm movement than leisure class... add 5-8" depending on the garment.
I want a 24 1/2" finished arm hole. This should give Brian enough room for his clothes & some arm movement.
*If someone is dancing or riding in this garment, I would add a little more in the upper sleeve.
**If this is for a theatrical event, ask the costume manager if they want a truly historic look or if they want the actors to be able to have full movement.
 Once you have the correct length on the sleeve (add X" to bicep & forearm), mark your width increases according to the individual.
In this case I had to add 2 1/2", so 1 1/4" to each side of the bicep.
If the wrist is correct as it was here, and the forearm needs to be larger, make gradual changes from one area to the other.
Alternatively, you can split the sleeve down the center line & add more there.
I prefer to add onto the outside along the horizontal guidelines as that is a little more forgiving. (Guidelines are in green).
 Set in your new sleeve-width measurements & lightly draw the new lines. Keep the shape of the sleeve.
(new lines are in green, old lines are in blue).
For this dress coat, I want 5" ease in the armhole,
3-4" ease in the bicep,
2-3" ease in the forearm
& 2" ease at the wrist.
 Using a triangle or T-square, mark the top of the sleeve cap in both directions. This will give you a good guideline for re-adjusting the upper sleeve.
 Re-draw the sleeve cap, making it meet the same place as the original cap.
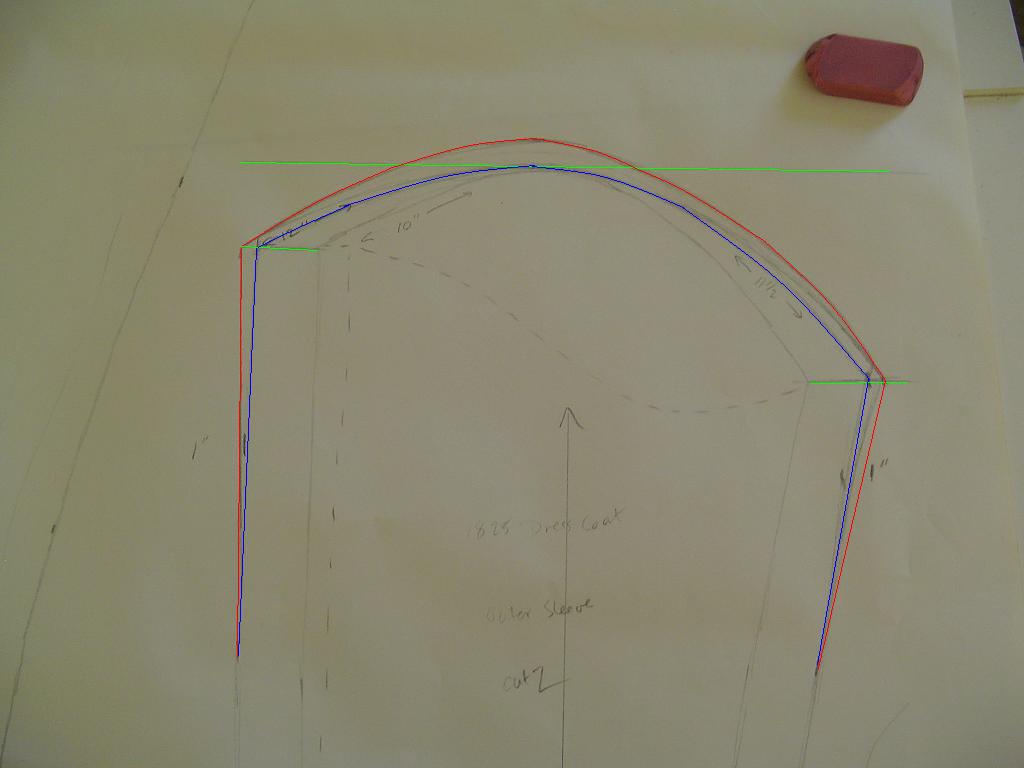 Now measure again & add more by measuring up from the highest point of the sleeve cap & re-draw the lines.
I re-drew this line 4 times before I got the measurement & shape I wanted. Be patient & don't get discouraged. You may have to readjust after you have played with the under sleeve too.
Do not erase the original pattern, but if your adjustment lines get too confusing, erase them as you go.
 Once your upper sleeve is "set", draw in guidelines for your under sleeve.
Guidelines should be at the lowest & highest points, and mark where the lines intersect.
Measure how many inches you increased the width, then move the lowest/highest point accordingly.
IE: if there is 1/2" difference on the left side of the lower & upper sleeve, mark 1/2" from the edge of the upper & under sleeve.
 Readjust the lines for the under sleeve. If you need more inches, lower the low parts & raise the high parts, but be careful to maintain the original shape as much as possible.
The guidelines are marked in green, the original line in blue & the adjustments in red.
Measure a final time & make sure your upper sleeve & under sleeve measurements are 24 1/2" or more.
I prefer to have 1/2"-1" more for a perfectly fitted sleeve as I can account for the ease, but don't like stretching the body of the coat.
 Re-draw the vertical lines to match up with the final edge of your top sleeves.
Make sure they meet up where they should (in this case it's just above the elbow).
 Re-check your measurements & shapes one last time & erase any old lines.
I prefer to use colored Sharpie markers to finalize my patterns.
Add seam allowance (I like 1/2") to the outside of whatever needs it (if you are working with cut edges, do not add seam allowance).
Be sure to label all pattern pieces with the following:
Garment name
Pattern piece
Grain lines
Number of pieces to cut
Customer name
Measurements
This will make it very easy to make another garment when your returning customers say "I want another one JUST LIKE THAT ONE!" Or if you have a customer with almost the same measurements, you don't have to reinvent the wheel.
I fold up my patterns & put them in gallon plastic storage bags with the garment & customer name on the front.
I also store my patterns according to male/female & century.
All of the original adjustments were made in pencil, any colors have been added on the computer for clarification. If you have any trouble understanding the directions here, please let me know... I'm a bit low on blood sugar & it's past time for lunch.
4 comments:
Gail, I've just found your blog and I'm amazed and inspired. I just started volunteering as a costume maker for a local group and your work and instructions are making me feel like I might just be able to do this! Thank you.
Carol,
You are welcome! Good luck in your sewing endeavors & if you run into problems don't be afraid to ask... if I can't help I might know someone who can.
There was a comment that got lost between e-mail & here, and I'll repost it then answer it, because she's 100% right. TY Theresa!
Just read your blog post on men's armhole alteration. I am making a frockcoat for a man with a huge chest (48") and am having difficulty fitting him. The patterns seem to get distorted on the larger sizes. I have made 5 mockups and am disappointed but want this project to complete. I saw what you did to the armhole and am skeptical at it working. Extending the back keyhole seems to cone in down. You also don't address the altered neckline by extending the shoulder on the front. Could you please add a bit more, maybe add picts of the finished garment?
Thanks for the help,
Theresa French
Yes, larger sizes do get distorted, and I no longer do my armholes this way. It works in smaller garments (sometimes), but once you get past a 45" chest, not so much.
The best way to fit a larger person is to drape. Make a test garment, then cut, patch & rearrange until you have it the way you want it. Don't be afraid to piece things to get them to fit properly.
Answering questions not in order:
Neck/shoulder width:
This stage is not shown here, but it is critical to make the garment work. Measure the neck-shoulder (side of the neck to point of the shoulder) and chest width (across the chest). Extend or widen that area so it will fit & not be a HUGE open neckline.
Back armhole:
Lengthen this piece only if the person is taller than the pattern, and you may have to raise the neckline up a little too. Maintain angles for style. Most 18th & early 19th c. coats had a very narrow space here & it shouldn't be extended except for large men (6' & over). Proportion is important.
Front Armhole:
Be careful how far into the chest you scoop the armhole. It's better to cut it down into the armpit than in towards the chest, but not too far or they will lose movement. Most armholes will need 5" minimum ease to allow for movement, 7" in stiffer fabrics.
If you are adding padding, you'll need more.
Shoulder piece:
Shoulder width is important here (this is your neck/shoulder measure). Make sure you maintain that. Just extending it up randomly won't give you the right shape. The man this was made for had a very long chest/shoulder distance, and it still wasn't long enough in the end.
I did alter the sides & back at a later date which brought it into the 1770's.
I hope this answers your questions and clears things up.
Post a Comment